Sunday, August 26, 2012

No-Bake Lemon Slice


No-Bake Lemon Slice © food-baby.blogspot.com All rights reserved

I love a good slice and it's such a shame that they're a bit hard to find. Everyone seems to have jumped on the cupcake, whoopie pie and macaron bandwagon. Not that there's anything wrong with those but they don't have that nostalgia of childhood and simpler times like a slice does. The thought just occurred to me though that maybe my kids will yearn for cupcakes, whoopies and macarons when they're older!

This is now my second no-bake recipe for the month which I think just shows what a busy month it has been. Between the flu, chest infections and my bad back there hasn't been a whole lot of spare time for baking.

So when I needed something to take for a morning tea the next day I immediately thought of this easy lemon slice which I saw on Around Here. Basic pantry ingredients and no need for the oven. Perfect!

Lemon Slice
(Very) Slightly Adapted from Around Here

1/2 cup (162g) condensed skim milk
100g butter
200g Granita biscuits
1 cup dessicated coconut
Grated rind of 1 lemon
2 cups icing sugar
40g melted butter
2 tbs lemon juice

Lightly grease a slice tray (approx 15 x 25cm), line with non-stick paper and set aside.

Place the condensed milk and butter in a saucepan over medium-low heat until the butter is melted.

Crush the biscuits to fine crumbs and add to a large bowl along with the coconut and lemon rind. Pour in the condensed milk and butter and mix until well combined. Press firmly into the prepared tray and refrigerate until firm.

Once the slice is firm, sift the icing sugar into a bowl and add the butter and lemon juice. Mix until smooth and spread onto the chilled slice. Refrigerate again until set. Slice into squares and serve.

This was a real hit with kids and adults alike at our morning tea. Sweet and lemony and very easy to eat!

This post is linked to Crazy Sweet Tuesdays:

Wednesday, August 22, 2012

Chocolate and Zucchini Muffins

Wholefood Chocolate and Zucchini Muffins - free from dairy and refined sugar - from www.mywholefoodfamily.com

I don't really need much of an excuse to bake. And when recipes like this come along you don't need one! Not only will you probably have all the ingredients already, they're healthy! Well healthier anyway.

The recipe seems pretty flexible so you could use whatever type of milk or oil suits you. Some chocolate chips or grated orange zest would be lovely additions!

So how did they taste? These muffins were moist, really chocolatey and slightly fudgy tasting. There was absolutely no detectable zucchini flavour and both the boys loved them and kept asking for 'more cake please.' This is definitely a keeper!

These would be a perfect treat for the lunchbox, just not everyday because they are still pretty sweet.

Chocolate and Zucchini Muffins
Recipe slightly adapted from Vegie Smugglers

1 1/4 cups self-raising flour
3/4 cup traditional rolled oats
1/4 cup raw cacao powder
1/2 cup coconut sugar
1/2 tsp cinnamon
1 egg
3/4 cup non-dairy milk
3/4 cup coconut or macadamia oil
1 tsp vanilla essence
1 small zucchini, finely grated

Preheat the oven to 180 degrees Celsius (160 degrees fan-forced). Grease a 12 cup muffin tray or line with paper liners.

In a large bowl mix together the flour, oats, cocoa, cinnamon and sugar. In a separate bowl mix together the milk, egg, oil, vanilla and grated zucchini.

Pour the liquid ingredients into the dry ones and mix gently until well combined. Divide the mixture evenly between your muffin holes and bake for 25 minutes or so, until they spring back when touched and a skewer comes out clean. Make sure you check a few minutes earlier, mine were one at 22 minutes. Leave to cool in the tin for 5 minutes before turning out onto a wire rack.

Makes 12.

If you haven't been there before make sure you check out Vegie Smugglers for more great kid-friendly meal ideas!

Tuesday, August 21, 2012

Baking with Julia - Popovers

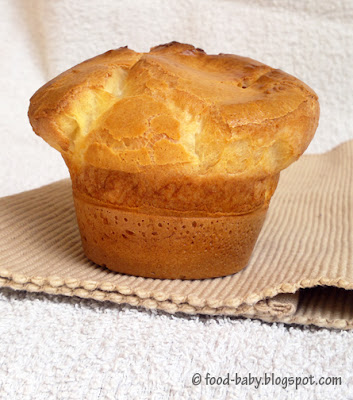
Popover © food-baby.blogspot.com
We've had one of those weeks around here. Those weeks where things are a bit crappy and the house is a mess and nothing gets done. I managed to hurt my back last weekend (standing still I might add) and literally couldn't leave the house for the ENTIRE WEEK. Things are finally starting to improve and get back to normal which means I can get back to normal baking and blogging.

Anyway, on this week's Baking with Julia recipe!

My first thought when I read this week's pick was 'what on earth is a popover?' Some research showed it seems to be a cross between a profiterole and a Yorkshire pudding. Very interesting!

I made these yesterday afternoon and was very happy that worked and puffed up like they were supposed to. Even after reading all the suggestions though I still wasn't really sure how to serve them. Or even what meal they are supposed to be. I ate one warm from the oven and enjoyed it, if only for the novelty of never having eaten one before.

Hubby came home, had one look and promptly declared they needed custard. Guess he thought they were like profiteroles too. So being the awesome man he is, he made his own chocolate custard and had one for dessert!

Popover with Chocolate Custard © food-baby.blogspot.com
Sometime soon I'll have to work on a perfect chocolate custard recipe. Will keep you posted!

Our hosts this week are Paula from Vintage Kitchen Notes and Amy of Bake with Amy. They will have the recipe up today so make sure you check it out!

Thursday, August 9, 2012

No-Bake Chocolate Chip Cheesecake

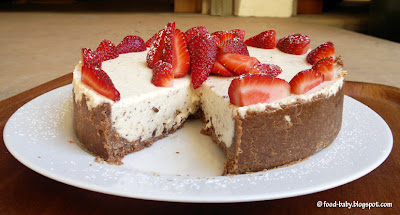
No-Bake Chocolate Chip Cheesecake © food-baby.blogspot.com All rights reserved

I've made a lot of cheesecakes over the years like these here, here and here. But I can't even remember the last time I made a no-bake one! So in honour of my dad coming to dinner I decided to make this no-bake Chocolate Chip Cheesecake.


No-Bake Chocolate Chip Cheesecake © food-baby.blogspot.com All rights reserved

The taste test ...

Wow, seriously good! The filling is smooth and light and the natural yoghurt gives it a lovely tangy creaminess. I actually chopped the chocolate rather than grated it so I had a few bigger chunks of chocolate that sank to the bottom. Not that there's anything wrong with that! Served with fresh strawberries this was the perfect make-ahead dessert and a great alternative when you don't have time for a baked cheesecake. Two thumbs up!!!

No-Bake Chocolate Chip Cheesecake
Recipe by me

250g chocolate chip biscuits
100g melted butter
250g cream cheese, at room temperature
1 x 400g tin condensed milk
300ml natural yoghurt
1 ts vanilla extract
100g dark chocolate, grated
3 ts gelatine
1/4 cup hot water

Line the base of an 8 inch springform pan with baking paper and set aside. Using a food processor, crush the biscuits into a fine crumb. Add the melted butter and blitz until well combined. Pour the crumbs into the prepare tin and smooth over the base and about halfway up the sides. Place in the fridge to set.

Sprinkle the gelatine over the hot water and set aside for a few minutes then stir to make sure it is completely disolved.

Wipe out the food processor bowl then add the cream cheese and whiz until smooth. Add the condensed milk, yoghurt and vanilla and mix well. Add the cooled gelatine mixture and whiz for 1 minute until thoroughly combined. Tip in the grated chocolate and blitz to mix through.

Pour over the prepared base then refrigerate until set, a few hours at least or overnight. Serve with sliced strawberries and a dusting of icing sugar. Serves 8-10.

Tuesday, August 7, 2012

Baking with Julia - Berry Galette

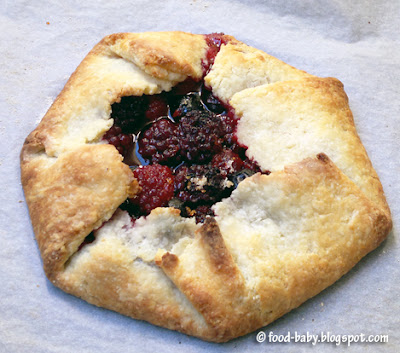
Berry Galette © food-baby.blogspot.com All rights reserved

After making a delicious (but boring) apple pie last time, there was no way I was passing on berries again this week! I did have to resort to frozen berries but honestly they worked just fine.

This is one of those cases where the end result is far greater than the sum of it's parts. The galette is a simple, buttery pastry folded around mixed berries. That's it. 

I made only slight changes to the recipe, based on what I had in the pantry. That meant using semolina instead of cornmeal in the pastry. After reading the P & Q this week I decided not to add any water at all to my pastry. I used 3 heaped tablespoons of natural yoghurt (instead of sour cream) and the dough came together perfectly. I also added the zest of 1/2 an orange in with the berries and sugar which gave a lovely citrus perfume when it came out of the oven. 

The resulting galette was insanely good and seemed far more special than just pastry wrapped around frozen berries!

I was surprised by how small the galette was, and I think next time I would use the full batch of pastry with double the fruit.

Our hosts this week are Lisa of Tomato Thymes in the Kitchen and Andrea of The Kitchen Lioness. They will post the recipe under today's date so make sure you check it out. Like Dorie says, this recipe is a keeper!


Saturday, August 4, 2012

Peanut Butter Cookies

In the midst of a flu-ridden and miserable week the urge for peanut butter cookies struck. These went from bowl to belly in 20 minutes flat...

Peanut Butter Cookies
Makes 24

1 cup natural peanut butter
1 cup brown sugar
1/2 cup rolled oats
1/2 cup wholemeal flour
1/2 ts salt
1 ts vanilla extract
1 egg

Preheat oven to 180 degrees celsius (160 degrees fan-forced). Line 2 trays with baking paper and set aside.

Combine dry ingredients in a large bowl then add the egg, vanilla and peanut butter. Mix well. Roll tablespoons of mixture into balls and place on the prepared trays. Flatten each ball slightly then bake for 10-12 minutes, rotating the trays halfway through.

Remove trays from the oven and allow to cool for at least 5 minutes before turning the cookies out onto a wire rack to cool completely. Devour.
Related Posts Plugin for WordPress, Blogger...