 Blogging may be a little sparse for the next few weeks but I will be back!

Sunday, April 26, 2009
Our new arrival
We are thrilled to announce the birth of our healthy son Oscar Theodore on Monday 20th April at 10.20am - 3.6kg/7lbs 9oz, 51cm/20 in. More details to come but here is one of my favourite pics, taken at 5 days old ...
 Blogging may be a little sparse for the next few weeks but I will be back!
Blogging may be a little sparse for the next few weeks but I will be back!
Tuesday, April 21, 2009
Tuesdays with Dorie: 4 Star Chocolate Bread Pudding

This week's pick made me very happy as I love bread pudding! I hadn't tried a chocolate version before so was curious to taste the results.
As it was around Easter I decided to replace the challah/brioche with leftover hot cross buns. I made a smaller version than the recipe using 4 buns each sliced into 9 rough cubes which fit perfectly into the dish. I also figured this would add enough dried fruit and spice so I left out the raisins.
The taste test ...
 I think I must be a bread & butter pudding purist, because while I liked this I didn't love it. We actually had a little piece leftover that ended up in the rubbish. That NEVER happens in this house! I think the chocolate flavour overwhelmed it. Maybe it was using hot cross buns rather than plain brioche. But then chocolate hot cross buns are fabulous. I just don't know!
Thanks to Lauren of Upper East Side Chronicle for this week's pick. You can find the recipe on her blog!
Tuesday, April 14, 2009
No TWD this week
Apologies to Holly from Phe/MOM/enon who chose the 15 Minute Magic Chocolate Amaretti Torte - I just didn't get around to it and am totally chocolated out after Easter!
Make sure you visit her blog for the recipe. Sounds like it was a winner!
Make sure you visit her blog for the recipe. Sounds like it was a winner!
Tuesday, April 7, 2009
Tuesdays with Dorie: Banana Cream Pie
 As an Aussie, to me a Banana Cream Pie conjures images of 1950s America. However like lots of recipes while it may be retro, it is definitely delicious!
I decided to make minis using my brand new baby tart tins purchased on a whim a few weeks ago. Because they are so shallow, I knew I wouldn't be able to layer the pastry cream and banana and decided instead to combine the two. By mashing the banana and folding it through I ended up with the most luscious banana custard you can imagine. Sure it looks like baby food but I would eat this straight out of the bowl any day!
I'm sure you can guess what happened though - the mashed banana really affected the consistency of the pastry cream and it oozed everywhere when I cut it. Bummer.
 I then simply piped the whipped cream on top (I actually forgot I needed sour cream for this so mine was plain cream). I really need to work on my piping skills but a sprinkle of cinnamon and a banana slice for decoration makes all the difference!
The taste test ...
 Fabulous! I loved the contrast between the crisp buttery crust, sweet spiced custard and smooth cream. Even a mini was a bit too much for one serve but I gave it a good go. These were pure comfort food and incredibly easy to make. I can see this becoming a real family favourite.
Thank you to Amy of Sing for Your Supper for this week's pick. We loved it! You can find the recipe on Amy's blog.
Wednesday, April 1, 2009
Oops
For the first time ever I completely forgot about TWD. And I mean completely!
Jayne of the Barefoot Kitchen Witch chose Coconut Butter Thins this week and they sound delicious. Nothing too fancy but golden, buttery, some nice flavours. I think I would have liked them. Oh well. Make sure you visit her blog for the recipe!
What I have been doing this week is some menu planning. The aim being to eat a fairly varied diet over the next few weeks and also to build up our frozen meal supplies for the babymoon:
Monday 30th - Apricot Chicken with Herbed Couscous
Tuesday 31st - Macaroni and Cheese with Sautéed Mushrooms and Bacon (Doubled for Freezer)
Wednesday 1st - Tomato Soup with Toast
Thursday 2nd - Hamburgers with the lot
Friday 3rd - Roast Chicken with Vegetables
Saturday 4th - Homemade Curry (Doubled for Freezer)
Sunday 5th - Tacos
Monday 6th - Fish and Chips
Tuesday 7th - Chicken and Sweet Potato Casserole (Doubled for Freezer)
Wednesday 8th - Lamb Steaks with Greek Salad
Thursday 9th - Tuna and Caper Pasta Salad
Friday 10th - Steak and Guiness Pie (Doubled for Freezer)
We also did minor bathroom renovations this weekend because I couldn't stand the 70s yellow walls anymore and I organised my baking cupboard.
Just on that issue, I have 16 muffin trays. Why would any sane person need so many muffin trays? Sure there are minis, regulars and texas sized pans, some have 12 holes (and therefore don't even fit in our oven here) and some only have 6. But still. I hardly ever make muffins. I shall have to remedy that.
Friday, March 27, 2009
Daring Bakers March - Lasagne
Being a lady of leisure now (aka on maternity leave) I was really looking forward to making this month's challenge. That and the fact I absolutely love lasagne! Even bad lasagne is good lasagne to me and this one was out-of-this-world good!
The March 2009 challenge is hosted by Mary of Beans and Caviar, Melinda of Melbourne Larder and Enza of Io Da Grande. They have chosen Lasagne of Emilia-Romagna from The Splendid Table by Lynne Rossetto Kasper as the challenge.
It was definitely time consuming though so I made it 3 stages - the ragu and bechemel the day before, the pasta dough on the morning and then the rolling and assembly right before baking. And we still ended up eating quite late!
We received a pasta machine as a wedding present last year which was a huge help. I am in awe of all those who made this completely by hand!
I'm disappointed my pasta wasn't such a vivid green as I had hoped. I used a 250g box of frozen spinach but by the time I squeezed out all the water I was left with just 110g. Maybe fresh spinach would have more zing, colour-wise? Oh well. I also added an extra egg to make up the liquid and it worked perfectly.
 Spinach pasta before kneading - rough and ready
 And after - smooth and elastic
 Hubs rolling the dough
 Our drying racks
 Assembling the dish
 The finished dish - we followed the baking instructions to the letter and still got golden, crunchy bits on top (thank goodness, those are the best bits!)
 Ready to eat!
This was hands down the best lasagne I had ever had. It was absolutely packed with flavour and not at all greasy. I managed to stretch the ingredients to make 2 complete dishes (although I did run out of bechemel for the second one) so we now have one waiting patiently in the freezer to enjoy once we are home with bub.
This is perfect dinner party food and we will definitely be making it again!
Thanks to our hosts for a wonderful pick this month. It's a great tie-in with the new Daring Cooks which I have registered for also.
Lasagne of Emilia-Romagna
Serves 6-8 as a main course
Spinach Egg Pasta (Pasta Verde)
2 jumbo eggs
300g fresh spinach, rinsed, dried and finely chopped or 170g frozen spinach, defrosted and squeezed dry
400g unbleached plain flour
Béchamel Sauce
60g unsalted butter
60g unbleached plain flour
570ml milk
Salt and freshly ground pepper, to taste
Freshly grated nutmeg, to taste
Ragu
3 tablespoons extra virgin olive oil
60g pancetta, finely chopped
1 medium onion, minced
1 medium stalk celery with leaves, minced
1 small carrot, minced
125g veal mince
125g pork mince
250g beef mince
30g thinly sliced Prosciutto di Parma
160ml dry red wine
375ml beef stock
500ml milk
1 tin plum tomatoes
Salt and freshly ground black pepper to taste
1 cup (or more) freshly grated Parmigano Reggiano ( I used a full 250g block!)
To make the ragu, Heat the olive oil in 30cm frying pan over medium-high heat. Add the pancetta and minced vegetables and sauté, stirring frequently with a wooden spoon, 10 minutes, or until the onions barely begin to color. Add the minces and slowly brown over medium heat. Stir often, scooping under the meats with the wooden spatula. Protect the brown glaze forming on the bottom of the pan by turning the heat down. Cook 15 minutes, or until the meats are a deep brown. Turn the contents of the skillet into a strainer and shake out the fat ( I didn't need to - there was barely any fat) then return them to the pan and set over medium heat.
Reducing and Simmering: Add the wine to the skillet, lowering the heat so the sauce bubbles quietly. Stir occasionally until the wine has reduced by half, about 3 minutes. Scrape up the brown glaze as the wine bubbles. Stir ½ cup stock into the saucepan and let it bubble slowly, 10 minutes, or until totally evaporated. Repeat with another ½ cup stock. Stir in the last 1/2 cup stock along with the milk. Adjust heat so the liquid bubbles very slowly. Partially cover the pot, and cook 1 hour. Stir frequently to check for sticking. Add the tomatoes, crushing them as they go into the pot. Cook uncovered, at a very slow bubble for another 45 minutes, or until the sauce resembles a thick, meaty stew. Season with salt and pepper.
To make the pasta, mound the flour in the center of your work area and make a well in the middle. Add the eggs and spinach, and use a wooden spoon to beat them together. Gradually start incorporating flour from the sides of the well into the liquid. Use a pastry scraper to keep the liquids from running off and to incorporate the last of the flour into the dough. It should look like a rough, messy lump. Start kneading the dough, using the scraper to scoop up any unruly pieces. Once it becomes a cohesive mass, knead for about 3 minutes. It should be elastic and a little sticky. If it is too sticky, knead in a few more tablespoons of flour. Continue kneading for about 10 minutes, or until the dough becomes smooth, satiny and very elastic. Wrap the dough in plastic wrap and let it relax at room temperature for 30 minutes – 3 hours. Cut off about a quarter of the dough, and re-wrap the rest to prevent it from drying out. Roll into a roughly long and thin rectangular shape. Set your pasta machine to its thickest setting and roll the dough through the machine. Continue rolling through each setting, cutting the dough into sections if it becomes too difficult to handle, until it becomes as thin as possible without tearing. You should be able to see your hand through the dough. Repeat with remaining dough, and either use immediately or dry at room temperature and store in a sealed container or plastic bag for 1 day.
To make the béchamel sauce, melt the butter in a medium sized saucepan over medium heat. Sift in the flour and whisk until smooth, stirring without stopping for at least one minute. Whisk in the milk a little at a time. Bring to a slow simmer, and stir for 3-4 minutes or until the sauce thickens. Season with salt, pepper and a hint of nutmeg.
To assemble the lasagne, have all ingredients on hand. Preheat the oven to 180ºC (350ºF). Layer the ingredients repeating in this order – pasta sheets, béchamel, ragu, Parmigano Reggiano, and finishing with a layer of pasta, béchamel, cheese, salt and pepper. Cover the baking dish with foil, taking care not to let it touch the top of the lasagne. Bake for 40 minutes or until almost heated through. Remove the foil and bake for another 10 minutes. When cooked, turn the oven off and let the lasagne rest inside for a further 10 minutes, then serve. This is not a solid lasagne but one that slips a bit when cut and served.

The March 2009 challenge is hosted by Mary of Beans and Caviar, Melinda of Melbourne Larder and Enza of Io Da Grande. They have chosen Lasagne of Emilia-Romagna from The Splendid Table by Lynne Rossetto Kasper as the challenge.
It was definitely time consuming though so I made it 3 stages - the ragu and bechemel the day before, the pasta dough on the morning and then the rolling and assembly right before baking. And we still ended up eating quite late!
We received a pasta machine as a wedding present last year which was a huge help. I am in awe of all those who made this completely by hand!
I'm disappointed my pasta wasn't such a vivid green as I had hoped. I used a 250g box of frozen spinach but by the time I squeezed out all the water I was left with just 110g. Maybe fresh spinach would have more zing, colour-wise? Oh well. I also added an extra egg to make up the liquid and it worked perfectly.
 Spinach pasta before kneading - rough and ready
 And after - smooth and elastic
 Hubs rolling the dough
 Our drying racks
 Assembling the dish
  The finished dish - we followed the baking instructions to the letter and still got golden, crunchy bits on top (thank goodness, those are the best bits!)
  Ready to eat!
This was hands down the best lasagne I had ever had. It was absolutely packed with flavour and not at all greasy. I managed to stretch the ingredients to make 2 complete dishes (although I did run out of bechemel for the second one) so we now have one waiting patiently in the freezer to enjoy once we are home with bub.
This is perfect dinner party food and we will definitely be making it again!
Thanks to our hosts for a wonderful pick this month. It's a great tie-in with the new Daring Cooks which I have registered for also.
Lasagne of Emilia-Romagna
Serves 6-8 as a main course
Spinach Egg Pasta (Pasta Verde)
2 jumbo eggs
300g fresh spinach, rinsed, dried and finely chopped or 170g frozen spinach, defrosted and squeezed dry
400g unbleached plain flour
Béchamel Sauce
60g unsalted butter
60g unbleached plain flour
570ml milk
Salt and freshly ground pepper, to taste
Freshly grated nutmeg, to taste
Ragu
3 tablespoons extra virgin olive oil
60g pancetta, finely chopped
1 medium onion, minced
1 medium stalk celery with leaves, minced
1 small carrot, minced
125g veal mince
125g pork mince
250g beef mince
30g thinly sliced Prosciutto di Parma
160ml dry red wine
375ml beef stock
500ml milk
1 tin plum tomatoes
Salt and freshly ground black pepper to taste
1 cup (or more) freshly grated Parmigano Reggiano ( I used a full 250g block!)
To make the ragu, Heat the olive oil in 30cm frying pan over medium-high heat. Add the pancetta and minced vegetables and sauté, stirring frequently with a wooden spoon, 10 minutes, or until the onions barely begin to color. Add the minces and slowly brown over medium heat. Stir often, scooping under the meats with the wooden spatula. Protect the brown glaze forming on the bottom of the pan by turning the heat down. Cook 15 minutes, or until the meats are a deep brown. Turn the contents of the skillet into a strainer and shake out the fat ( I didn't need to - there was barely any fat) then return them to the pan and set over medium heat.
Reducing and Simmering: Add the wine to the skillet, lowering the heat so the sauce bubbles quietly. Stir occasionally until the wine has reduced by half, about 3 minutes. Scrape up the brown glaze as the wine bubbles. Stir ½ cup stock into the saucepan and let it bubble slowly, 10 minutes, or until totally evaporated. Repeat with another ½ cup stock. Stir in the last 1/2 cup stock along with the milk. Adjust heat so the liquid bubbles very slowly. Partially cover the pot, and cook 1 hour. Stir frequently to check for sticking. Add the tomatoes, crushing them as they go into the pot. Cook uncovered, at a very slow bubble for another 45 minutes, or until the sauce resembles a thick, meaty stew. Season with salt and pepper.
To make the pasta, mound the flour in the center of your work area and make a well in the middle. Add the eggs and spinach, and use a wooden spoon to beat them together. Gradually start incorporating flour from the sides of the well into the liquid. Use a pastry scraper to keep the liquids from running off and to incorporate the last of the flour into the dough. It should look like a rough, messy lump. Start kneading the dough, using the scraper to scoop up any unruly pieces. Once it becomes a cohesive mass, knead for about 3 minutes. It should be elastic and a little sticky. If it is too sticky, knead in a few more tablespoons of flour. Continue kneading for about 10 minutes, or until the dough becomes smooth, satiny and very elastic. Wrap the dough in plastic wrap and let it relax at room temperature for 30 minutes – 3 hours. Cut off about a quarter of the dough, and re-wrap the rest to prevent it from drying out. Roll into a roughly long and thin rectangular shape. Set your pasta machine to its thickest setting and roll the dough through the machine. Continue rolling through each setting, cutting the dough into sections if it becomes too difficult to handle, until it becomes as thin as possible without tearing. You should be able to see your hand through the dough. Repeat with remaining dough, and either use immediately or dry at room temperature and store in a sealed container or plastic bag for 1 day.
To make the béchamel sauce, melt the butter in a medium sized saucepan over medium heat. Sift in the flour and whisk until smooth, stirring without stopping for at least one minute. Whisk in the milk a little at a time. Bring to a slow simmer, and stir for 3-4 minutes or until the sauce thickens. Season with salt, pepper and a hint of nutmeg.
To assemble the lasagne, have all ingredients on hand. Preheat the oven to 180ºC (350ºF). Layer the ingredients repeating in this order – pasta sheets, béchamel, ragu, Parmigano Reggiano, and finishing with a layer of pasta, béchamel, cheese, salt and pepper. Cover the baking dish with foil, taking care not to let it touch the top of the lasagne. Bake for 40 minutes or until almost heated through. Remove the foil and bake for another 10 minutes. When cooked, turn the oven off and let the lasagne rest inside for a further 10 minutes, then serve. This is not a solid lasagne but one that slips a bit when cut and served.
Tuesday, March 24, 2009
Tuesdays with Dorie: Blueberry Crumb Cake
 Sihan of Befudlement chose Dorie's Blueberry Crumb Cake this week and I could not be happier with this pick! This recipe is definitely a keeper.
Like lots of others I had a few problems baking this one. It took closer to 75 minutes to be cooked by which stage the edges were getting pretty dark and I had a big pool of butter in the middle until the 70 minute mark. It also seemed to sink a little where the butter pool was but it was definitely cooked through.
All these were minor issues though and the end result was absolutely worth it.
 The taste test ...
In a word ... divine. During baking this cake smelt like Christmas to me - cinnamon, nutmeg, orange zest and walnuts. It was wonderful straight out of the oven, albeit incredibly difficult to cut because of the crunchy streusel topping! I had a second piece a few hours later which was moist and even more flavoursome. It would also make a wonderful dessert served warm with custard or cream. This would have to be in my top 5!
You can find the recipe at Befuddlement.
Tuesday, March 17, 2009
Tuesdays with Dorie: French Yoghurt Cake with Marmalade Glaze
 A big thank you to Liliana from My Cookbook Addiction because I've had my eye on this recipe since day one! Now I know it's not the flashiest sounding cake and there isn't even a photo but I'm a sucker for anything French and I eat marmalade out of the jar by the spoonful. Yum!
I thought there were some interesting techniques in this cake, from rubbing the lemon zest into the sugar which produced the most magical fragrance to stirring the oil through the batter rather than simply combining with the other wet ingredients. I also loved the fact there was no creaming of butter or sugar involved (which appeals to my lazy side which would prefer not to have to wash the mixer).
I used a thick greek yoghurt and light olive oil in the cake, and a classic breakfast marmalade for the glaze. I've never actually seen lemon marmalade though I will certainly keep my eye out for it now. I thought about using lime marmalade (Rose's makes a brilliant one) but I thought it might overpower the lemon in the cake too much.
I know Dorie said to strain the marmalade but the fruit is the best bit so I piled it all on top. Look at that drizzle!
 The taste test ...
 Ummm, did you read what I wrote up top? There was no way I wouldn't like this cake! It didn't disappoint. I cut one slice the same day as baking (just for the photos) but saved the rest for a morning tea the next day by which time the flavours had really come out. Yoghurt really does amazing things for cakes as this was incredibly moist. It was fabulous.
You can find the recipe at My Cookbook Addiction.
Monday, March 16, 2009
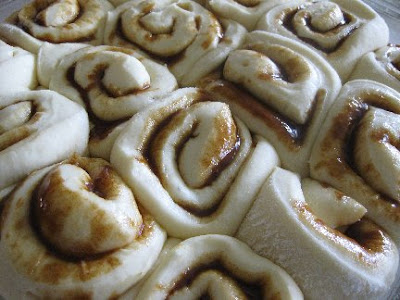
Walnut & Cinnamon Sticky Buns
I realised today that I am over my yeast phobia, because on a whim I decided to make sticky buns. Actually I think it is less of a phobia and more of an aversion because with most yeasty things it takes forever before you get to enjoy them! My first thought was to do hot cross buns but Easter is still a month away and anyway I've been buying them since Christmas!
 I've had my eye on Dorie's Pecan Sticky Buns for ages but being based on a brioche dough they need an overnight rest in the fridge. I whipped out my version in just a couple of hours. These are my own adaptation.
 Walnut & Cinnamon Sticky Buns
Makes 16 buns
For the buns:
4 cups plain flour
1 1/4 cups milk
2 x 7g sachets of instant yeast
1/3 cup caster sugar
1/4 ts salt
100g butter, melted and cooled
For the glaze and filling:
125g butter
1/2 cup golden syrup
1 cup brown sugar
1 1/2 cups walnuts
1 tbs cinnamon
For the buns:
Grease a square baking pan, approximately 10 x 10, generously with butter and set aside.
In a small heavy based saucepan combine the milk and sugar and stir over low heat until warm (I always aim for blood temperature) and the sugar is dissolved. Switch off the heat. Stir in the yeast and leave for around 10 minutes. It should become thick and foamy which means your milk was warm enough and your yeast is active (if it does nothing take my advice and just start over again with fresh ingredients).
Sift the flour and salt together into the bowl of your mixer. Add the melted butter and yeast mixture and give a quick stir to combine. Using a dough hook attachment work the dough until it becomes smooth and elastic, approximately 5-8 minutes.
Place in a greased bowl, cover loosely with plastic wrap and leave in a warm place for an hour or until it has doubled in size.
For the glaze and filling:
In a small saucepan combine the butter, golden syrup and brown sugar. Bring to the boil over medium heat, keeping a close eye and stirring occasionally.
Pour the mixture into your prepared baking pan, reserving around 4 tbs in the saucepan. Tilt the pan to coat the surface evenly. Sprinkle over the walnuts then set aside.
To the reserved mixture add the cinnamon and stir well to combine. This forms the filling of the buns. You will need to reheat the mix over low heat to make it a spreadable consistency when you are ready to assemble the buns.
Preheat your oven to 200 degrees celsius.
Turn out the dough onto a floured board and roll out into a large square, approx 16 x 16. Spread the filling mixture over the top as evenly as possible. Starting with the edge nearest you, roll the dough up into a cylinder.
Cut the dough into 16 pieces and place cut side up into the baking pan on top of the glaze.
Cover loosely with plastic wrap and allow to rest for around 30 minutes or until they have doubled in size, rising up to the top of the pan.
Bake at 200 degrees celsius for 10 minutes then reduce the temperature to 180 and bake for a further 15-20 minutes or until the buns are golden brown.
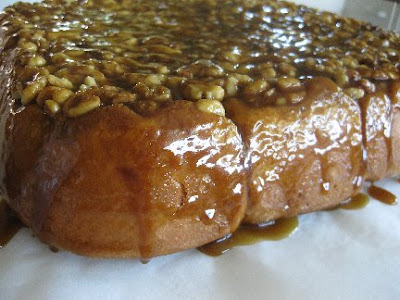
Turn out onto a platter or bread board covered in baking paper as soon as possible after removing the buns from the oven. Be very careful as the glaze will be scalding hot.
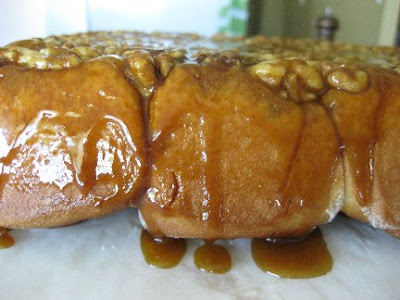 Try to hold out for a few minutes at least before digging in as you will most definitely burn your fingers and your mouth. But it's totally worth it!
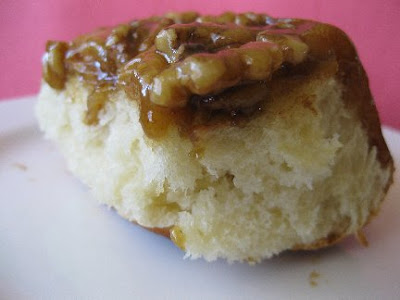 Delicious!!!
 I've had my eye on Dorie's Pecan Sticky Buns for ages but being based on a brioche dough they need an overnight rest in the fridge. I whipped out my version in just a couple of hours. These are my own adaptation.
 Walnut & Cinnamon Sticky Buns
Makes 16 buns
For the buns:
4 cups plain flour
1 1/4 cups milk
2 x 7g sachets of instant yeast
1/3 cup caster sugar
1/4 ts salt
100g butter, melted and cooled
For the glaze and filling:
125g butter
1/2 cup golden syrup
1 cup brown sugar
1 1/2 cups walnuts
1 tbs cinnamon
For the buns:
Grease a square baking pan, approximately 10 x 10, generously with butter and set aside.
In a small heavy based saucepan combine the milk and sugar and stir over low heat until warm (I always aim for blood temperature) and the sugar is dissolved. Switch off the heat. Stir in the yeast and leave for around 10 minutes. It should become thick and foamy which means your milk was warm enough and your yeast is active (if it does nothing take my advice and just start over again with fresh ingredients).
Sift the flour and salt together into the bowl of your mixer. Add the melted butter and yeast mixture and give a quick stir to combine. Using a dough hook attachment work the dough until it becomes smooth and elastic, approximately 5-8 minutes.
Place in a greased bowl, cover loosely with plastic wrap and leave in a warm place for an hour or until it has doubled in size.
For the glaze and filling:
In a small saucepan combine the butter, golden syrup and brown sugar. Bring to the boil over medium heat, keeping a close eye and stirring occasionally.
Pour the mixture into your prepared baking pan, reserving around 4 tbs in the saucepan. Tilt the pan to coat the surface evenly. Sprinkle over the walnuts then set aside.
To the reserved mixture add the cinnamon and stir well to combine. This forms the filling of the buns. You will need to reheat the mix over low heat to make it a spreadable consistency when you are ready to assemble the buns.
Preheat your oven to 200 degrees celsius.
Turn out the dough onto a floured board and roll out into a large square, approx 16 x 16. Spread the filling mixture over the top as evenly as possible. Starting with the edge nearest you, roll the dough up into a cylinder.
Cut the dough into 16 pieces and place cut side up into the baking pan on top of the glaze.
Cover loosely with plastic wrap and allow to rest for around 30 minutes or until they have doubled in size, rising up to the top of the pan.
Bake at 200 degrees celsius for 10 minutes then reduce the temperature to 180 and bake for a further 15-20 minutes or until the buns are golden brown.
Turn out onto a platter or bread board covered in baking paper as soon as possible after removing the buns from the oven. Be very careful as the glaze will be scalding hot.
 Try to hold out for a few minutes at least before digging in as you will most definitely burn your fingers and your mouth. But it's totally worth it!
 Delicious!!!
Sunday, March 15, 2009
Blueberry Oatmeal Pancakes
 For the past couple of years Saturday has been just another working day for me. Working for yourself from home kind of means the days of the week are irrelevant anyway so I've never minded. Then for the past couple of weeks we've had birthing classes to go to which were a lot of fun but still an early start.
But now I am officially on maternity leave ... no clients, no classes, nothing to do but get ready for this baby who will be here in 6 weeks (!!!) And what better way to celebrate a Saturday morning than with pancakes!
I've been on an oats kick for the past month or so, having either porridge or bircher muesli every day without fail and although I wanted pancakes I wasn't ready to give up on my oats either. Lucky for me this recipe has been floating around for awhile, first at Joy the Baker, then at A Whisk and a Spoon.
They were the perfect start to the day. We also finally got out to the movies for the first time in about 6 months and saw Ghost Town. We liked!
Blueberry Oatmeal Pancakes
Adapted from Sunset Magazine
1 1/2 rolled oats
1 cup buttermilk
1 1/2 cups all purpose flour
1/4 cup sugar
1 teaspoon baking soda
1 teaspoon baking powder
1/2 teaspoon salt
4 eggs
1 1/2 cups milk
1 teaspoon vanilla extract
1 cup blueberries or raspberries ( I used frozen)
butter or oil to grease the pan
1. In a bowl mix oats and buttermilk. Let stand at least 15 minutes, or up to 30 minutes.
2. Meanwhile, in a small bowl, mix flour, sugar, baking powder, baking soda and salt.
3. In a large bowl, beat eggs, milk and vanilla. Stir in flour and oats mixture. Mix until evenly moistened, then fold in blueberries.
4. Place a nonstick griddle, or nonstick frying pan over medium heat. When hot, coat the pan with a few teaspoons of a light colored oil (you can eyeball the measurement).
5. Pour batter in 1/2 cup portions onto griddle and cook until pancakes are browned on the bottom and the edges begin to look dry, about 2 minutes. Turn with a spatula and cook another 1 1/2 to 2 minutes. Coat pan with more oil as needed to coat remaining pancakes.
6. Serve the pancakes as cook or keep warm on a baking sheet, in a single layer in a warm oven (less than 100 degrees Celsius or they will dry out) for 15 minutes, or until you’re able to serve them.
7. Stack and serve with berries, maple syrup, ice cream - whatever takes your fancy!
This quantity will easily feed 4 people. We did find the batter a little runny. so next time I would use only 3/4 cup milk and double the baking powder to give them a little more lift.
Tuesday, March 10, 2009
Tuesdays with Dorie: Lemon Cup Custards

Wow there was a lot of tension in the ranks about this one! Personally, I love lemon, love custard and love eggs so had absolutely no problem with it. Thanks to Bridget of The Way The Cookie Crumbles for choosing such a simple, delightful recipe!
After reading about the lack of lemonyness, I let the milk simmer for about 10 minutes before bringing it up to the boil and then let it steep for over an hour. I baked them for just over 45 minutes because I wanted firm not jiggly custard. They got a little browner on top than I anticipated but I really liked the effect!
The taste test ...
 Luscious, creamy and exactly what you want from a baked custard. I thought it was brilliant to get this effect from a custard which doesn't contain any cream. The lemon flavour was subtle but definitely there and really elevated an otherwise very plain dessert. I was originally planning on topping these with some stewed blueberries but in the end decided they didn't need it.
We will definitely be making these again and playing around with other flavour combinations.
You will find the recipe on The Way The Cookie Crumbles.
Subscribe to:
Posts (Atom)