Saturday, October 13, 2012
Pumpkin Spice Waffles
Brinner (aka breakfast for dinner) has become a regular feature on our weekly meal plan. And why not?! This week I decided to make waffles, and having a lot of pumpkin to use up, went searching for pumpkin waffles. I think I've said it before but pumpkin based sweet dishes really aren't popular in Australia which is such a shame as they're so good!
I actually felt great about the boys having these for dinner. They're dairy free, low in sugar, use wholemeal flour, eggs for protein and of course pumpkin for veggies. Topped with a little crispy bacon and a generous slug of maple syrup they were the perfect dinner for all of us. You could of course leave off the bacon to make them vego.
Pumpkin Spice Waffles
Adapted from Food.com
1 cup plain flour
1 cup wholemeal flour
2 ts baking powder
1/2 ts bicarb soda
Pinch salt
2 tbs brown sugar
3 ts cinnamon
1 ts ginger
1/8 ts ground cloves
1/8 ts nutmeg
3 eggs
2 tbs melted butter (I used nuttelex)
1 1/2 cups milk (I used oat milk)
3/4 cup mashed pumpkin
Maple syrup to serve
Preheat waffle maker.
Combine the all the dry ingredients in a large bowl and whisk together. In a separate bowl whisk the eggs, milk, pumpkin and melted butter. Pour the wet ingredients over the dry and mix well to combine.
Place 1/3 cup mixture into the waffle maker at a time and cook until firm and crispy, about 2 1/2 minutes. Keep warm in a low oven until ready to serve.
Makes 8 waffles.
We will definitely be making these again!
Thursday, October 11, 2012
Slow Cooker Pulled Pork
It's funny how tastes change. Up until a couple of years ago I had a major sweet tooth and really wasn't a fan of chilli. Now though, give me spicy food any day, and I can take or leave dessert (although I always have room for ice cream!).
In fact I'm getting hungry just thinking about this amazing pulled pork! And on a rainy cool day like today I'm wishing this is what we were having for dinner tonight.
This is such an easy and budget-friendly recipe. While the pork shoulder may cost a bit it will feed an army and I tend to have all the other ingredients in the pantry already. You can add as much or as little chilli powder as you like or use fresh red chillies if you have them.
The house will smell amazing during the day and the end result is the most succulent, flavourful, amazing piece of meat. I like it served on a roll with a really fresh and zingy coleslaw to balance out the richness of the meat. It will be messy but it's so worth it!
Slow-Cooker Pulled Pork
1 x 1.5kg pork shoulder, skin and excess fat removed
1 onion
6 cloves of garlic
2 ts - 2tbs chili powder
1 tbs paprika
2 ts pepper
1 ts cumin seeds
2 ts salt
1/4 cup coconut sugar
3 tbs Worcestershire sauce
2 tbs dijon mustard
3/4 cup white vinegar
1/3 cup homemade tomato ketchup
1 bay leaf
Combine all ingredients except the pork and bay leaf in the food processor and blitz until smooth and thoroughly combined.
Place the pork into your slow cooker, pour over the marinade mix and add the bay leaf. Cover and cook on low for 8 hours.
To serve - remove the pork from the slow cooker then pour the liquid into a saucepan. Bring the liquid to the boil then simmer for 10-15 minutes until it has reduced by at least half.
Using 2 forks, pull the pork into shreds then add the meat to the reduced sauce and stir to combine.
Serve on top of a hot buttered roll with plenty of zingy coleslaw. Devour.
Monday, October 8, 2012
Zingy Green Juice
After thinking about it for probably 6 months, I completed a 3 day juice cleanse last weekend and afterwards felt pretty damn good (longer post to come about the cleanse). In an attempt to keep that good feeling I have been detoxing my diet since then and just eating a bit lighter overall. Part of that process has been to keep up the juice.
I adore fresh juice and as we already had a juicer it's such an easy way for me to get a hit of nutrients in a tasty way. This green juice is really fresh and zingy and no one would ever know they were drinking 1/2 a cucumber and some lettuce leaves!
I watered some down and gave it to my boys who both loved it and wanted more!
Super Tasty Green Juice
3 large green apples
2 kiwi fruits
1/2 medium cucumber
6 large cos leaves
1 small lemon
2cm piece ginger
Juice all ingredients in your juicer. Serve immediately over ice. Serves 2.
Sunday, October 7, 2012
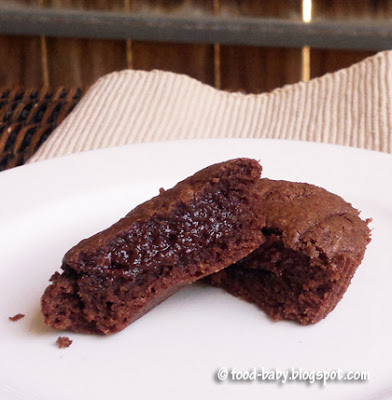
Easy Nutella Brownie Bites
They were originally called 3 ingredient brownies with just nutella, flour and eggs, but I can't help tweaking so I added some salt and also vanilla extract to round out the flavour.
The verdict? 10/10. These would be up there with some of the best brownies I've made and for a lot less effort. I managed to freeze a few and after a quick zap in the microwave they were back to brownie perfection. They would be sensational smooshed up through vanilla ice cream as well. Yum!
Nutella Brownie Bites
Makes 12. Adapted from various sources including Laura's Sweet Spot
1 cup Nutella
1/2 heaped cup plain flour
2 eggs
1 ts vanilla extract
Pinch of salt
Preheat oven to 180 degrees celsius (160 degrees fan-forced). Line a muffin tray with paper liners and set aside.
In a large bowl mix together the nutella, eggs and vanilla until smooth. Sprinkle over the flour and salt and mix until just combined. Spoon evenly into the prepared tray and bake for 12 minutes.
Allow to cool to room temperature before removing from the tray and the paper cases. Just try to stop at one!
Oscar has definitely inherited his father's sweet tooth and couldn't wait for a taste.
Tuesday, October 2, 2012
Baking with Julia - Cranberry and Pumpkin Loaf
Just wondering, is there anyone else out there who completely missed the mark with this recipe? I somehow had it into my head that this was a quick bread, more of a cake even. Imagine my surprise when I go to make it and not only is it a proper bread, it has to rest in the fridge overnight! Aaaah!
Now I could have just made it properly another day but I was psyched for pumpkin and cranberries and knew I wouldn't get another chance before posting day. I even had steamed pumpkin leftover from the night before ready and waiting to be mashed. (We can't buy canned pumpkin or pumpkin pie filling in Australia).
So instead I pulled out my trusty bread maker and made it in there.
Granted it's not exactly the same as in the book, but the basic elements are all there - pumpkin, cranberries, spices. Yum! I didn't use any walnuts as I didn't have any on hand and I wanted to make it child friendly.
Luckily my breadmaker cookbook had a recipe for pumpkin bread already so I just had to tweak it slightly. Let me tell you, the aroma wafting through the house as this was cooking was to die for! And it was ready in just 3 1/2 hours!
Pumpkin and Cranberry Bread in the Breadmaker
200ml water
1 tbs melted butter
1/2 cup mashed pumpkin
1 ts salt
1 tbs brown sugar
100g wholemeal flour
350g white bread flour
2 ts ground cinnamon
1/2 ts ground nutmeg
1 tbs milk powder
1/2 ts bread improver
1 1/4 ts instant dried yeast
1/2 cup dried cranberries
Add all ingredients except the cranberries to your breadmaker in the order listed above. Select the 750g loaf size, basic bread setting and medium crust. If you have a fruit and nut dispenser, add your cranberries in there and make sure you select 'Nuts - Yes' so they will be added automatically. Otherwise add in your cranberries after the first mix. Press start and wait just a couple of hours for your delicious bread to be ready!
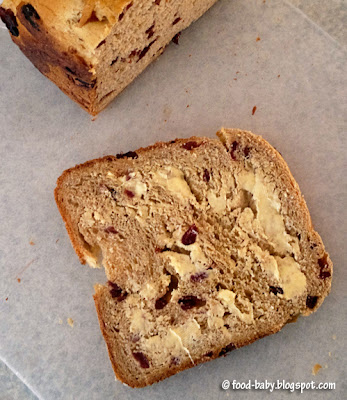
The taste test ...
Just gorgeous! It was amazing fresh out of the 'oven' but sliced up the next day and toasted it was possibly even better. There wasn't much pumpkin flavour but it did add a lovely colour and helped to keep the bread moist. My boys loved it toasted for breakfast with a big glass of milk and my pumpkin-hating husband had a taste before he knew it contained pumpkin and declared it 'really good.' Success!!!
Our host this week is Rebecca at This Bountiful Backyard. Make sure you check her blog for the proper recipe or give mine a go if you're time-poor.
Subscribe to:
Posts (Atom)


