Monday, April 6, 2015

Chocolate Custard Tart and our Easter wrap-up

Chocolate Custard Tart - dairy free, gluten free, fructose free - no refined sugar - from www.mywholefoodfamily.com


Every Easter for the past few years my goal for our family has been to cut back on commercial chocolate, indulge in a healthier way and make some great family memories instead of gorging on sugar.

In our house the Easter Bunny always brings winter pyjamas, a CD and 1 chocolate (this year it was a Lindt dark chocolate bunny). We do an Easter egg hunt using small plastic eggs that each have one of those little fluffy chickens inside and then once they've found them all they get a prize (this year they each got a pre-printed canvas set with paint and brushes which kept them busy for a few hours). In spite of our efforts to cut back on junk both the big boys still had stomach aches at the end of the day so we had a bit of a chat about how junk food can taste good but still make your body feel yucky.

We had a delicious lunch of roast lamb and vegetables and I made this fabulous chocolate custard tart for dessert. I found it on Alexx Stuart's blog and if you haven't heard of her then head on over and check out her amazing real food recipes and low-tox living ideas.

This tart is creamy, chocolatey and indulgent but won't leave you with a stomach ache! It's also easily grain and dairy free and totally decadent. I had all the ingredients in the pantry already except the chocolate so it was really easy to whip up and also very easy to eat!

I've just included the Thermomix instructions but Alexx's recipe includes non-Thermomix instructions as well so you can check out the link below.

This really was one of the best things I've made in a long time and we will definitely be making again for another special occasion!

Chocolate Custard Tart
Recipe from Alexx Stuart

Base:
1 1/4 cups (120g) tapioca flour
1/3 cup (30g) almond meal
2 heaped tbs (20g) coconut flour
1/2 cup (45g) buckwheat or sorghum flour
160g butter (or solid coconut oil to be dairy free) (VERY COLD)
1 egg
2ts vanilla extract
2 tbs rice malt syrup (or honey/maple syrup to be grain free)
2 tbs raw cacao

Filling:
400ml coconut cream (I used Ayam brand)
100ml water
2 whole eggs
1 egg yolk
2 tbs arrowroot flour
1 tbs gelatin
5 tbs rice malt syrup (or honey/maple syrup to be grain free)
1 ts vanilla extract
120g very dark chocolate (Lindt 85% is good, grated or finely chopped

To make the base:
Place the flours and cacao into the thermomix (3 secs/ sp 5) to aerate and combine. Add the chilled fat and pulse until it has disappeared (TMX 3 secs / sp 6). Whisk together the egg, vanilla and syrup and slowly add 2/3 of this mixture to the dry ingredients. If it clumps you don't need to add anymore, or you may need the whole lot.

Use a spatula to remove the dough (it will be very wet) onto plastic wrap, shape into a disc and place in the fridge for 20 minutes.

Preheat the oven to 180C / 350F fan-forced or 200C/400F non-fan-forced. Grease a 23 cm loose-bottomed tart pan with coconut oil and dust with a little extra sorghum flour. Set aside.

Dust the dough with some extra flour and then roll it out in between 2 sheets of baking paper. Remove the top sheet, flip the dough and lay it over the prepared tart pan. Remove the second sheet of baking paper and press the pastry into the tin. It will be soft, sticky and a little temperamental. If it breaks or there are holes just patch them with a blob of dough. Trim the excess and then blind bake (covered with baking paper and filled with beans or rice) for 10 minutes. Remove the baking rice and bake for a further 15-20 minutes or until it is a deep brown (not black!).

Set aside. Start the filling as soon as you remove the the blind baking rice/beans to get the timing right - hot filling needs to go into a hot pastry shell, cold filling into a cold pastry shell (that tip is courtesy of the great Maggie Beer).

To make the filling:
Place all ingredients except the gelatin and chocolate into the thermomix and cook for 7 mins/90 deg/sp 4. Add the gelatin at the end for 5 secs / sp 6. Then the chocolate for 20 secs / sp 7.

Pour into the baked pastry shell and chill until firm. Decorate with grated chocolate and serve with berries. Serves 10.

Friday, April 3, 2015

Coconut Bread


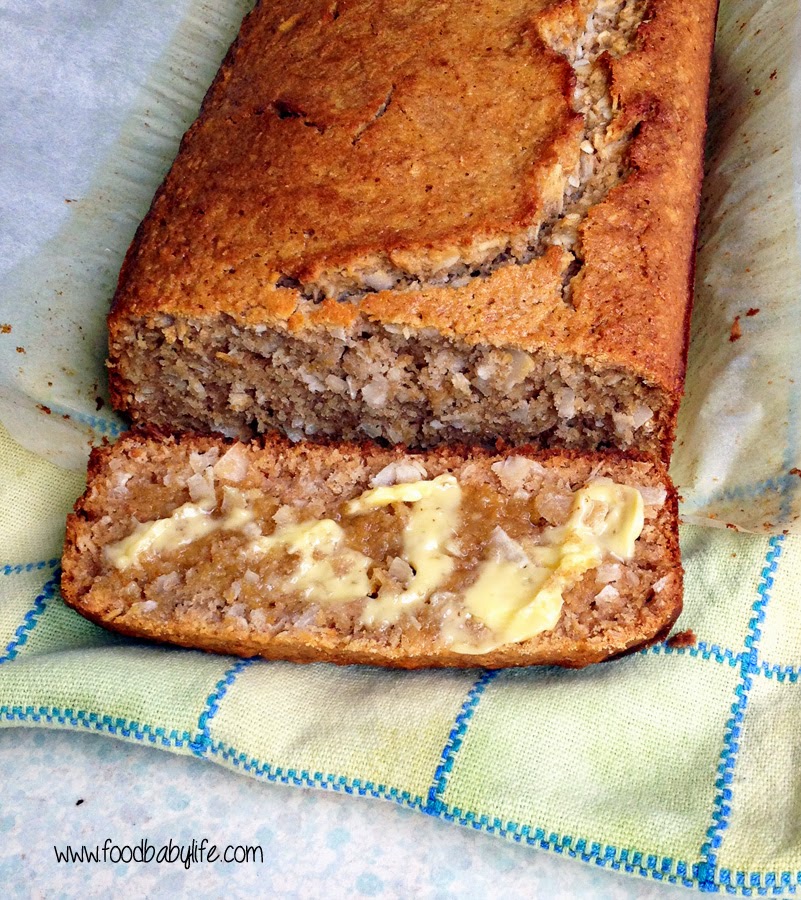
Coconut Bread © www.foodbabylife.com

Move over banana bread there's a new kid in town!

When this coconut bread popped up in my facebook feed from Smitten Kitchen I had no idea it would lead me back to a blog I used to read religiously (The Wednesday Chef) and from there to renowned Aussie chef Bill Granger who is famous for this recipe.

We've been on a real coconut kick lately and eat it in some form every day be it coconut milk on my muesli, coconut flour in some muffins or coconut oil in a stir fry.  This bread is a celebration of coconut and while I knew my husband wouldn't be particularly keen, the rest of us would love it and I was not disappointed.

I did make a few substitutions (of course) but I think I have stayed pretty true to the original recipe. It makes a huge (10 x 5) loaf which is pretty tasty warm from the oven but is absolutely sensational toasted and spread with lots of butter and a drizzle of syrup.

I was intending on serving a slice of this topped with homemade mango sorbet for my mother in law's birthday but in the end we had a piece of this for afternoon tea and saved the mango sorbet for a few days later when we weren't quite so full from our dinner of takeaway Chinese food.

It is the perfect breakfast or brunch bread and is really substantial without being too heavy. I loved it.

If you like coconut and are getting sick of the same old banana bread, this is the one for you!

I chose to use the recipe from the Australian Women's Weekly just so I wouldn't have to do any of the conversions.


Coconut Bread
Slightly adapted from AWW

1 1/2 cups plain flour
1 cup wholemeal plain flour
2 ts baking powder
2 ts cinnamon
150g shredded coconut (I used coconut flakes which I blitzed in the food processor to make finer)
300ml milk (I used almond and coconut milk)
2 eggs
1 ts vanilla
1/2 cup rice malt syrup
75 g melted butter
pinch salt

Preheat oven to 180 degrees celsius. Grease and line a large loaf tin (mine was 10 x 5 even though the original said 8.5 x 5) and set aside.

Place the dry ingredients into a large bowl and stir together. Make a well in the middle.

Place the liquid ingredients into a large and whisk well.

Pour the wet ingredients into the well and mix until only just combined. Pour into the prepared tin and bake for 1 hour or until a skewer inserted in the middle comes out clean.

Remove from the oven and leave for 5 minutes before turning out of the tin. Serve warm or slice and freeze to be thawed and toasted later.

Serves 10-12.


Friday, March 27, 2015

Lemon Diva Cupcakes


I have a confession to make. I'm a little embarrassed to admit that I became completely hooked on I'm a Celebrity Get Me Out of Here! I think I watched every episode and was cheering for the fabulous Chrissie Swan to win (she came third). I was also cheering when Julie Goodwin arrived as an intruder because she was fabulous on MasterChef and I have her cookbooks. During the show Julie made her Lemon Diva Cupcakes so guess what I couldn't resist making the next day?

There is a reason these have become famous - they are completely delicious! I haven't made cupcakes for ages and it's been even longer since I used a piping bag. My piping skills are atrocious but the taste more than made up for that.

If you like lemon you will love these cupcakes! I made a few changes to the recipe like using rice malt syrup instead of sugar in the cupcakes and dextrose in the icing but other than that it is as per the original.

Perfect for afternoon tea. Make them!!

Lemon Diva Cupcakes
Found online here

Cupcakes:
100g butter, softened
1/2 cup rice malt syrup
1 ts vanilla extract
zest of 3 lemons
1 1/2 cups self-raising flour
1/2 cup milk (I used homemade almond and coconut milk)

Icing:
125 g unsalted butter, softened
2 cups dextrose
1 1/2 tbs lemon juice

Preheat the oven to 160 degrees C fan-forced. Line a 12-hole muffin pan with paper cases. Using a stand mixer or electric beaters, beat together the butter, syrup, lemon zest and vanilla until light and creamy.

Add the eggs one at a time, beating well after each. Alternately fold through the flour and milk in two batches. Spoon the mixture evenly into the paper cases.

Bake for around 20 minutes or until golden brown and the centre springs back when touched. Place on a wire rack to cool completely before decorating.

To make the icing, beat the butter until light and creamy using electric beaters. Add the dextrose a little at a time, beating constantly. Add half the lemon juice and beat well. Add the remaining lemon juice a little at a time. Pipe the icing onto the cooled cupcakes (Julie recommends a 1cm fluted nozzle which I don’t have).

Monday, March 23, 2015

Garlic Smashed Potatoes (SRC)


Secret Recipe Club time! This month I was assigned Confessions of a Cooking Diva by Julie. I had a great time looking through Julie's blog this month and I especially liked all her menu planning posts and the way she bases her meals around different themes. We plan and shop fortnightly (which I know doesn't work for everyone) but tend to base our meals around the kids' activities and having enough leftovers for hubby's lunch. I really should do a menu-planning post of my own one of these days!

Anyway there were lots of yummy recipes to chose from and I have her Slowcooker Chicken Drumsticks, Baked Banana Bread Oatmeal and these Baked Eggs all bookmarked to try soon but in the end I couldn't go past these Garlic Smashed Potatoes. I mean, Julie is from Idaho after all!

We have a roast dinner probably every second Sunday and I am always on the lookout for different and interesting sides. We've had potatoes lots of ways but never smashed despite seeing variations of them all over the place.

These are such a simple yet delicious way to cook potatoes. Crispy and crunchy on the outside, fluffy in the middle and seasoned beautifully with garlic. We had them with roast chicken, roast beetroot and green beans tossed in lemon and olive oil. It was a seriously good dinner. Unfortunately the day I chose to make all this was ridiculously hot and we all sweltered with the oven on for a few hours (sorry to all of you in the Northern Hemisphere who are dealing with endless snow - here it is a seemingly endless summer!).


Garlic Smashed Potatoes
Recipe from Confessions of a Cooking Diva

1-2 potatoes per person
2 tbs olive oil
2-3 ts minced garlic
salt and pepper to taste

Boil the potatoes in lightly salted water until just tender, approximately 10-15 minutes. Remove from the water and cool for 15 minutes. While they are cooling, preheat the oven to 190 C/375 F degrees. Grease a baking dish and set aside.

Place the potatoes in the baking dish and using a fork or potato masher gently squash each potato. Mix together the oil and garlic, drizzle this mixture over the potatoes, sprinkle with salt and pepper and bake for around 20 minutes or until crisp and golden brown.

Serve warm or hot.

Thanks for a great recipe Julie! This has become our new favourite way to have potatoes :)

secret-recipe-club.blogspot.com

Friday, March 20, 2015

Sweet Potato Brownies


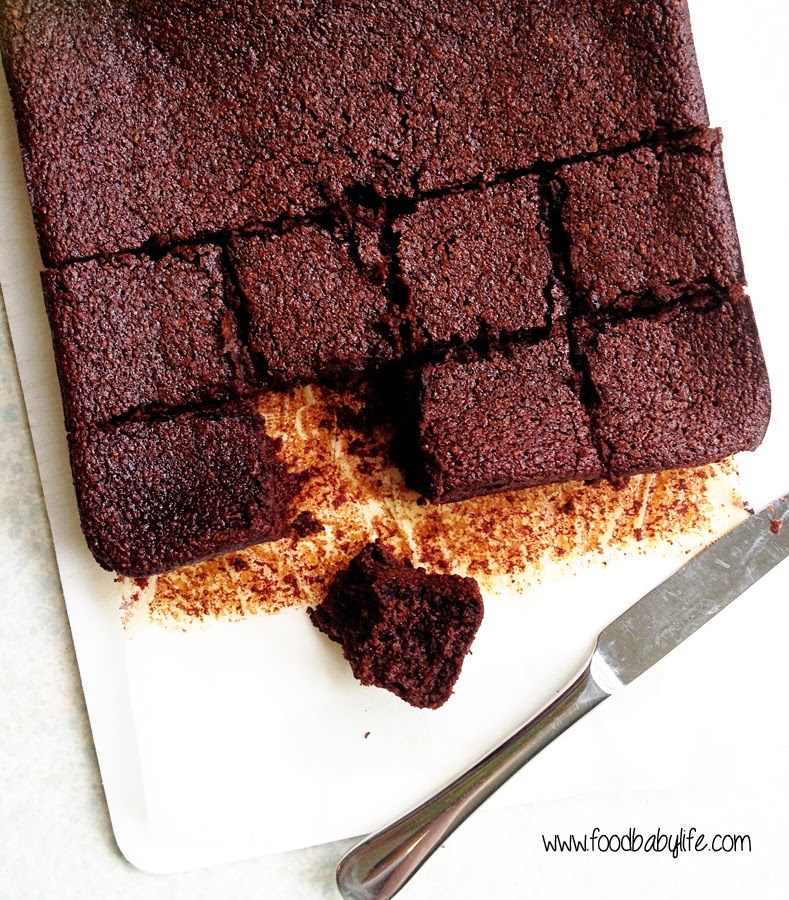
Sweet Potato Brownies © www.foodbabylife.com


The idea of hiding veggies isn't new but I must admit I am becoming more and more intrigued by just what you can get away with hiding! I have a very fussy 4 year old and we have struggled with expanding his range of foods. We've been through feeding therapy with a speech pathologist and occupational therapist which helped a little but his palate is still extremely limited and he is not at all open to trying new things. So while we still put veggies on his plate at dinner time the only time they actually pass his lips is if they are hidden in something else.

Chocolate is the ideal medium for hiding veggies not only because kids love it but it's taste and colour are great at disguising them. These chocolate and zucchini muffins have been a continued success but our new favourites are these Sweet Potato Brownies. There are 2 small sweet potatoes hidden here which along with the coconut oil, eggs, almond meal and raw cacao make them not only a really substantial snack but also a really nutrient dense one.

My boys all loved these. In the words of my 5 year old 'Mum please make these again and DON"T CHANGE A THING.' Hilarious!

These are richly chocolatey like all good brownies and even have a little crunch around the edges but the interior is very soft. I sliced these when they were still a bit warm and it was a bit messy as you can see. We kept the rest in the fridge and it was equally delicious cold but it sliced much more cleanly.

Sweet Potato Brownies
Adapted from this and this

1 medium sweet potato (3 cups grated)
2 ts vanilla extract
2 eggs, at room temperature
1/2 cup liquid coconut oil or olive oil
1/2 cup raw cacao
1/2 cup rice malt syrup
1/2 cup almond meal with 1 tbs coconut flour mixed in
1 ts baking powder
1 ts bicarbonate soda

Preheat oven to 180 degrees C. Grease and line an 8 inch square brownie pan and set aside.

Finely grate the sweet potato (and place in the food processor along with the vanilla, eggs and oil. Mix well. Add the dry ingredients and pulse until just combined.

Pour the mixture into the prepared pan and bake for approx 35 minutes or until  just set and firm to the touch in the middle. Allow to cool completely in the pan before slicing.

Store in the fridge. Makes 16 serves.

Related Posts Plugin for WordPress, Blogger...