Sunday, January 31, 2010

Kitchen Reader January - What We Eat When We Eat Alone


Happy new year, fellow kitchen readers!

January's book selection is “What We Eat When We Eat Alone” by Deborah Madison & Patrick McFarlin.

On a purely aesthetic level, this is a gorgeous book: crisp white pages, appealing use of colour and charming illustrations by co-author Patrick McFarlin. It also makes for a wonderful read.

Begun on a whim as a means of passing the time during long bus rides, the authors asked friends, foodies and complete strangers what they cook for themselves when they eat alone. The resulting conversations give us a glimpse into how other people really live. The meals were as varied and wide-ranging as you would expect, but what I wasn't expecting was just how candid some of those responses would be!

Sure there are those who will enjoy a salad or steamed vegetables, but there are others who will just eat melted cheese. And then there are those meals one wouldn't dream of eating with anyone else present: "I pour sardine juice onto cottage cheese while standing on one foot in front of the refrigerator, not putting down the other foot because there's been a meat leak from the vegetable drawer" says one.

Still others will go to great lengths planning, shopping for and preparing fabulous meals of fresh pasta or roast meats. But it seems most of us will cut corners a little when we are cooking for one.

I don't know about you but when I eat alone it tends to be a great opportunity to not cook. I will have cereal, sardines on toast or even just ice cream for dinner and I will delight in every mouthful. When I picture other people eating alone I imagine they do it far more properly and healthily than I.

"When I'm cooking for myself, it happens like an urge. That is, it probably isn't a regular mealtime. I first notice that I'm hungry and then I have a vision of something that's in the fridge or the pantry. Then I dream up a recipe for it." - Moky McKelvey, p45

Each chapter contains a selection of single serve recipes or simple ideas to run with if you happen to be cooking just for yourself. For me, the Fried Potatoes with Yoghurt Sauce on p156 are calling my name!

The main message of the book though is that eating alone can be a joyful and fulfilling experience. With no one else's needs to satisfy but your own, you can let your taste buds run wild, indulge in those foods that you truly love or even eat in bed if it suits you.

Saturday, January 30, 2010

Ten in 10 Update 4 and Banana Pancakes

I don't know if it came through in last week's update but I was feeling a little blah about my Ten in 10 journey. So this week I didn't do anything special. Oh I still exercised but apart from that I didn't worry about any calorie counting or food choices. The result? I actually lost weight.

No wonder dieting makes us all crazy when there's no rhyme or reason to it!

This week I re-read 'Changing Habits, Changing Lives' by Cyndi O'Meara. I think this is one of the most common sense approaches to healthy living and re-reading it has brought me back to basics.

The premise is simple: unhealthy habits like skipping breakfast, not exercising and drinking too much coffee are all habits that can be broken. Unlike other programs where you go cold turkey, here you read one chapter at a time and start a new healthy habit. Chapter 1 is on eating a healthy breakfast every day. So for a week or month or however long it takes you to form that habit, that's all you work on before proceeding to chapter 2.

Now I've always eaten breakfast. There's no way I would make it through the day if I didn't. But this week I will be enjoying some healthier and more filling options like bircher muesli. Hopefully will have some recipes to post as well.

Now onto another breakfast, we had these scrummy banana pancakes a few weeks ago. They were without doubt the BEST banana pancakes on the face of the earth. I took photos and filed it away to post sometime. Problem is I made up the recipe on the spot and I cannot for the life of me remember what I did.

I know there was yoghurt in them, and ... umm ... bananas? Sorry 'bout that.

But here is a photo of the best banana pancakes on the planet served with greek yoghurt and maple syrup. Enjoy! :)

Tuesday, January 26, 2010

Vanilla Bean Panna Cotta with Summer Fruits

Happy Australia Day everyone! We're doing the traditional laze around at home followed by roast lamb on the BBQ thing today. Absolute bliss. Although it does make for a strange week having a public holiday in the middle.

I'm a little late jumping on the panna cotta bandwagon but better late than never. This is something you find on restaurant menus a lot but after seeing just how simple it is you'll be making it for yourself instead.

I couldn't think of anything more perfect for an Australia Day lunch than this cool and silky panna cotta paired with fresh pineapple and mango. If you're somewhere cold at the moment (lucky you!) than this would work wonderfully served with a warm fruit compote.

"A panna cotta should wobble like a Rubenesque woman wearing 5 inch heels"

As you can see from my photos the mixture split into 2 distinct layers while it chilled in the fridge. Apparently this is really common and can be caused by over-heating the cream (which did happen when I turned my back for a moment) and not allowing the mix to cool sufficiently before pouring it into the moulds. I actually quite like the effect although it does make the creamy bottom layer VERY creamy.

Vanilla Bean Panna Cotta
Recipe adapted from taste.com.au

1 1/2 cups (375ml) cream
1 1/2 cups (375ml) milk
1 vanilla bean (I used 1 ts of vanilla paste)
1/2 cup (115g) caster sugar
2 1/2 tsp gelatine powder

Place the cream and milk in a saucepan. Use a small sharp knife to split the vanilla bean lengthways, then scrape the seeds from inside the bean. Add the seeds and bean to the saucepan. Slowly bring to the boil over a medium heat. Remove from the heat and set aside for 10 minutes.

Discard bean from cream mixture. Add sugar and return to a low heat. Cook, stirring, for 5 minutes, or until sugar dissolves.

Place 2 tbs of boiling water in a small heatproof bowl. Sprinkle over gelatine. Bring a small saucepan of water to boil. Remove from heat. Sit the bowl of gelatine in the water and stir until dissolved. (I microwaved the combined gelatine powder and water in 5 second bursts until dissolved). Cool slightly, then stir into the cream mixture.

Lightly oil 6 x 1/2 cup (125ml) plastic dariole moulds or ramekins (I used spray oil). Place on a tray and pour in cream mixture. Refrigerate for 4 hours.

To serve, break the seal by inserting a small knife between the panna cotta and the mould. Turn onto a serving plate and shake to release.

Monday, January 25, 2010

Ten in 10 Update 3 and Garlic Bread

It's usually about this point into a diet that I start to lose motivation and this time is no different. There's nothing I can really put my finger on, I'm just a bit over it all.

I chose not to count calories this week so paid extra attention to how much I ate and exercised 6 days out of 7. I also made sure we ate less red meat and more veges with dinner. The end result? I gained 200g. Could it be 200g of muscle? I hope so! My fitness is definitely improving and I feel I have more muscle tone.

I'm thinking maybe I won't weigh myself at all for the next 2 weeks but rather will focus on how I feel and how my clothes fit.

And now onto something that makes me smile just thinking about it ...

Cheesy Garlic Bread

I made this absolutely delicious garlic bread to accompany some leftover spaghetti. Now I know that sounds like a very carb heavy meal (and it was!) but the pasta was jam-packed with veges. I have to admit I'm not great at sitting down to a plateful of unadorned vegetables. So I tend to 'sneaky chef' myself and fill everything I cook for dinner with hidden veges.

If you have a favourite vegetable recipe please let me know! I'm definitely looking for inspiration :)

I have been continuing to bake from the fabulous Healthy Bread in 5 Minutes a Day cookbook. I made this garlic bread using 1/4 of the master recipe found on p53. But you could use your own favourite bread dough and do the same thing.

Cover a baking tray with a good dusting of cornmeal. Using as light a touch as possible, flatten the dough into a large circle, about 1/2 inch thick. Place on the tray. Sprinkle with 2 cloves of finely minced garlic, a handful of mozzarella cheese and any fresh or dried herbs you like. Dot with butter (about 1 tablespoon total) and then roll up the dough into a sausage shape. Fold under the ends to seal. Using a sharp knife, slash the top of the loaf.

Once again, I won't post the full recipe because I think you should get the book!

My baking hiatus is now almost over. Come February I will be back in the swing of things. It will be interesting to see how that impacts on my Ten in 10 program!

Wednesday, January 20, 2010

Chicken Noodle Soup

It's official. Oscar has his first cold. I think he's done really well to get to 9 months without picking up any bugs, particularly as both hubby and I had the flu a few months ago.

Despite it being the middle of a hot summer, chicken noodle soup was definitely in order. While Oscar only got a little of the broth and some finely chopped chicken, the rest of us got the whole deal including noodles made from scratch.

Chicken Noodle Soup

For the broth:

1 x 2kg chicken, preferably organic
1 carrot,
1 stick of celery
2 cloves of garlic
1 red onion
2 bay leaves
water

Rinse the chicken under cold water and place in a large stock pot.Chop the onion, carrot and celery into large chunks. Add to the pot with the garlic and bay leaves. Cover with cold water and place over high heat. Bring to the boil then reduce the heat and simmer gently for 1 hour, skimming any scum that comes to the surface.

Remove the chicken from the broth and refrigerate. Remove and discard the vegetables and bay leaves (you may need to strain the broth to remove the onion and any sediment). Pour the broth into a large jug and refrigerate for at least a few hours. Once cold, remove most of the fat that has risen to the surface and discard. If you don't do this the soup may be too oily.

Once the chicken is cool, remove the meat from the bones and shred or chop it into pieces. Refrigerate until needed.

For the noodles:
Recipe adapted from Romaine's Chicken and Dumplings


1 1/2 cups plain flour
1 egg beaten
1 tbs butter
1/2 ts salt
5 tbs cold water

Add the flour, salt and butter to the bowl of your food processor and blitz until the mixture resembles course sand. Add the egg and pulse a few times to combine. Add the water 1 tablespoon at a time, pulsing in between additions, until the mixture starts to form a ball.

Remove from the mixer, cover with plastic wrap and let rest for 10 minutes.

Flour a large board or work surface and roll out the dough into a thin sheet (basically as thin or thick as you would like the noodles to be). Use a sharp knife to cut into the desired shape. I cut long ribbons about 1/2 inch wide, then cut each ribbon into 4 inch strips.

Cover with a tea towel and allow to dry for 20 minutes.

For the soup:

1 large carrot, finely diced
1/2 onion, finely chopped
1 zuchini, finely diced
salt and pepper to taste
Your cooked chicken and cooled broth
Noodles

Pour the cooled broth into a large saucepan and bring it to the boil. Check for seasoning at this stage and add salt and pepper to taste. Once boiling, add the vegetables and noodles and cook for about 10 minutes, or until the vegetables are tender. Add the chicken and stir through until hot.

Serves 6.

It doesn't matter how hot the weather is, there is just something so comforting about chicken noodle soup, and the homemade noodles really made this dish something special!

Sunday, January 17, 2010

Ten in 10 Update 2 and Jam Drops

Well, another week done and it's been really up and down. We had some sad news on Thursday when we found out my uncle (Dad's brother) passed away suddenly overnight. Totally unexpected and I still can't believe it.

I'm the sort of person who cooks and cleans when I'm upset so the house looks great and I made some yummy cookies which I will get to in a moment.

First an official update for Ten in 10...

Things I did well this week:

1. Exercised 5 days out of 7. I was aiming for 7 days this week but overslept 2 mornings after being up a few times in the night with Oscar.

2. Switched workout dvds. The old one was becoming too easy so I guess that means my fitness is improving!

3. Weighed myself once! Lost 0.6kg which I am really happy with.

Things to work on for next week:

1. Eating consciously/watching portion size. I ate 4 jam drop cookies before I even knew what I was doing. Oh well.

When the urge to bake struck I was going to make Moogie's chocolate-filled poppyseed cookies but I think my poppyseeds were rancid. Ugh.

But I love these jam drops. Very homey and comforting. They are really sweet though so I would use only dark chocolate and a tart jam or marmalade. The flavour is more mellow the second day but they don't hold together as well. That's if they last that long!

Jam Drops/Choc Drops
Recipe adapted from Modern Classics #2 by Donna Hay, p18

180g (6oz) softened butter
1 cup caster sugar
1 egg
1 ts vanilla essence
2 cups plain flour
1/2 ts baking powder
jam and chocolate melts to decorate

Preheat the oven to 180 degrees C. Place the butter and sugar in the bowl of an electric mixer and beat until light and creamy. Add the egg and vanilla and beat well. Stir through the flour and baking powder and mix to a dough.

Roll tablespoonfuls of mixture into balls. Place on a baking tray lined with non-stick baking paper, allowing room for each biscuit to spread, and flatten slightly. Press a finger into the middle of the dough to make an indent.

Fill the hole with jam (preferably something tart like raspberry or rosella) or a chocolate melt. Bake for 10 minutes or until golden brown. Remove from the oven and add a little extra jam or another chocolate melt to each biscuit while they are still warm. Allow to cool completely before serving.

Makes approx 30 large or 60 small biscuits.

Wednesday, January 13, 2010

Homemade BBQ Sauce


We have recently discovered a super butcher near us (literally called Super Butcher) where they have wonderful quality meats like wagyu roasts at great prices. A few years ago I could have easily become a vegetarian but I've since discovered a taste for red meat. We have had the most amazing grilled steaks, pork belly and roasts I've ever eaten and they all came from the super butcher.

On the menu tonight were Black Angus beef sausages and I was looking for some way to spice them up a bit. This recipe falls into the always-wanted-to-make-but-never-got-around-to-it category. I think most of us have a list like that and while a lot of wishlist recipes tend to be extravagant, expensive or just downright decadent, this was a great addition to a weeknight meal.

I know there are a million other bbq sauce recipes out there, some sweeter, some hotter, some that take days to make in a slow cooker ... but this was perfect for us and I will definitely be making it again!

BBQ Sauce
Recipe adapted from Taste.com.au

2 tbs olive oil
1 small onion, peeled, chopped
2 garlic cloves
1 x 400g can diced tomatoes
2 tbs tomato puree
1 heaped tbs brown sugar
1 tbs Worcestershire sauce
1 tbs sweet chilli sauce (I used a tomato, capsicum and chilli salsa)
2 tbs white wine vinegar
1 tbs Dijon mustard

Place the oil in a saucepan over low heat, add the onion and cook for 5 minutes until softened slightly. Add all the other ingredients and bring to the boil. Reduce heat to medium and cook for 5 minutes, stirring, until thickened slightly. Set aside to cool slightly. Place in a blender and blend until smooth. Store in an airtight container in the fridge for up to 2 weeks.

Saturday, January 9, 2010

Ten in 10 Update & Chocolate Self-Saucing Pudding


I realise having a diet update and a chocolate pudding recipe in the same post is a little contradictory but just go with me! I wouldn't last more than 5 minutes on a deprivation diet and while I've gone there in the past ... no more! I intend to get fitter and healthier over the next 10 weeks but I still want to have the foods I enjoy, just in moderation.

Overall it's been a great week!

Things I did well:

1. Kept track of what I ate (I'm using a great FREE resource called Calorie King which tracks calories, offers menu plans and generally helps keep me aware of what I'm eating)

2. Exercised 5 days out of 7. I'm going to try for 7/7 this week but honestly even 5 days is fantastic. Anytime I've attempted a program like this in the past, lack of exercise has been my stumbling block. It's just not something that comes naturally but I feel great afterwards and I actually miss it when I skip a day.

Things I can do better next week:

1. Late afternoon snacking. I definitely get the 4pm munchies so I need to have plenty of healthy snack options around. I tend to graze during the afternoon and seeing just how the calories add up has been eye-opening.

2. Plan my meals. I not only need healthy and filling dinners but also leftovers for N to take the next day, where possible. So steak and salad might be a great dinner but it's not great second time round. I will hopefully plan better for next week.

3. Throw away the scales! I know I said I wasn't going to get stuck on the scales but I ... weighed myself every day. *hangs head in shame* The number yo-yo'ed up and down all week to finally settle a measly 200 grams down from last week. So. I will weigh in once a week (on Saturday). The end.

And now onto the good stuff!

By Friday I was really craving something sweet. N reminded me of my 'no bake' policy for January so he decided to whip up dessert for us!

We thought this recipe originally came from his grandmother but now we're not so sure. Wherever it came from it's easy to make at a moment's notice and is absolutely sublime with a big scoop of ice cream!

N's Chocolate Self-Saucing Pudding

1/2 cup self-raising flour
1/4 teaspoon salt
90g (3oz) sugar
1 tbs cocoa powder
1/4 cup milk
1 tbs melted butter/vegetable oil

For the sauce:
1/2 cup brown sugar
1 rounded tbs cocoa powder
210ml (7 fl oz) very hot water

Preheat the oven to 180 degrees C.

Place the sauce ingredients into the bottom of a 1 litre casserole dish and stir to combine. Set aside.

Sift together the flour, sugar, salt and cocoa. Add the milk and melted butter and mix until just combined. Spoon the mixture over the sauce. It does not have to placed evenly as the cake will rise to the top and the sauce will remain underneath.

Bake for approx 45 minutes. Remove and allow to cool for 10 minutes before serving with cream or icecream.

For a larger quantity, double the amount of pudding mixture but only 1 1/2 times the sauce is sufficient.

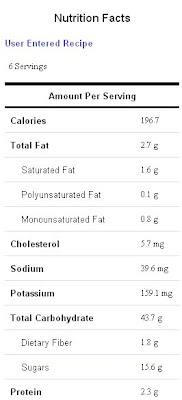
** Update - Thanks to Liss who directed me to the recipe calculator at Spark Recipes, I can now offer the following nutrition info for my chocolate pudding.

Enjoy! :-)

Tuesday, January 5, 2010

TWD 2nd Anniversary - Tarte Tatin

This week marks the 2nd anniversary of Tuesdays with Dorie! Two years ago I didn't have a blog and had only just discovered that food blogs even existed. It didn't take long for me to stumble across the Tuesdays with Dorie bakers and to want a piece of the pie. And shortbread. And cheesecake. (Oh, the brown sugar apple cheesecake!)

Laurie's idea to bake her way through Dorie Greenspan's Baking From My Home to Yours was a great one. So many of us have cookbooks that sit on the shelf despite our best intentions to use them regularly. Baking and blogging together has been a fabulous experience for me and I am looking forward and letting us all have a turn selecting a recipe was inspired. I am number 133 in the list (we are up to 96 now) so I still have a little wait for my turn.

In honour of the anniversary we voted for our recipe this week and I was thrilled the Tarte Tatin won out! (I made the Cocoa-Buttermilk Birthday Cake for my 30th last year). As I mentioned a few days ago I am taking a baking hiatus for January, but I couldn't let this one slip by so I made it for our New Year's Eve dinner.

First off, the actual dinner was spectacular! We made a slow roasted pork belly with caramelised vinegar, sauteed pears and potatos and baby broccoli. Honestly if I ordered this in a restaurant I would have been thrilled. The photo really doesn't do it justice. You'll just have to trust me!

I was a little worried about making the tarte tatin but it was a breeze. I used a square baking dish so I didn't even have to trim my pastry sheet. The caramel cooked up beautifully, nothing burnt and it turned out of the dish easily as well. The only problem came with the eating...

The taste test

It was SOOOOOOO sweet. As in tooth-aching, I-don't-think-I-can-eat-my-whole-piece sweet. Which is such a shame! I did in fact manage to eat my piece but I didn't have any for breakfast the next day as I was hoping to. Hubby didn't mind though, he polished off the rest in no time flat.

Still, I can say that I have mastered the Tarte Tatin and now I know I can do it, I will be making it again, just with less sugar! (I have since looked at some other tartin recipes and they all use less than half the amount of butter and sugar as this one).

Thank you Laurie! I am proud to be a part of this fabulous group of bakers and I'm looking forward to another great year!

Monday, January 4, 2010

Healthy Bread in 5 - Soft Whole Wheat Sandwich Loaf

We eat a lot of toast in this family. My dad has even been known to have toast with jam for dessert! But to make good toast you definitely need good bread and this recipe fits the bill perfectly.

This was the second recipe I made out of Healthy Bread in 5 Minutes a Day. I was looking for a more standard loaf (I made a boule the first time). Something that would hold up for both sandwiches and toast.

This loaf is a honey and egg-enriched, wholewheat bread with a lovely sour/sweet flavour. As it contains eggs it doesn't keep in the fridge as long as the other recipes, just 5 days as opposed to 14. But really when it tastes this good I defy you to have it last even that long!

One batch of this recipe was enough for 2 full loaves (made in a 9 x 4 pan). It sliced up beautifully and we are still enjoying it toasted, straight from freezer.

I won't post the recipe here as I think you should get the book! You'll find it on p78 of Healthy Bread in 5 Minutes a Day.

Saturday, January 2, 2010

Ten in 10


Lori aka Recipe Girl has started a wonderful challenge for the new year called Ten in 10. The aim? To get healthy, whatever healthy means to you! I had already decided I was going to make January a detox month, now I am committed to a full 10 weeks of getting healthier, fitter and stronger.

I SO need this challenge. I am still 10 kilos heavier than I was pre-pregnancy which means my clothes don't fit, I get tired more easily and I have pudgy bits that are getting me down. Not cool. While I desperately want to lose those 10 kilos I am keeping my goals health oriented. I know the weight will come off in the process and I won't get fixated on the scales.

My goals are:

1. To eat consciously (watch my portion size, only eat when hungry, stop when I'm full and keep track of what I eat)
2. To exercise for 30 minutes daily
3. To live like a healthy, active person ie. getting up off the couch and out of the house!

To help kickstart my Ten in 10 I will be taking a break from all baking groups for the month. That means no TWD, Daring Bakers or Daring Cooks. But make sure you check back on Tuesday - I couldn't miss the TWD 2nd anniversary!

I will be posting every Saturday with an update. There are over 200 participants from around the world so to join or check in and see how everyone's going, click here.

Friday, January 1, 2010

Fridays with Dorie: Low and Lush Chocolate Cheesecake

I've always thought if you have nothing nice to say, don't say anything at all. Could that be the reason I am 3 days late in posting?

I had really high hopes for this recipe. I mean, chocolate and cheesecake? How can it go wrong? Ummm. Sorry to say but this was bad. BAD. I always make cheesecakes in a waterbath. It keeps the temperature consistent, cooks evenly and ensures a silky, luscious texture. The fact that this recipe did not require a waterbath had me nervous from the get go.

I had the temperature slightly lower than stated and also gave it less time. Still I ended up with a very, very, very solid cheesecake. Something like a block of cheddar cheese. The taste? Not good enough to make up for the fact it was so damn hard. That I was serving this on Christmas Eve and not one of us could even finish a piece? Not happy, Jan.

On the plus side the crust was fabulous! One of the best ever. I used crushed granita biscuits and brown sugar which resulted in a caramelly flavour that I loved.

Another huge plus was the Spiced Cranberry Sauce I served with the cheesecake. This was its saving grace and I will definitely be making it again. And again. And again. You get the idea!

Spiced Cranberry Sauce
Adapted from here

300g frozen cranberries
1 cup sugar
1 1/2 cups water
Juice and zest of one orange (remove the zest in wide strips using a vegetable peeler)
1 cinnamon stick
1 x 2 inch piece fresh ginger, peeled
Juice of 1 lime

Place all ingredients except the cranberries into a medium saucepan over high heat. Bring to the boil. Once the sugar has dissolved, add the cranberries, reduce heat to low and simmer for 5 to 10 minutes, until the cranberries are soft but still mostly whole.

Remove from the heat. Discard the cinnamon stick, ginger and orange zest. Can be served warm or cold.

Option - strain the the liquid, squashing the cranberries to remove all the juice. Cool completely. Add 2 tablespoons to a champagne flute and top up with sparkling wine.

My apologies to The Tea Lady for stuffing up her pick somehow. I was so disappointed. Make sure you check out her blog for a successful version. I adore chocolate cheesecake so am tempted to have a go again, this time using a waterbath. Fingers crossed!
Related Posts Plugin for WordPress, Blogger...