Monday, July 29, 2013

Spiced Apple Baked French Toast (Secret Recipe Club)


My blogging has been a bit sporadic lately but there is no way I would miss the Secret Recipe Club! This month I was assigned A Cook's Quest by Jenn. She and I seem to have a very similar outlook on food and what we like to feed our families. I love that there was a good mix of healthy and not-so-healthy recipes. Everything in moderation!

We love Mexican food around here so my first pick from Jenn's blog was going to be her Mexican Lasagne. But then I saw her Apple and Spice Baked French Toast and couldn't go past it!

Breakfast here tends to be pretty straight forward - lots of porridge, muesli and toast. On weekends we might do pancakes or bacon and eggs but that's about it. One of my favourite desserts is bread and butter pudding and this baked french toast is pretty much the same thing with the addition of apples and spices. Love it.


Spiced Apple Baked French Toast
Adapted very slightly from A Cook's Quest

1 loaf French bread
8 large eggs
2 cups milk
1 cup cream
1 cup sugar, divided (I used dextrose to cut down on the fructose)
1 tablespoon vanilla
3 teaspoons cinnamon
1 teaspoon mixed spice
6 Granny Smith apples
2 tablespoons butter
Cream and maple syrup to serve

Grease a 9 x 13 inch glass pan with butter. Slice the bread into 1 inch slices and place in the dish, packing the pieces quite tightly together.

In separate bowl, use a whisk to beat together the eggs, 1/2 cup sugar, milk, cream and vanilla. Pour one-half of this mixture over bread.

Peel, core and thinly slice the apples and layer them over the top of the bread to cover. Pour the leftover milk mixture evenly over the apples.

In a small bowl mix the remaining 1/2 cup sugar with the spices and sprinkle evenly over the top of apples. Dot with small pieces of butter, cover and refrigerate overnight.

The next day, preheat the oven to 180 degrees C/ 160 degrees fan-forced. Uncover the dish and bake for 1 hour. It should be risen and browned and smell amazing. Remove from the oven and allow to rest for 10 minutes before serving.

To serve, slice into squares (and if you're feeling really indulgent drizzle with maple syrup and cream). Be prepared not to be hungry for the rest of the day!


We LOVED this. It was a bit like having dessert for breakfast so in future we will definitely be saving it for special occasions like birthdays or Easter!

I actually made only about 2/3 of this recipe and it made a huge amount which we ate over a couple of days. Half the recipe would be plenty for most families. My favourite bit would have been the sweet and spicy apples on top. Could not get enough! Next time I will layer some apple slices in amongst the bread and also add some spices into the custard mixture to really boost the flavour. Thanks for a great recipe Jenn!


Secret Recipe Club


Saturday, July 27, 2013

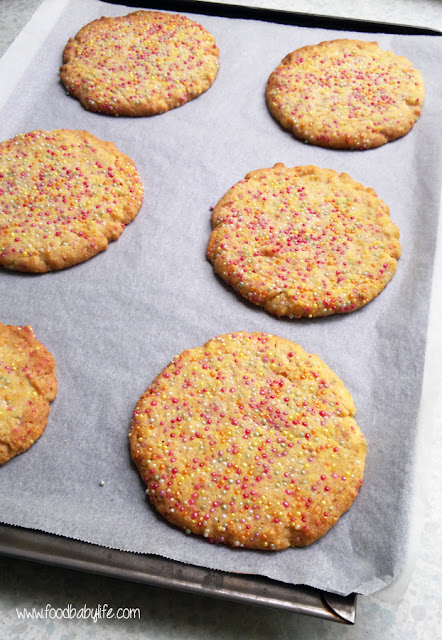
Sprinkles Biscuits

Sprinkles Biscuits Stack © www.foodbabylife.com
This is second of the yummy goodies I made for a cake stall at Oscar's kindy this weekend. You can see the Triple Chocolate Brownies here.

To me these biscuits/cookies just scream childhood. I mean, what kid doesn't love sprinkles??

These hundreds & thousands contained no artificial colours or flavours, and this is something I cam starting to notice more and more. Such a good thing although I know some kids (and adults) do react to natural colours and flavours as well.

I adapted the recipe for these beauties from Averie Cooks. Hers were for Chewy Sprinkles Cookies. They were much smaller and baked for less time so they come out of the oven very blond. However, my perfect biscuit is crispy on the outside and chewy in the middle so that's how I made them. I love the golden brown colour and their sweet buttery aroma was incredible.

I think I showed great restraint not tasting even one of these, but I gave one to my littlest taste tester Charlie and he gave it a huge thumbs up.

Why not make these this weekend? You won't be disappointed!

 
Sprinkles Biscuits
Makes 18 large biscuits/cookies
Adapted from Averie Cooks

250g unsalted butter
1 cup white sugar
1 tbs dark brown sugar, packed
1 large egg at room temperature
2 ts vanilla extract
2 cups plain flour
1/2 ts baking powder
1/4 teaspoon salt
1/2 cup hundreds & thousands (plus 1/2 cup extra to decorate, optional)

Place the flour, salt and baking powder in a medium bowl and whisk together to combine. Set aside.

In a stand mixer or large bowl using a hand mixer, cream together the butter and sugars at medium-high speed until light and fluffy. Stop and scrape down the sides of the bowl and add the egg and vanilla. Beat for 30 seconds, until just combined.

Switch to a spatula and fold through the flour and sprinkles until just combined. Wrap the dough in plastic wrap and refrigerate for at least 2 hours (or up to 5 days) before baking.

Preheat oven to 180 degrees C / 160 degrees fan-forced. Line 3 baking sheets with baking paper and set aside.

Divide the dough into 18 balls (my batch of dough weighed 968g so I got 18 x 54g pieces from the batch). Roll each ball in the extra sprinkles and place on the prepared trays, 6 per tray leaving plenty of room for spreading. Use your hand or lightly grease the bottom of a glass to flatten each ball to about 1cm thick.

Depending on your oven size you can bake these all at once or in batches. I did 1 tray at a time, with the remaining trays waiting in the fridge.

Bake for 12 minutes, rotating the trays halfway. They will be just golden brown around the edges and pale golden in the middle. Remove and allow to cool on the tray for at least 5 minutes before carefully lifting them onto a wire rack to cool completely. They will firm up as they cool.

Store the biscuits in an airtight container at room temperature for up to 5 days or in the freezer for up to 3 months. You can also store unbaked cookie dough in an airtight container or plastic wrap in the fridge for up to 5 days before baking.


Friday, July 26, 2013

Triple Chocolate Brownies

Triple Chocolate Brownies © www.foodbabylife.com

I love an old-fashioned cake stall and remember them fondly from childhood. There were always cupcakes, anzac biscuits, coconut ice and little toffees with hundreds and thousands on the top. A sugarholics dream!

There is an open day at Oscar's kindy on the weekend and I couldn't pass up the chance to bake something delicious to give to the cake stall. I'm not baking like this for us much lately but it was so much fun to do it and give it all away!

After much deliberation I decided on my Triple Chocolate Brownies and some hundreds & thousands biscuits, figuring they would go down a treat with the kids and parents alike. I will post the recipe for the bikkies later but today, it's all chocolate baby!

Triple Chocolate Brownies

1/4 cup plain flour
1/4 teaspoon salt
120 grams unsalted butter, cut into pieces
1/2 cup cocoa powder
2 large eggs at room temperature
1/2 cup white sugar
1/2 cup brown sugar
1 teaspoon pure vanilla extract
1 cup white chocolate chips (reserve a few tbs to scatter over the top)
120 grams dark chocolate, roughly chopped

Preheat the oven to 160 degrees C / 140 degrees fan-forced.

Grease an 8-inch square baking pan with butter and line the bottom with baking paper. Butter the paper, dust the inside of the pan with flour and tap out the excess. Place the pan on a baking sheet.

Whisk the flour and salt together and set aside.

Place the butter in a medium heavy-bottomed saucepan over low heat. Once the butter has melted, sift the cocoa over the top and stir until combined. Remove from the heat and allow to cool for a few minutes.

Using a whisk beat the eggs into the butter/cocoa mix one at a time. Next, whisk in the sugar and vanilla until smooth. Switch to a spatula and fold through the flour, salt, dark chocolate and most of the white chocolate chips. Scrape the batter into the pan. Scatter over the remaining white chocolate chips so it looks pretty.

Bake for 30 minutes. The brownies will still be gooey but the top will be dry and papery. Place the pan on a wire rack and allow to cool for at least 30 minutes before turning out onto a rack to cool completely. Cut into desired size (I do 12 pieces).

Wednesday, July 24, 2013

WINNER UPDATE - AntiOx Chocolate Giveaway!

Calling reader Merryl, you have now won an AntiOx Chocolate Gift Pack!


I am a chocoholic and I am always looking for new chocolate to try. This new Anti Ox sugar free dark chocolate sounds irresistable.


Please send your mailing address to food.baby.food.baby @ gmail.com as soon as possible to receive your prize.

Wednesday, July 10, 2013

AntiOx Chocolate Giveaway winners!!!

Well the winners of the AntiOx Chocolate Giveaway have been drawn! Congratulations to:

Rockn
I am currently trying very hard to be good and healthy and lose a little weight, but I miss my chocolate!

and

sapna
because these are high in anti-oxidants and will come under healthy snack category.

Could you please email your mailing address as soon as possible to food.baby.food.baby @ gmail.com and I will arrange to have your prize packs sent to you!


Tuesday, July 2, 2013

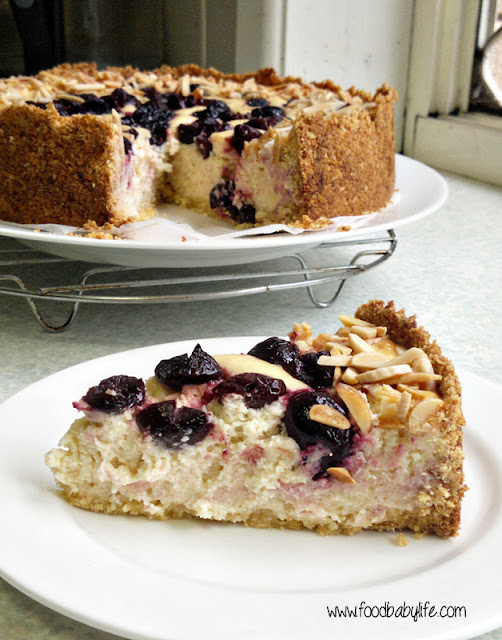
Baked Yoghurt Tart with Cherries and an Oatmeal Crust (Baking with Julia)

Baked Yoghurt Tart © www.foodbabylife.com

I've never heard of a baked yoghurt tart before but when I read it was similar to a custard tart I got very excited! I love a classic custard tart (as I've made before here) but I'm always looking for healthier options. A tart filling based on natural yoghurt and flavoured with vanilla, fruit and almonds sounded perfect.

Fresh berries are ridiculously expensive here, even in season, so I chose to use frozen cherries instead. I thawed, drained and patted them dry before using and they worked really well. 

I also opted for a different crust. I found someone else's version of this yoghurt tart here and they had used an oatmeal crust which sounded delicious so that's what I used.  I made it fructose-free by using dextrose instead of brown sugar. It was more like a cheesecake base than a tart base and I loved it. In fact it could become by go-to cheesecake base instead of biscuit crumbs!

I'm going to blame my oven but this took more than double the stated time to cook, 1 hr 10 mins as opposed to 35-40 minutes.

Baked Yoghurt Tart with Cherries and Oatmeal Crust © www.foodbabylife.com

The taste test ...

We loved this! Much more similar in texture to a cheesecake than a custard tart. Which makes it even more of a winner in my book because I adore cheesecake! I loved the nuttiness of the base with the almonds and cherries, and the filling was smooth and only slightly tangy. Just delightful.

The recipe is available online (just google Julia Child Baked Yoghurt Tart) but I have included the recipe for the crust here. Click on the link below for the orginal recipe made on brown sugar.

For the Oatmeal Crust
Adapted from Wellsphere

1 cup rolled oats
1 cup plain flour
1/2 cup dextrose
1/2 tsp baking powder
1/2 tsp salt
100 grams butter, melted and cooled
1 egg yolk

Lightly grease a 9 inch springform pan and line the base with non-stick paper.

Place all the dry ingredients in a food processor and blitz until the oats are finely chopped. Add the melted butter and egg yolk and process until combined. It should resemble damp sand and stick together when pressed.

Tip the mixture into the prepared tin and press evenly over the base and halfway up the sides. Chill for 30 minutes.

Place the pan on a baking sheet and blind bake at 170 degrees C / 150 C fan-forced for about 20 minutes, then remove the pastry weights and bake uncovered for another 10 minutes. (I put foil around the edges which were starting to get a little dark.

Cool to room temperature before filling.


Related Posts Plugin for WordPress, Blogger...