Showing posts with label Secret Recipe Club. Show all posts

Monday, July 29, 2013

Spiced Apple Baked French Toast (Secret Recipe Club)


My blogging has been a bit sporadic lately but there is no way I would miss the Secret Recipe Club! This month I was assigned A Cook's Quest by Jenn. She and I seem to have a very similar outlook on food and what we like to feed our families. I love that there was a good mix of healthy and not-so-healthy recipes. Everything in moderation!

We love Mexican food around here so my first pick from Jenn's blog was going to be her Mexican Lasagne. But then I saw her Apple and Spice Baked French Toast and couldn't go past it!

Breakfast here tends to be pretty straight forward - lots of porridge, muesli and toast. On weekends we might do pancakes or bacon and eggs but that's about it. One of my favourite desserts is bread and butter pudding and this baked french toast is pretty much the same thing with the addition of apples and spices. Love it.


Spiced Apple Baked French Toast
Adapted very slightly from A Cook's Quest

1 loaf French bread
8 large eggs
2 cups milk
1 cup cream
1 cup sugar, divided (I used dextrose to cut down on the fructose)
1 tablespoon vanilla
3 teaspoons cinnamon
1 teaspoon mixed spice
6 Granny Smith apples
2 tablespoons butter
Cream and maple syrup to serve

Grease a 9 x 13 inch glass pan with butter. Slice the bread into 1 inch slices and place in the dish, packing the pieces quite tightly together.

In separate bowl, use a whisk to beat together the eggs, 1/2 cup sugar, milk, cream and vanilla. Pour one-half of this mixture over bread.

Peel, core and thinly slice the apples and layer them over the top of the bread to cover. Pour the leftover milk mixture evenly over the apples.

In a small bowl mix the remaining 1/2 cup sugar with the spices and sprinkle evenly over the top of apples. Dot with small pieces of butter, cover and refrigerate overnight.

The next day, preheat the oven to 180 degrees C/ 160 degrees fan-forced. Uncover the dish and bake for 1 hour. It should be risen and browned and smell amazing. Remove from the oven and allow to rest for 10 minutes before serving.

To serve, slice into squares (and if you're feeling really indulgent drizzle with maple syrup and cream). Be prepared not to be hungry for the rest of the day!


We LOVED this. It was a bit like having dessert for breakfast so in future we will definitely be saving it for special occasions like birthdays or Easter!

I actually made only about 2/3 of this recipe and it made a huge amount which we ate over a couple of days. Half the recipe would be plenty for most families. My favourite bit would have been the sweet and spicy apples on top. Could not get enough! Next time I will layer some apple slices in amongst the bread and also add some spices into the custard mixture to really boost the flavour. Thanks for a great recipe Jenn!


Secret Recipe Club


Monday, June 24, 2013

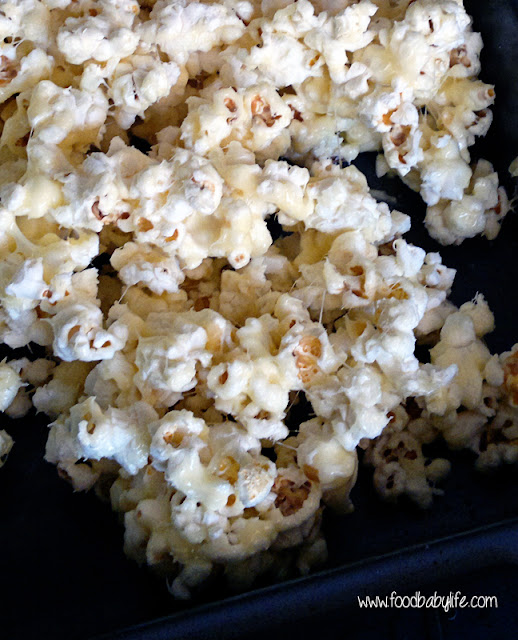
Snow White Popcorn Treats (Secret Recipe Club)

Snow White Popcorn Treats © www.foodbabylife.com

SRC time again! This month I was assigned Life and Kitchen by Lindsay. I love that Lindsay posts so many veggie and meatless meals but after doing something savoury for the past few months of SRC I had already decided to do something sweet this month, and was delighted that she had so many to choose from!

The instant I saw these Snow White Popcorn Treats I was sold. It actually is winter here, but this is as close as my boys will get to snow!

We make popcorn a few times a week using our air popper. I like mine with a little melted butter and sea salt but the kids are totally happy having it plain. But let me tell you they were very excited about their special sticky popcorn!

The recipe called for 1 large or 2 small bags of popcorn but I have no idea what size that would actually be. I just did the usual 1/4 cup we always do and hoped for the best. It was pretty much spot on.

So how did it taste? Totally amazing as you would expect! I did find it VERY sweet though and added extra salt to mine (love that sweet and salty contrast). This would be perfect bagged up and given as gifts at Christmas and I will be doing just that this year.

Thanks for a great recipe Lindsay!

Snow White Popcorn Treats
From Life and Kitchen

1/4 cup popping corn
20 white marshmallows
2 tbs butter
1/4 cup white chocolate
sea salt

Pop the corn and spread it out on a lightly greased baking tray, making sure to remove any unpopped kernals.

In a medium pan over lowish heat gently melt the butter and the marshmallows, stirring constantly. Once they are completely melted and liquidy, add in the white chocolate and stir until smooth.

Quickly pour the mixture over the popcorn using a silicone spatula to toss it all together, coating as much of the popcorn as you can.

Sprinkle generously with sea salt and leave to set for about 10 minutes before devouring.


Secret Recipe Club

Monday, May 27, 2013

SRC - Chicken and Apple Rice Paper Rolls

Chicken and Apple Rice Paper Rolls © www.foodabylife.com

Well it's reveal day for Group D of the Secret Recipe Club! This month I was delighted to be given Natural Noshings by Nora. I came across Nora's blog quite a few months ago and had already flagged a number of recipes to make.

We have been making a real effort over the past 6 months or so to cut out processed foods and remove refined sugar from our diet. We have a pantry full of oats, coconut oil, chia seeds, natural nut butters and raw cacao. Natural Noshings has some amazing recipes that are gluten free and use real whole ingredients with nothing artificial or processed in sight.

I have bookmarked some of the sweet treats to make like the Oatmeal Raisin Cookie Dough Bites (which will be the perfect after kindy snack for my 4 year old) and the Healthy Nutella (which my peanut butter loving 2 year old will go nuts for - pun intended!).

Yet again though I have chosen to make a main because quite simply I couldn't go past these. Nora calls them spring rolls but in Australia spring rolls use a different wrapper and are baked or fried. We call these rice paper rolls. But really whatever you call them they are little parcels of deliciousness!

Adding the apple was a stroke of genius. The sweetness of red apple paired with the chicken and peanut sauce was fantastic. My kids adored these. Well actually Charlie my 2 year old couldn't be convinced that the rice paper wrappers were actually edible so he just ate the fillings and lots of sauce.

The original recipe had apple and cabbage but as usual I couldn't pass up the opportunity to get some extra veges into the kids. All the colours of the rainbow crammed into something they can roll up and dip in a yummy sauce (my version of the sauce has a few extra flavours added). All in all a healthy and delicious dinner!

Apple and Chicken Rice Paper Rolls with Peanut Sauce 
Adapted from Spring Rolls on Natural Noshings

For the rolls:
12 rice paper wrappers
4 small chicken thighs (marinated in a little soy sauce and sesame oil then baked and cut into strips
1 medium red apple, sliced into matchsticks
1 large carrot, peeled and cut into matchsticks
1 medium avocado, sliced thinly
1 small red capsicum, thinly sliced
½ bunch fresh coriander, roughly chopped

For the peanut sauce:
3 tablespoons hot water
3 tablespoons peanut butter (mine was smooth, all natural)
juice of 1 lime
1 tablespoon soy sauce
1 teaspoon rice malt syrup
1 teaspoon grated fresh ginger
½ teaspoon sesame oil

To prepare the sauce, place all the ingredients in a small jug and whisk to combine.

To prepare the rice paper rolls, fill a large shallow bowl with just warm water. Working with one wrapper at a time, submerge it in the water and allow to soften (about 30 seconds) turning once or twice. Carefully remove from water and lay flat on a damp tea towel.

Half way between the centre of the wrapper and the edge closest to you, layer on some carrot, capsicum, avocado, chicken, apple and chopped coriander, leaving a gap of about an inch on each side.

Take the edge closest to you and fold it over the filling. Roll it once more and then fold the shorter left and right sides inward, like you would a burrito. Then continue wrapping and rolling until sealed. Place on serving platter, leaving a little room between them as they will stick together.

Repeat with remaining wrappers and serve with the peanut sauce!

Secret Recipe Club

Monday, April 29, 2013

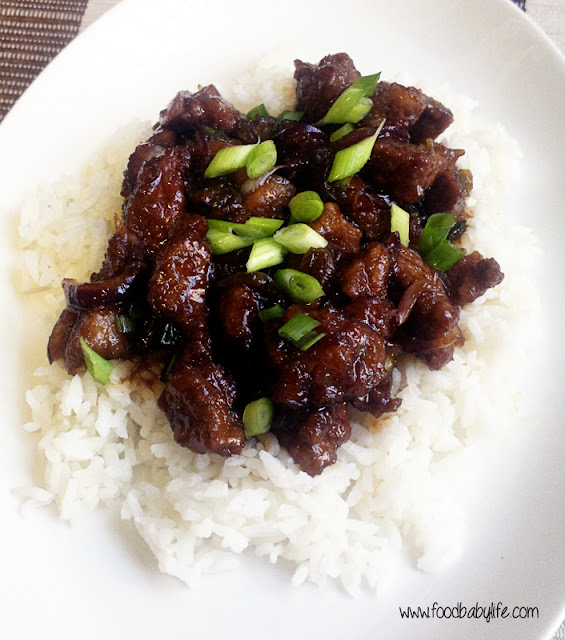
Secret Recipe Club - Mongolian Lamb

Mongolian Lamb © www.foodbabylife.com
This is now my third month with the Secret Recipe Club and I'm loving everything about it! From waiting expectantly for the email with my assigned blog inside, to spending many happy hours scouring that blog to find just the right recipe.

This month I was assigned Lynsey's blog called Lynsey Lou's. Despite living on the other side of the world I found we have lots in common from being married at around the same time in 2008 and starting to blog soon after, to just a general passion for food and cooking. I loved all of Lynsey's recipes and had a really hard time choosing just one! In the end I let my husband choose his favourite and that was Lynsey's Mongolian Beef. Not sure whether it's just in Australia but we used to get Mongolian Lamb whenever we had Chinese food so I of course adapted it to use lamb instead. 

I haven't eaten much Chinese food at all in recent years after figuring out I have a sensitivity to MSG aka Chinese Restaurant Syndrome. Hubby and I went to a Thai restaurant on our second date and I spent half the meal locked in the bathroom feeling faint with heart palpitations and a throbbing headache. Lucky for me he stuck around!

Anyway, no such problems this recipe! It was absolutely delicious, packed with flavour and probably the closest thing to takeaway Chinese food that I've ever made at home. It was the first time I've fried meat like this and it really gave the dish that authentic taste and texture. I did find it a little too sweet so next time I would reduce the brown sugar to just 1/2 cup. Otherwise this was a huge success.

Mongolian Lamb
Adapted from Lynsey Lou's Mongolian Beef

2 ts vegetable oil
1 tbs fresh minced ginger
3 cloves garlic, crushed
1/2 cup soy sauce
1/2 cup water
3/4 cup dark brown sugar
Vegetable oil, for frying (about 2 cups)
500g lamb steaks
1/4 cup corn flour
1 large red onion, thinly sliced
2 green shallots, sliced finely

To make the sauce, heat the oil in a medium saucepan over medium-low heat. Add the ginger and garlic to the pan, give it a quick stir then quickly add the soy sauce and water before the garlic scorches. Add the brown sugar, stir to dissolve, and then bring the sauce to the boil until it thickens and reduces, approx 5 minutes. Remove sauce from the heat and set aside.

To prepare the lamb, slice it thinly on the diagonal into ½ cm thick pieces. Tilting the blade of your knife to about 45 degrees will give wider cuts. Dust the pieces in corn flour then leave to rest for a few minutes so it sticks to the meat.

Heat 2 cups of oil in a wok or large deep fry pan until it's hot but not smoking (a wooden spoon dipped in the oil should start to bubble straight away).Carefully add the lamb in 2 or 3 batches to the hot oil and fry for two minutes, or until it just begins to darken on the edges. It doesn’t need to be cooked through at this stage. Stir the meat around a little so that it cooks evenly then remove with a large slotted spoon and drain on paper towel. Repeat with remaining batches of lamb. Tip the hot oil into a heatproof jug then return the pan to the stove over medium heat.

Add the red onion and shallots (reserving a small handful of the shallots for garnish) and sauté for a few minutes until it becomes soft and translucent. Add the beef and the sauce and cook, stirring for another few minutes until it is well combined and the sauce has thickened.

Remove the lamb and onions (leaving excess sauce behind as it is very rich) and serve with plenty of steamed rice and a sprinkle of shallots over the top. Serves 4-6.


Secret Recipe Club


Tuesday, March 26, 2013

Secret Recipe Club - Chicken Cheesesteaks

Chicken Cheesesteaks © www.foodbabylife.com

Secret Recipe Club time! This month I was given So Tasty So Yummy by Katie, and let me tell you I was really spoilt for choice when it came to picking a recipe. She has some amazing things on there!

Her Sea Salt Peanut Butter Oatmeal Chocolate Chip Cookies are on my must-bake list for another time, as is Katie's mum's Chocolate Cheesecake (swoon).

But for this month I really wanted an easy dinner to add into our rotation and her Chicken Cheesesteaks fit the bill perfectly.

I've always been intrigued by 'cheesesteaks' and used to imagine it was some sort of cheese that was crumbed and fried (how awesome would that be!). A little research showed it was actually thinly sliced steak covered with melted cheese. Katie has a chicken version on her blog which is much more us as we always have chicken in the freezer.

I made a few minor changes to the recipe, using chicken thighs instead of breast, red capsicum instead of green, red onion and mozzarella instead of provolone.

And the verdict? We LOVED this. So quick and easy and sooo tasty. Perfect for a quick dinner or weekend lunch. I topped ours with homemade dijonnaise (a mixture of mayonnaise and dijon mustard) and it was absolutely delicious! Definitely a keeper.

Chicken Cheesesteaks
Recipe from So Tasty So Yummy

1 tbs olive oil
2 large chicken thigh fillets
1/2 red onion, finely sliced
1/2 red capsicum, finely sliced
Worcestershire sauce, a few dashes to taste
1 cup shredded mozzarella cheese
4 long white bread rolls
Salt and pepper to taste

Split the rolls and place under the grill for 1-2 minutes to toast.

Thinly slice the chicken (you can freeze the pieces for about 15 minutes first to make this easier). Saute the onion and capsicum in the oil for a few minutes until starting to soften, then add the sliced chicken and cook until the chicken is starting to brown. Add the salt, pepper and worcestershire sauce and cook for another minute or so until the chicken is cooked through.

Place the chicken mixture into each roll, top with mozzarella and grill until the cheese is melted and bubbly.


Secret Recipe Club

Tuesday, February 26, 2013

Secret Recipe Club - Chicken Tikka Masala and Garlic Chive and Mozzarella Paratha


This is my first post for the Secret Recipe Club! I was given a really interesting blog called Enriching Your Kid written by mum Shirley to chronicle the recipes she makes for her family.

The recipes all have a strong Indian vibe and given we love Indian food in this house it was a really tough choice picking just one. So I went with 2 instead!

First up was a creamy Chicken Tikka Masala with a twist, that twist being that it contains cheese! A little research showed this is actually not uncommon. I love cheese but would never have thought to use it in a curry.

I did make a few changes to the recipe, firstly using chicken thighs instead of breast for extra flavour and also to ensure it stayed moist as we were cooking on the BBQ. Secondly, I used the remainder of the marinade in the sauce so as not to waste all those delicious flavours and to make the sauce really creamy. There were a few measures missing from the original recipe, for example the amount of lemon juice needed so I have just included what I used. I also doubled the recipe and that's what you will see below. You could easily halve it.

The second recipe I chose was the Garlic Chive and Mozzarella Parathas. While we do make curries pretty often I have never really made Indian breads and this one looked too good to pass up. It didn't disappoint. We all LOVED this bread!

The chicken and parathas made a fabulous dinner. The Chicken Tikka Masala has a lovely warmth from the spices (no chillies) so it is the perfect curry for kids. My 2 year wasn't keen (but he's going through a VERY picky stage) but he did love the bread. My almost 4 year old loved both and wanted seconds. So that's a pretty big tick of approval.

There were lots of other great recipes for choose from so make sure you check out Shirley's blog!

Chicken Tikka Masala
Recipe adapted from Enriching Your Kid

8 chicken thighs

1st marinade
1 tbs ginger-garlic paste (see recipe below)
Juice of 1 lemon

Cut each chicken thigh in half, add marinade ingredients and mix thoroughly. Place in the fridge for at least 1 hour or overnight.

2nd marinade
200 ml Cream
2tbs ginger-garlic paste
50 grams cheddar cheese, finely grated
3 tbs almond meal
2 egg white
1 tsp cardamom powder
1 ts crushed black pepper
oil
salt to taste

In a large bowl, mix together the first 5 ingredients the cheese dissolves and becomes a fine paste. Add the cardamom and pepper and mix well. Add the marinated chicken pieces and mix until the chicken is well coated. Set aside in the fridge for 2 hours.

Remove the chicken from the marinade, scraping off any excess. Reserve the leftover marinade to use in the sauce. Drizzle oil over the pieces, sprinkle with salt to taste and cook on a hot grill, turning often until golden brown and cooked through, approx 10 minutes.

Sauce

1 tbs oil
½ tsp cumin seeds
1 large onion
2 large ripe tomatoes
½ bunch fresh coriander, roughly chopped
salt to taste

Blitz the onion and tomato in a blender until smooth. Heat oil in a large frying pan, add the cumin seeds and cook for a few minutes until fragrant. Add the onion and tomato mixture along with the remaining marinade and mix well. Bring to the boil then cover, reduce the heat to low and simmer for around 15 minutes. Season to taste. Toss through the cooked chicken pieces and coriander and serve with parathas.

Serves 6.


Ginger & Garlic Paste
Recipe from Hub UK

115g fresh ginger, peeled and roughly chopped
115g garlic cloves

In a food processor blend the ginger and garlic to form a smooth paste, adding a little cold water or oil if necessary. Store in the fridge for up to 2 weeks in a glass container. Makes approximately 100ml.


Garlic Chives and Mozzarella Paratha
Recipe adapted from Enriching Your Kid

1 bunch garlic chives, finely chopped
½ cup grated mozzarella
1 cup wholemeal flour
1 cup plain flour
2 tbs olive oil
1 tsp cumin
1 tsp tumeric
½ tsp chilli powder
½ tsp asafoetida (I used 2 ts ginger-garlic paste instead)
1 ts salt
Approx 1/3 cup water

Mix all the ingredients in a large bowl and add enough water to create a dough. Leave to rest for 30 minutes.

Divide the dough into 8 equal portions and roll each portion out into a round, approx 15 cm across. Brush each side with oil and fry in a hot pan on both sides until crisp and golden brown. Serve hot.
Makes 8.


Secret Recipe Club

 
Related Posts Plugin for WordPress, Blogger...