Showing posts with label Cookies. Show all posts

Friday, February 2, 2018

Jam Drops (free from Gluten, Dairy, Nuts and Refined Sugar)


raspberry and coconut jam drop cookies - free from gluten, nuts, dairy and refined sugar - from www.mywholefoodfamily.com

Do you have a picky eater?

I feel your pain.

My picky eater has recently gone from picky to downright ridiculous and we are left with very few foods that he finds acceptable.

He's started rejecting a few favourite recipes that I have healthified so for these, I kept it really simple.

A 'white' dough with homemade raspberry jam (that I blitzed the chia seeds for by the way so they wouldn't get spotted and rejected). The things we do!

These freeze beautifully and being nut-free they are perfect for school lunches or a quick after-school treat.

I hope your kids enjoy them as much as mine!

raspberry and coconut jam drop cookies - free from gluten, nuts, dairy and refined sugar - from www.mywholefoodfamily.com

Jam Drops
Free from gluten, dairy, nuts and refined sugar

2 cups gluten-free flour (I used Orgran brand)
1/2 cup desiccated coconut
1 ts gluten-free baking powder
pinch salt
1/3 cup rice malt syrup
1/3 cup + 1 tbs coconut oil
1 ts vanilla paste
1 egg

Jam to top (I adapted my strawberry chia jam recipe found here - note that I blitzed 1/2 cup chia seeds in the Thermomix first to make a powder and used some of that to make the jam)

Preheat oven to 180 degrees C. Line 2 baking trays with baking paper and set aside.

In a medium bowl, stir together the flour, coconut, baking powder and salt. Add all remaining ingredients (except jam) and mix until well combined. You should have a stiff dough that can be easily rolled into balls.

Roll spoonfuls of mixture into balls and place on the prepared tray (I got 20 from this batch). Use your thumb or the end of a wooden spoon to make an indent for the jam.

Place a small amount of jam on each biscuit, 1/2 ts or so.

Bake for 15 minutes or until golden brown. I rotated the trays halfway through.

All to cool on the tray for 5 minutes before placing on a wire rack to cool completely.

Makes approx 20

Jam drops are such a nostalgic treat for me. And these ones even more so because they remind of an Iced Vovo which I loved as a child! What's your favourite childhood bikkie? xx


Tuesday, November 21, 2017

Chocolate Peanut Butter Cookies

gluten free - dairy free - sugar free - chocolate peanut butter cookies - www.mywholefoodfamily.com

Hello dear reader!

I'm back and with a delightfully simple and seriously delicious recipe to share.

As we approach the end of the term, the kids have been really running out of energy. Tempers are short and patience even shorter.

I've learnt that the best way to guarantee a peaceful time after school is to feed them well the INSTANT they walk in the door.

Such a cliche but a few of these cookies and a glass of milk (1 x cows milk, 1 x rice milk, 1 x coconut milk) and there were 3 happy little campers.

I made these yesterday and saved a couple for myself to have today, and I'm so glad I did because they were even better today! More flavour and better texture. When they're fresh they are verrrry soft and likely to fall apart. Next day, they have a good bite to them and are absolutely perfect with a cup of tea.

I've been doing a bit of experimentation with xylitol as a sweetener lately and so far I'm really impressed. Most peanut butter cookies call for equal amounts of peanut butter and sugar, which would be WAY too sweet for us. Even the 1/2 cup of xylitol was a little much and I would cut it back to 1/3 or even 1/4 cup next time.

Xylitol is a sugar alcohol made from birch with a low GI. As with all sweeteners, I use it sparingly and rotate between different types so we are not having the same thing all the time.

If you have dogs, I would suggest using an alternative sweetener as it is DEADLY for them and you wouldn't want to risk your fur-babies eating the crumbs of these cookies.

Chocolate Peanut Butter Cookies

1 cup natural peanut butter
1/2 cup xylitol
1 heaped tbs raw cacao
1 egg
1/2 ts salt
3/4 ts bicarb soda

Mix together until well combined. Roll teaspoons of mixture into balls and place on a baking tray.

Flatten the tops with a fork and bake for 10 minutes, rotating the trays halfway.

Makes 24

Have you tried xylitol? What's your favourite non-refined sugar sweetener? xx

Monday, July 18, 2016

Coconut Oil and Sea Salt Brownie Cookies (SRC)


And just like that it's Secret Recipe Club time again! Each month members are assigned a blog in secret to peruse and choose a recipe from, then we all reveal our posts at the same time. It's a lot of fun and I always look forward to reveal day.

This has been an interesting month for me, in terms of food, as I have decided to cut out gluten for at least 4 weeks to see if it helps my energy levels and thyroid symptoms. After just the first few days I noticed my brain-fog lifting and I'm nowhere near as tired as I have been, so it seems like the experiment is working. On the one hand, yay! On the other hand, no more decent bread?? :(

Anyway, being temporarily gluten-free meant I had to look more closely at the recipes on my chosen blog for the month, which is Our Table for Seven by Erin.

As you can tell by the name of her blog, Erin has a lot of mouths to feed! Erin says she only really got into cooking and baking when her eldest son developed some picky eating habits and she wanted to make the foods he would eat a bit healthier. Erin, I hear you! I have the same issues with my Mr 5.

I decided I wanted something sweet and simple this month and found loads of recipes to choose from that I could easily adapt to gluten and dairy free. Like this Flourless Chocolate Cake that looks so rich and decadent, these Walnut and Maple Syrup muffins and this Simple Homemade Caramel Corn which I am planning on taking to a Christmas in July party next weekend!

But when I saw these 
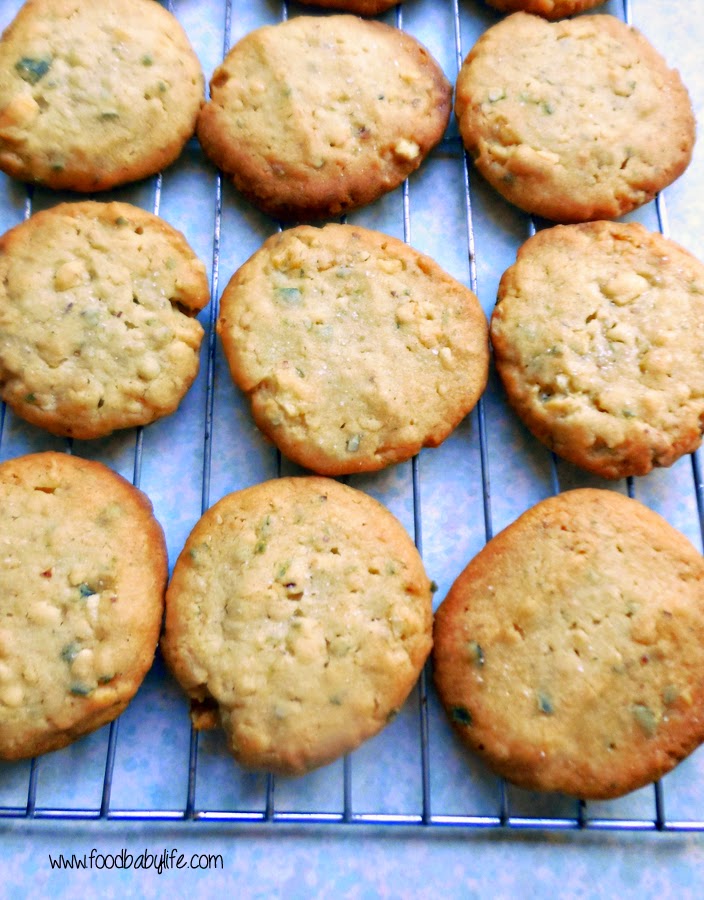
Coconut Oil and Sea Salt Brownie Cookies the search was over. We love our coconut oil in this house (in fact we love it so much I buy it in huge 5kg tubs!). It tastes amazing and it's a brilliant substitute for butter in baking.

So these cookies were in a word, AMAZING. The mixture was so rich and chocolatey and I couldn't stop sneaking little tastes as it rested in the fridge. Once they came out of the oven my boys were hovering and couldn't wait to try them. They were fascinated by the salt on top (which according to Heston Blumenthal helps balance out the bitterness in dark chocolate in case you were wondering).

I made very minor changes to the recipe, swapping out the flour for gluten free varieties, reducing the sugar slightly and using chopped dark chocolate instead of chocolate chips.


I've only included the Thermomix instructions here but it can easily be converted to stove top (you really just need to melt the coconut oil in a saucepan then mix everything else together) or just check the original recipe for Erin's instructions.

Coconut Oil and Sea Salt Brownie Cookies
Gluten and Dairy free
Adapted from Our Table for Seven

1/2 cup (100g) coconut oil
2/3 cup (130g) coconut sugar
3/4 cup (120g) buckwheat flour
1/4 cup (40g) gluten-free plain flour
3/4 cup (80g) raw cacao powder
1 ts vanilla extract
2 eggs
1/2 ts sea salt (plus extra for sprinkling on top)
1 ts bicarb soda (baking soda)
1 tbs very hot water
150g dairy-free dark chocolate, roughly chopped (I used Lindt 85%)
 
Preheat oven to 180 degrees Celsius. Line 2 baking trays with baking paper and set aside.

Melt the coconut oil (TMX 2 minutes / 50 degrees / SP 2). Add the coconut sugar and beat for 20 seconds / SP 4. Add the eggs and vanilla and beat again for 20 seconds / SP 4. Mix the bicarb soda and hot water together and add to the mixture (4 secs / SP ).

In a small bowl whisk together the flours, cacao and salt.

Add to the egg mixture and mix for 10 seconds / SP 4.

Add the chopped chocolate and mix for 6 secs / REVERSE / SP 3.

Place the bowl into the fridge for 15 minutes to allow the mixture to firm up.

Roll spoonfuls of mixture into balls and place on the prepared trays. Flatten the tops very slightly then sprinkle with extra salt.

Bake for 10 minutes.

Leave on the trays to cool for 5 minutes before carefully placing them on a wire rack to cool completely.

Makes 24


Thank you for a wonderful month, Erin! I so enjoyed getting to know you and your family :)

Tuesday, March 22, 2016

My Spelt, Cranberry and Oat Cookies (Thermomix)

Spelt Cranberry and Oat Cookies for Thermomix from www.mywholefoodfamily.com

I'm never quite sure where I stand in the cookies v biscuit debate. Being Australian I have always called them biscuits but now cookies seems to be more universally accepted. Especially if they have chocolate chips, or in this case cranberries.

Lately I've been baking up a storm but it's been weeks since I made any cookies. If you've been following me on Facebook you will have seen loaf after loaf of bread and several batches of hot cross buns recently and not much else!

Ever since I bought the Well Nourished Lunchbox (not an affiliate link - I'm just a huge fan), my go-to take-a-plate dish has been Georgia's Gruffalo Crumble Cake which is a banana cake with a spiced crumble topping. I encourage you to check out the book if you haven't already because this cake is a standout and I've had rave reviews from kids and adults alike for everything I've made from it. However we were completely out of bananas so instead I thought I would whip up some cookies to take to a play date last week.

Spelt Cranberry and Oat Cookies Thermomix from www.mywholefoodfamily.com

The cookies were delightful. Tender, buttery and studded with tart and chewy cranberries. They are not overly sweet (which I liked) but if you are used to sweet things you could add a few tablespoons of your preferred sweetener. If you have coconut sugar it's caramel notes would work perfectly.

Spelt Cranberry and Oat Cookies Thermomix from www.mywholefoodfamily.com

Spelt Cranberry and Oat Cookies (Thermomix)

120g butter, at room temperature
60g rice malt syrup
1 egg
1 ts vanilla extract
60g rolled oats
150g wholemeal spelt flour
100g dried cranberries
1/2 ts bicarb soda

Preheat oven to 170 degrees Celsius / 150 degrees fan-forced. Line 2 trays with baking paper.

Place butter, syrup and vanilla into bowl and beat 10 secs / SP 5. Add all other ingredients (except cranberries) and mix for 10 secs / SP 4. Add cranberries and mix for 10 secs / SP 2 / REVERSE.

Place spoonfuls of mixture onto prepared tray leaving room to spread.

Bake for 10 minutes or until golden brown. Leave to cool on the trays for 10 minutes before turning out onto wire racks to cool completely. They will firm up as they cool.

Makes 18

I think this will become a regular on our rotation as it is just so easy and also very adaptable. Use sultanas and add a teaspoon of cinnamon instead of the vanilla or add chocolate chips instead of fruit for a wholefood choc chip cookie. Yum.

Do you have a dish you are famous for? Or do you panic when asked to bring a plate?

Monday, October 26, 2015

Pumpkin Spice Peanut Butter Cookies (SRC)


Pumpkin Spice Peanut Butter Cookies © www.foodbabylife.com 

The last month has been really busy around here. We're 2 weeks into the term and still feel a bit all over the place and not back into our usual routine. My recipe choice for this month's Secret Recipe Club is perhaps indicative of my state of mind at the moment. Here Spring has arrived with a vengeance - the weather has warmed up and the jacarandas are in full bloom - but I'm still making soups and stews and feeling like hibernating. I think it's the stress and busy-ness of moving house that has finally caught up with me!

So when I was assigned Palatable Pastime by Sue for SRC this month it wasn't her amazing array of salads like Apple-Fennel Salad with Almonds that I was drawn to, it was heartier fare like Corned Beef Hash and Rustic Tortellini Soup. As usual though I needed an idea for an after school snack so I started looking for something sweet and ended up making 2 related recipes.

Pumpkin really hasn't caught on here in Australia as an ingredient for sweet dishes. You will never find canned pumpkin or pumpkin pie spice on the shelves. I decided to finally remedy that and make my first batch of pumpkin pie spice to enjoy whenever I like.

Pumpkin Pie Spice © www.foodbabylife.com

Pumpkin Pie Spice
Recipe from Palatable Pastime

1/2 cup cinnamon
5 tbs ginger
1 tbs nutmeg
2 ts allspice
2 ts ground cloves

Makes 1 cup (I plan on using lots of this over the coming months but Sue's post also gives instructions for smaller quantities as well).

And what to make with this fabulous blend of spices? I couldn't go past Sue's Pumpkin Spice Peanut Butter Cookies (yep I definitely have a bit of a peanut butter obsession but lucky my kids do too!)

Whether you have access to canned pumpkin puree or not, it is so, so easy to make your own. Simple steam or bake some pumpkin, throw it in a blender or food process and puree until smooth. That's it!

how to make pumpkin puree © www.foodbabylife.com

Pumpkin Spice Peanut Butter Cookies
Adapted from Palatable Pastime

60g softened butter
1/2 cup coconut sugar
1/4 cup pumpkin puree
1/2 cup natural peanut butter
1 tbs pumpkin pie spice
1 large egg
1 1/2 cups white spelt flour
1/2 ts sea salt

Preheat oven to 180 degrees Celsius.  Line 2 trays with baking paper.

In a large bowl, beat together the butter and sugar until well combined. Add the egg and beat well.

Add the pumpkin puree, peanut butter, salt and spice and mix until well combined.

Next fold through the flour to form a thick and sticky dough.

Roll tablespoons of dough into balls and place on the prepared trays.

Dip a fork into some extra coconut sugar and press the cookies flat with a criss-cross pattern.

Bake for approximately 12 minutes or until golden brown.

Cool on the tray for a few minutes then place on a wire rack to cool completely.

Makes 24 cookies.

Thanks for 2 great recipes Sue! My kids and I LOVED these crispy edged-chewy middle cookies and I am such a fan of the pumpkin pie spice.

Monday, September 28, 2015

Apple Pie Cookies (SRC)


Apple Pie Cookies  © www.foodbabylife.com

What a month it's been! We moved into our new house exactly 2 weeks ago and while we still have a few boxes around, it's feeling more and more like home. I love our new oven and induction cooktop but as we don't have an induction suitable frypan it has made cooking dinner a little challenging.

But today of course is all about the Secret Recipe Club, a dedicated band of bloggers who are assigned a blog each month to secretly peruse and cook from, with everyone posting their recipes on the same day. Today is reveal day for group D.

This month I was assigned The Spiffy Cookie by Erin. In a funny coincidence she had my blog just last month! Erin has a PhD in microbiology (just like my husband), loves the combination of peanut butter and chocolate and her favourite meal is dessert.  I know I say it every time but I was really spoilt for choice when it came to recipes.

Erin recently did a round-up of her top 10 peanut butter and chocolate recipes which included a Dark Chocolate Peanut Butter Cup Cake that had me drooling over the computer!

Her Steel Cut Oatmeal with Bananas and Cobbler Topping looks like just the thing to pimp up our regular porridge and her Spiced Pear Smoothie sounds delicious. To round out breakfast how about baked eggs with a crispy hash brown crust?

We had most of a box of apples to use up though so I started searching for apple recipes and came up with some beauties like Homemade Apple Jelly, Apple Walnut Pancakes and just last week this Apple Pecan Praline Bread. One that really jumped out at me though were these Apple Pie Cookies which were just so cute! All the best bits of apple pie but in cookie form which I knew my kids would love. Genius right?!

I played around with a few ingredients to suit our dietary requirements but I think these are pretty close to the original and they were AMAZING. Apple pie is one of my favourite things but I don't tend to make it very often. These little cookies had all the same flavours and were exactly like mini apple pies. The recipe made 24 and they were gone in a day. As you can tell it was very hard to stop at just one!

Apple Pie Cookies  © www.foodbabylife.com

Apple Pie Cookies
Adapted from Dorothy Kern's Dessert Mashups via The Spiffy Cookie

Base:
100 g butter, at room temperature
1/2 cup ground almonds
1 cup spelt flour
1 egg
2 tbs coconut sugar
1 ts vanilla extract

Filling:
5 granny smith apples (peeled, cored and finely diced)
1/3 cup water
1 ts cinnamon
1/4 ts ground cloves
1 tbs coconut sugar
1 tbs spelt flour

In a large bowl cream together the butter and coconut sugar, then add the egg and vanilla and mix well. Fold through the flour and almond meal until incorporated into a thick dough. Spoon the mixture onto plastic wrap, wrap well and place in the fridge for 30 minutes.

Meanwhile prepare the apples. Peel, core and finely dice the apples. Place in a medium pan with 1/3 cup water and the spices and cook over low-medium heat until just tender. Drain and place into a heat proof bowl. Sprinkle over the coconut sugar and flour and mix well.

Preheat the oven to 180 degrees Celsius / 350 degrees Fahrenheit. Grease 2 x 12 hole mini muffin pans.

Place a tablespoon of dough into each muffin hole and press over the base and sides creating an indent for the filling. Spoon a teaspoon of apple filling into each cookie.

Bake for approximately 10 minutes or until golden brown. Leave to cool in the tin for 10 minutes before turning out and dusting with icing sugar. Delicious warm from the oven.

Makes 24 cookies

Thanks for a great month Erin! :)

Wednesday, September 2, 2015

Chocolate Chunk Cookies

Spelt Chocolate Chunk Cookies © www.foodbabylife.com

Well the house is officially ours!!! We picked up the keys this afternoon and the boys were thrilled with the big yellow bow tied on the front door.  So now it all begins in earnest. We have trades booked to start sanding and polishing the floors upstairs first thing in the morning as well as measuring the stairs for new carpet. So much to do and so little time! Moving day is Monday 14th so we are officially on a countdown now.

I knew this afternoon would be a whirlwind so I took the time this morning to make something easy and delicious for afternoon tea. These are easily the best cookies I've made for ages. The rice flour gives them a little shortbready crunch and the big chunks of chocolate are a great surprise. SO tasty and they were mixed, baked and ready to eat within 30 minutes.

I guarantee you'll have happy little campers if you make these for afternoon tea!!

Chocolate Chunk Cookies

1 1/4 cups wholemeal spelt flour
1/4 cup rice flour
1/4 cup flaxseed meal
1/2 ts bicarb soda
1/4 ts salt
4 tbs rice malt syrup
4 tbs coconut oil, melted
1 ts vanilla extract
50g dark chocolate (Lindt 70% is good for this), roughly chopped

Preheat oven to 170 degrees celsius. Line  baking tray with baking paper and set aside.

Mix all ingredients together in a large bowl. Roll into walnut-sized balls and place on the prepared tray.

TMX - place all ingredients except chocolate in mixing bowl and mix for 10 secs / SP 4. Add the chocolate and mix on reverse / 6 secs / SP 3.

Bake for 10-12 minutes. They will still be soft but will firm up once they cool to become crunchy around the edges and chewy in the middle, just the way I like them!

Makes approx 16.

Monday, August 17, 2015

Gluten-free Orange Shortbread Cookies

gluten free orange shortbread cookies © www.foodbabylife.com

With citrus so abundant and so delicious at the moment I've been looking for different ways to use it. One of my favourite things is a whole orange and almond cake which I've been meaning to blog about for ages. Today though I felt like making biscuits and came up with these little gems.

I've been doing lots of experimenting with different flours for baking lately and while none of us have coeliac, I know I at least feel so much better when I limit the amount of gluten that I eat. You can buy some great gluten free flours these days but I prefer to make my own as it lets me choose the recipe that best suits what I am baking.

My top 2 gluten free flour recipes are from The Holistic Ingredient and Gluten-free-Girl.

For these shortbread cookies I used the Gluten-free-Girl recipe which gives a light, crisp and slightly crumbly result, perfect for shortbread. This one doesn't contain xanthan gum so I added a tablespoon of linseed meal which has similar properties.

You will notice there is a lot (a LOT) of butter in these cookies and as you mix them up you will probably see butter beginning to ooze out of the mixture. When I first made them I wondered whether I'd made a huge mistake but actually the end result is amazing and there is no extra butter to be seen - just perfect little shortbread cookies which are crisp, short and crumbly and beautifully fragrant from the orange zest. The house smelt spectacular while they were baking and made for a delicious afternoon snack with a cup of ginger tea.

Whether you need to be gluten free or not, with treats like these you certainly won't feel like you are missing out!

Gluten free Orange Shortbread Cookies

2 1/4 cups gluten-free plain flour
1 tbs linseed meal
1 ts baking powder
1/2 cup coconut sugar
zest of 1 large orange
1 ts vanilla extract
250g salted butter, melted and cooled
1 egg

Preheat the oven to 170 degrees Celsius. Line 2 trays with baking paper and set aside.

Place the dry ingredients into a large bowl and add the orange zest. Use your fingers to rub the zest into the flour mix until well combined. Add the wet ingredients and mix well.

Roll into small balls and place on the prepared trays. They don't spread very much so they can be placed quite closely together.

Bake at 170 degrees Celsius for approx 12 minutes. They will be golden brown and firm to touch. Leave to cool on the trays for 5 minutes before placing on wire racks to cool completely.

Makes approximately 30 cookies.


Thursday, May 21, 2015

Chocolate Chickpea Biscuits

Chocolate Chickpea Cookies - free from gluten, dairy and fructose - from www.mywholefoodfamily.c

I know they don't look like much but these Chocolate Chickpea Biscuits are one of the best things I've baked in ages. Seriously! I've made a Magic Bean Chocolate Cake before which we all loved and these biscuits are just as good with their fudgy chocolate middles surrounded by raggedy, crinkly, crispy edges that make it incredibly hard to stop at 1 (or 2).

My kids are always ravenous at the end of the day and afternoon tea often turns into one big grazing session (and yes they still eat a big dinner!). We had an after school function to go to the day I made these so I packed them up and hoped it would be enough to keep them going until we got home. Well, they each ate 3 biscuits and were set. They absolutely loved them but 3 was enough and I didn't get a single 'I'm hungry' the whole afternoon! The chickpeas and oats in these are packed with protein and fibre and they are really satisfying. Next time I will be doubling the recipe and stashing some in the freezer. 

Even straight from the oven there was absolutely no discernible taste or smell of the chickpeas so if you've been on the fence about the whole beans-in-cakes thing give these a go!

Chocolate Chickpea Biscuits - Gluten, Dairy and Fructose Free
Recipe adapted from The Road to Loving My Thermomixer

45g quinoa flakes
80g rice malt syrup*
zest of 1 orange (optional but delicious!) 
400g tin chickpeas
40g raw cacao powder
1 ts vanilla extract
1 ts gluten-free baking powder
100g coconut oil

Preheat oven to 180 degrees C / 160 degrees fan-forced. Line 2 trays with baking paper and set aside.

Place quinoa flakes into a food processor and blitz for 20 seconds (TMX 20 secs / SP 7). Add all remaining ingredients and process for 30 seconds (TMX 30 secs / SP 5).

Dollop small spoonfuls of mixture onto the prepared trays, allowing some room to spread, and flatten slightly (I often forget to do this).

Bake for 15 minutes. Remove from the oven and allow to cool for 5 minutes before placing the biscuits on a wire rack to cool completely (or not, they are absolutely delicious warm from the oven!).

* Using RMS is what makes these fructose free but they are definitely not as sweet as the original - if you're not worried about fructose you could use raw honey instead or half-and-half. 

Makes approx 20

Saturday, January 10, 2015

Grain-free Oatmeal Raisin Cookies

Grain-free oatmeal raisin cookies © www.foodbabylife.com 

If you're anything like me you have tons of recipes marked to try - ripped out of magazines, bookmarked, pinned or printed out. I had been meaning to make these little bites of awesomeness from Against All Grain for ages and you should definitely follow Danielle on Facebook if you don't already!

We devoured this batch in record time. They were sweet, spicy, chewy and delicious. Exactly what you expect from an oatmeal raisin cookie and even the most hardened gluten addict (I'm looking at my husband here) wouldn't miss the grain. I've had problems with my coconut oil based cookies spreading lately so even though the recipe said to press them down I only gave them the teeniest little press with my fingers and of course they didn't spread at all! So we have been calling them oatmeal raisin balls and pretending that's how they are supposed to be.

I will be making 2 batches of these as part of my back to school baking over the next couple of weeks and stashing them straight in the freezer ready for lunchbox treats and after school snacks.

Grain-free oatmeal raisin cookies © www.foodbabylife.com

These were so SO good and I'm wishing I had one (or 3) right now!

Grain-free Oatmeal Raisin Cookies
Adapted from Against All Grain

1/4 cup coconut oil, liquid
3 tbs honey or maple syrup
1 ts vanilla extract
1 large egg, at room temperature
1 tbs mixed spice (or 4 ts cinnamon plus 3/4 ts nutmeg)
1 cup almond meal
2 tbs coconut flour
1/2 ts bicarb soda
1/4 ts sea salt
2 ts chia seeds
3/4 cup desiccated coconut
1/2 cup raisins

Preheat the oven to 180 degrees celsius / 160 degrees fan-forced / 350 degrees fahrenheit. Line 2 trays with baking paper and set aside.

In a small bowl mix the coconut oil, honey, egg and vanilla together until well combined.

In a large bowl mix together the spice, flours, bicarb soda, salt, chia seeds and coconut.

Add the wet ingredients into the dry ingredients and stir together until just combined.

Fold through the raisins.

Roll golf ball sized balls of dough and place on the prepared trays, making 16 cookies. Press down lightly on each cookie with your palm or the bottom of a glass.

Bake for 9-10 minutes or until golden brown.

Remove from the oven and cool for 5 minutes on the trays before turning out onto a wire rack to cool completely.

Makes 16.

Monday, December 15, 2014

Long Winter Molasses Cookies (SRC Cookie Carnival)

Long Winter Molasses Cookies © www.foodbabylife.com

It's December so there is no Secret Recipe Club post for Group D but instead it's Cookie Carnival time! Members from all 4 groups have volunteered to do a cookie post today. I think this is the first time we have done this (certainly it's the first time I have participated) and I was so excited to find a new cookie recipe.

Christmas wouldn't be Christmas without cookies. Over the years I've made dozens of different types to give as gifts, to share when friends and family drop around and just to have something special in the cookie jar.

I was assigned Cheese Curd in Paradise by Ashley. Ashley lives in Green Bay, has a 2 year old son and is a serious Packers fan (and yes even here in Australia I have heard of the Green Bay Packers!). I actually did the final semester of my law degree at Marquette University in Milwaukee so am quite familiar with that part of the world.

Ashley has some amazing looking recipes including a Crispy Parmesan Chicken with Lemon Hollandaise which had my mouth watering and she even won a prize for her Brat and Beer Mac and Cheese in a tailgating recipe contest! - although it does always make me giggle because here tailgating is when you drive too close behind the car in front of you and they don't give prizes for that :)

BUT this is all about the cookies and when I saw her Long Winter Molasses Cookies I was sold. Even though it is stinking hot here at Christmas time these cookies are so Christmassy it doesn't matter whether it is summer or winter! They are packed with spices like cinnamon, nutmeg, ginger and cloves (I added a few extra to the original recipe) and flavoured with rich, dark molasses. My boys went nuts for these and kept asking for 'more gingerbread!' I made 2 batches and each disappeared in record time.

'Santa' has already put in a request for a plateful of these to be left out with a glass of milk on Christmas Eve and I am more than happy to oblige.

Thanks for a great recipe Ashley, and Merry Christmas to all my fellow SRC members!

Long Winter Molasses Cookies
Adapted from Cheese Curd in Paradise

2 cups plain flour
1 egg
1/4 cup molasses
1 ts cinnamon
1 ts ground ginger
1/8 ts ground cloves
1/4 ts nutmeg
1/4 ts ground white pepper
1/2 tsp salt
1 cup white sugar
2 tsp bicarb soda
170 grams melted butter

In a medium sized bowl, whisk together the flour,spices, baking soda and salt and then set aside.

In a large bowl, mix together the melted butter, sugar, egg and molasses until well combined. Add the prepared dry ingredients to wet and stir to form a sticky dough.

Wrap the dough in greaseproof paper and chill in the fridge for at least 1 hour.

Preheat oven to 190 degrees Celsius / 170 degrees fan-forced / 375 Fahrenheit and line 2 trays with baking paper.

Roll out the dough on a floured surface and cut into cookies of whatever shape you like.

Bake for 8 minutes and leave to cool on the tray for 5 minutes before turning out onto a wire rack to cool completely. Try not to eat them all at once.


Thursday, November 20, 2014

Sweet and Salty Potato Chip Cookies


I am a sucker for the combination of sweet and salty, be it popcorn, pastry or salted caramel. When I saw these pop up on Laws of the Kitchen and I happened to have half a bag of potato chips sitting in the pantry their fate was sealed!

The little green pieces in my cookies are actually pumpkin seeds. I didn't have enough of any one type of nuts to make up the 1/2 cup needed for the recipe but I did have a bag of Lucky Smart Snax Recovery which has oven roasted peanuts, almonds, cashews and pepitas. It was perfect for these cookies and using a mixture of nuts made them especially tasty.

My cookies were no where near as chunky looking as the original so I think I overprocessed the nuts and chips but they were still packed with crunchy bits and were deliciously sweet and salty. They were a real hit with the kids and they disappeared in record time. Sorry for the blurry photo, I think someone's little sticky fingers have been playing with my camera!

Oh and there's only 1 day left to win the #luckysmartsnax hamper so if you're an Australian resident and want to win some nuts visit my post here to enter!

Sweet and Salt Potato Chip Cookies
Adapted from The Caker via Laws of the Kitchen

225g butter
1 cup dextrose (or 100g sugar)
1/2 cup nuts, finely chopped
250g plain flour
1/2 cup crushed salty potato chips
1 ts vanilla extract

Preheat oven to 180 degrees celsius. Line 2 baking trays with baking paper and set aside.

In a stand mixer cream together the butter and sugar until smooth and pale. Add the vanilla and beat to combine. Fold in the flour and when mostly combined add the nuts and potato chips and stir until well mixed through.

Roll the dough into balls and place on the prepared trays. Flatten with the bottom of a glass or your palm.

Bake for approximately 15 minutes or until just golden brown around the edges. Remove from the oven and allow to cool on the tray for 5 minutes before turning out onto a wire rack to cool completely.

Makes 24.


Monday, October 27, 2014

5 Ingredient Flourless Peanut Butter Cookies (Secret Recipe Club)

5 Ingredient Gluten Free Flourless Peanut Butter Cookies © www.foodbabylife.com

It's Secret Recipe Club time! Each month SRC members are assigned another member's blog in secret to peruse and choose a recipe to make, photograph and blog about. Reveal day is seriously one of my favourite days!

This month I was assigned Shockingly Delicious by Dorothy and let me tell you I spent many happy hours perusing her blog (when I should have been studying!). Dorothy has 25 years of food writing and recipe development experience and it really shows. Her blog is full of scrumptious 'scary good' food and is beautifully written. I thought I had a lot of cookbooks but Dorothy has more than 400!

There were quite a few recipes which caught my eye. I will definitely be surprising my kids with her Strawberry-Citrus Frappe after school one day soon, and I can't wait to try the Breakfast Banana Chocolate Chip Bread Pudding with Leftover Panettone after Christmas (it might take me until then to perfect a dairy-free version of that one!).

But after all that I really couldn't go past these peanut butter cookies. I already have 2 recipes for peanut butter cookies here but neither of them are as simple as this one, and that's exactly what I'm after these days. With only 5 ingredients and no flour or dairy these fit the bill perfectly. I've made 2 batches this month, one with peanut butter and one with almond butter and both were gobbled up in record time.

I used natural peanut butter so added 1/2 teaspoon of salt to the batter.

5 Ingredient Gluten Free Flourless Peanut Butter Cookies
Adapted from Shockingly Delicious

1 egg
1 cup peanut butter
1 cup sugar (I used dextrose)
1 ts vanilla extract
1/2 ts bicarbonate of soda (baking soda)

Preheat the oven to 180 degrees Celsius and line 2 baking trays with baking paper.

In a food processor or large bowl with electric beater, beat all ingredients together until smooth, about 1 minute.Scoop out teaspoons of mixture, roll into balls and place on prepared trays. Flatten with a a fork.

Bake for 10-11 minutes. They will be just golden brown around the edges. Remove from the oven and allow to cool on the trays for 5 minutes before turning out onto a wire rack to cool completely.

Try to stop at just one. 

Dorothy got 32 from this recipe but I got just 22.


http://secret-recipe-club.blogspot.com.au/


Tuesday, January 28, 2014

Starting School and Sultana Oat Biscuits

Sultana Oat Biscuits © www.foodbabylife.com
Today is a big day in our family as our eldest is starting school! While this year is called different things around the country here in Queensland this first year of school is called prep and is for kids who will turn 5 by the 30th of June.

Whatever you call it, it is the end of an era for us and the start of a new exciting chapter for Oscar!

We have been preparing for months getting school uniforms bought, washed and labelled, school books covered and the all-important lunch box chosen. After much deliberation I went with a medium size Fridge to Go lunch bag, a stainless steel lunchbots trio container and a 4 My Earth sandwich wrap and snack pocket. I bought all of these on Lime Tree Kids (my favourite online kids store) but they are available at other places. All of these should last him for years and I'm happy to be moving away from plastic to more environmentally friendly products.

At Oscar's school they eat 3 times in first term then twice a day after that. This means we need to send a piece of fruit for mini munch, lunch and a snack. For this first week I thought a yummy cookie would be perfect for his afternoon snack as it only has to keep him going for the hour or so until he gets home and I can bake and freeze ahead of time.

I came up with these Sultana Oat Biscuits using ingredients I had in the pantry. While I am baking without wheat and dairy most of the time these days, Oscar doesn't have any allergies and these are sugar free, contain wholemeal flour and will give him a good energy hit from the sultanas.

Good luck to all the preppies and their mums/dads today!

Sultana Oat Biscuits
Recipe by me

125g butter, softened
1 tbs stevia (I used Natvia)
1 ts vanilla extract
1 egg
1/2 cup wholemeal plain flour
1/2 cup plain flour
1 cup rolled oats
1 ts baking powder
pinch salt
1/2 cup dessicated coconut
1/2 cup sultanas

Preheat the oven to 180 degrees Celsius. Line 2 baking trays with baking paper and set aside.

Cream the butter and stevia together until pale, add the vanilla and egg and beat until thick and smooth. Fold through the dry ingredients until well combined. Roll spoonfuls of dough into 16 balls and place on 2 trays. Flatten each ball with damp fingers.

Bake for approx 10-12 minutes or until golden brown. They will be soft at first but will firm up when cool.

Saturday, July 27, 2013

Sprinkles Biscuits

Sprinkles Biscuits Stack © www.foodbabylife.com
This is second of the yummy goodies I made for a cake stall at Oscar's kindy this weekend. You can see the Triple Chocolate Brownies here.

To me these biscuits/cookies just scream childhood. I mean, what kid doesn't love sprinkles??

These hundreds & thousands contained no artificial colours or flavours, and this is something I cam starting to notice more and more. Such a good thing although I know some kids (and adults) do react to natural colours and flavours as well.

I adapted the recipe for these beauties from Averie Cooks. Hers were for Chewy Sprinkles Cookies. They were much smaller and baked for less time so they come out of the oven very blond. However, my perfect biscuit is crispy on the outside and chewy in the middle so that's how I made them. I love the golden brown colour and their sweet buttery aroma was incredible.

I think I showed great restraint not tasting even one of these, but I gave one to my littlest taste tester Charlie and he gave it a huge thumbs up.

Why not make these this weekend? You won't be disappointed!

 
Sprinkles Biscuits
Makes 18 large biscuits/cookies
Adapted from Averie Cooks

250g unsalted butter
1 cup white sugar
1 tbs dark brown sugar, packed
1 large egg at room temperature
2 ts vanilla extract
2 cups plain flour
1/2 ts baking powder
1/4 teaspoon salt
1/2 cup hundreds & thousands (plus 1/2 cup extra to decorate, optional)

Place the flour, salt and baking powder in a medium bowl and whisk together to combine. Set aside.

In a stand mixer or large bowl using a hand mixer, cream together the butter and sugars at medium-high speed until light and fluffy. Stop and scrape down the sides of the bowl and add the egg and vanilla. Beat for 30 seconds, until just combined.

Switch to a spatula and fold through the flour and sprinkles until just combined. Wrap the dough in plastic wrap and refrigerate for at least 2 hours (or up to 5 days) before baking.

Preheat oven to 180 degrees C / 160 degrees fan-forced. Line 3 baking sheets with baking paper and set aside.

Divide the dough into 18 balls (my batch of dough weighed 968g so I got 18 x 54g pieces from the batch). Roll each ball in the extra sprinkles and place on the prepared trays, 6 per tray leaving plenty of room for spreading. Use your hand or lightly grease the bottom of a glass to flatten each ball to about 1cm thick.

Depending on your oven size you can bake these all at once or in batches. I did 1 tray at a time, with the remaining trays waiting in the fridge.

Bake for 12 minutes, rotating the trays halfway. They will be just golden brown around the edges and pale golden in the middle. Remove and allow to cool on the tray for at least 5 minutes before carefully lifting them onto a wire rack to cool completely. They will firm up as they cool.

Store the biscuits in an airtight container at room temperature for up to 5 days or in the freezer for up to 3 months. You can also store unbaked cookie dough in an airtight container or plastic wrap in the fridge for up to 5 days before baking.


Tuesday, March 19, 2013

BWJ - Mocha Chocolate Chips

Mocha Chocolate Chips © www.foodbabylife.com
They may not be the prettiest things but they were pretty tasty!

I made just a 1/4 batch of these Mocha Chocolate Chips because I don't need 4 dozen chocolate anythings hanging around here. I also left out the apricots as that just seemed a little odd.

Most of the batch was frozen and it was great I could eat them straight from the freezer as they didn't go rock hard.

So that's about it! Probably wouldn't make them again but they did disappear pretty quickly which is always a good sign.

Our host this week is Peggy of Galettista and you will find the recipe there.


Thursday, February 7, 2013

Carrot Cake Cookies

Carrot and Seed Cookies © www.foodbabylife.com

I've had a hankering for carrot cake this week but really couldn't be bothered making a whole cake. Plus I've been meaning to make a big batch of something to stash in the freezer for after-kindy snacks and a cake doesn't really work.

I spotted some Sunflower Seed Cookies on Planning with Kids a while back and have had them bookmarked to try.

As always when I find a recipe I like I very rarely make it as written. Here I've switched around quite a few of the ingredients using wholemeal flour, carrot and pumpkin seeds which weren't in the original. I've also used dextrose instead of sugar to make them lower in sugar/fructose and added extra baking powder so they are more cakey. Think a not-too-sweet carrot cake but in cookie form.

My boys went nuts for these! They had 2 each with a glass of milk for afternoon tea desperately wanted more but mean mummy said no.

This recipe makes a huge batch so they will last for more than 5 minutes. Most of the batch is in the freezer and I'm looking forward to bringing them out for after-kindy afternoon teas. As they are nut-free they would also be suitable to pack in Oscar's lunchbox for kindy.

Carrot Cake Cookies
Inspired by Sunflower Seed Cookies on Planning with Kids
Makes 4 dozen

225 grams butter, softened
1 ½ cups dextrose (or white sugar)
2 eggs
1 teaspoon vanilla
1 cup plain flour
1 cup wholemeal plain flour
1 teaspoon baking soda
1 teaspoon ginger
1 teaspoon cinnamon
1 teaspoon baking powder
1/4 teaspoon salt
2 cups rolled oats
½ cup sunflower seeds
½ cup pumpkin seeds
1 cup grated carrot (about 3 carrots peeled then finely grated)

Preheat oven to 180 degrees celsius /160 degrees fan-forced. Line 4 baking trays with non-stick paper and set aside.

Place the butter and dextrose a large bowl and beat with an electric beater until light and fluffy. Add the eggs one at a time followed by the vanilla, beating well after each addition.

In another bowl add all the dry ingredients and stir to combine then pour over the butter mixture. When roughly combined add the grated carrot and enough milk to make a thick and slightly sticky batter.

Roll heaped tablespoons of dough into balls and place them onto the trays (12 per tray), leaving plenty of room for spreading.

Bake for approx 12 minutes, rotating the trays halfway through, until lightly golden brown. Leave the cookies to cool for 5 minutes then transfer them to a wire rack to cool completely. Cookies will be soft but will firm up when cooled.

Makes approx 48. Suitable to freeze.

Friday, December 21, 2012

Cranberry, White Chocolate & Pistachio Cookies

Cranberry White Chocolate and Pistachio Cookies © food-baby.blogspot.com All rights reserved

These cookies just shout Christmas to me! They're red, white and green and packed with Christmassy flavours. I always make cookies to give as Christmas gifts because they are so transportable and always so well received.  Every year I say I should make more cookies and fewer chocolate-y things because of the heat but it never happens!

These are the sort of cookies with so many mix-ins you wonder how they will stay together. Then you make them and they're perfect, crunchy on the outside, chewy in the middle and packed with little surprises. Oh and they make the house smell amazing :)

Cranberry, White Chocolate and Pistachio Cookies
Recipe adapted from Brown Eyed Baker

1¼ cups plain flour
½ ts baking powder
½ ts baking soda
¼ ts salt
120g butter, at room temperature
½ cup light brown sugar
½ cup white sugar
1 large egg
1 ts vanilla extract
½ cup rolled oats
½ cup roasted salted pistachios, chopped
1 cup white chocolate chips
1 cup dried cranberries

Preheat oven to 190 / 170 degrees fan-forced. Line 2 trays with baking paper and set aside.

Whisk together the flour, salt, baking powder and baking soda in a medium bowl.

Using an electric mixer beat the butter and both sugars until light and fluffy. Add the egg and vanilla and beat until well combined. Carefully mix in the dry ingredients then using a spatuala, fold through the oats, pistachios, cranberries and white chocolate.

Roll the dough into balls and place onto prepared trays, allowing room for spreading. Flatten the top of each biscuit with your fingers then bake for approx 10 minutes or until slightly golden on top. Allow to cool on the trays for 5 minutes then transfer to a wire rack to cool to room temperature. Store in an airtight container.

Makes approx 30.

Tuesday, November 13, 2012

Happy Birthday Charlie!

Digger Cake © food-baby.blogspot.com All rights reserved

Hard to believe but my baby turned 2 last week! Quite honestly it has been the fastest 2 years of my life and my boys are growing up so very quickly.

To celebrate we had a party on Sunday for friends and family. It was supposed to be at the park but rain the day before (the first real rain in months) put an end to that. I had visions of muddy toddlers sliding all over the place! So Plan B was at our place and amazingly we fit 19 adults and 13 children in our lounge/dining room and little backyard. We must live in the Tardis.

Here is the birthday boy checking out his new cubby and opening his presents ...


And onto the important stuff, the food!

As you will have seen above I made Charlie a digger cake. He is obsessed with all things truck and I just I would have to do some sort of truck cake for him. I have 3 kids birthday cake books but unfortunately there was nothing quite right. I was thinking I would have to just wing it (a dangerous idea because cake decorating is really not my strength!) when I came across a digger cake on Cake 2 the Rescue.

This is a local business which sends out cake kits complete with everything you need to make a brilliant cake - cake mix, icing mix, pre-coloured fondant icing in the right amounts, food colouring, a rolling pin, cake lifter and cake board. While I wouldn't normally go for something so pre-packaged it was a real time saver and a lot of fun! And just for the record this is not a sponsored post, I paid for own cake kit and just wanted to give them a shout-out.

Digger Cake © food-baby.blogspot.com All rights reserved

Here is the finished cake with M&Ms 'dirt' and lots of little fingers waiting (or not) to dig in! It was a real hit on the day and Charlie loved it. Everyone loved the taste of the cake but as the decorator I found the cake a bit too spongy. Despite being in the fridge first it still crumbled in parts when I iced it whereas a slightly denser buttercake may have held together better. No big deal really but still.

Keeping with the truck theme I also had a go at decorating some biscuits. I found this cute cutter at Matchbox and used Charlie's favourite colour orange to decorate. This was my first ever attempt at decorating biscuits and I think I did ok. My only real issue came with the tyres. I completely underestimated how much black food colouring I would need to make a real black and of course my icing was far too runny by them and began to ooze and run off the edges of a few of the biscuits. Luckily no one cared!

Truck Cookies © food-baby.blogspot.com All rights reserved

I used a sugar cookie recipe from Sweetapolita which you can find here and an icing recipe from I Am Baker which you can find here. I was really happy with both of these and would definitely recommend them. I also used Wilton gel colours.

So that's it! Another birthday done and dusted. Oscar is already asking for a dinosaur cake for next year so I will have another opportunity to work on my cake decorating skills.

Saturday, August 4, 2012

Peanut Butter Cookies

In the midst of a flu-ridden and miserable week the urge for peanut butter cookies struck. These went from bowl to belly in 20 minutes flat...

Peanut Butter Cookies
Makes 24

1 cup natural peanut butter
1 cup brown sugar
1/2 cup rolled oats
1/2 cup wholemeal flour
1/2 ts salt
1 ts vanilla extract
1 egg

Preheat oven to 180 degrees celsius (160 degrees fan-forced). Line 2 trays with baking paper and set aside.

Combine dry ingredients in a large bowl then add the egg, vanilla and peanut butter. Mix well. Roll tablespoons of mixture into balls and place on the prepared trays. Flatten each ball slightly then bake for 10-12 minutes, rotating the trays halfway through.

Remove trays from the oven and allow to cool for at least 5 minutes before turning the cookies out onto a wire rack to cool completely. Devour.
Related Posts Plugin for WordPress, Blogger...