Showing posts with label Desserts. Show all posts

Sunday, March 24, 2013

Baked Churros with Chili Chocolate Sauce

Baked Churros with Chili Chocolate Sauce © www.foodbabylife.com

Recently we have had a few casual dinners with a group of friends and to make things interesting, we chose  a country's theme for each one and everyone brought their favourite meal to share.

Our Italian dinner was a huge hit with homemade pizzas cooked on the BBQ, a fabulous antipasto platter and a tiramisu cake made by moi.

Our most recent dinner was Mexican theme and it was amazing - chicken burritos, tacos, chili con carne, vegetarian fajitas, nachos. YUM. The only Mexican dessert I could think of was churros but our past adventures in deep frying have not turned out well. But then what should pop up in my google reader but some baked churros from the fabulous Sprinkle Bakes! That, my friends, is destiny.

Heather's recipe is really detailed and has some great tips so I won't post it again here. You will find the recipe on Sprinkle Bakes here.
 
Baked churros piped ready to bake © www.foodbabylife.com

My notes:

- for fellow Aussies 1/3 cup butter is 80 grams

- Heather said if using butter they would spread more but I found they didn't spread at all. After the first tray I realised that and placed them much closer together, meaning fewer batches were required.

- not sure if we were meant to cool the mixture before piping but I almost burnt my hands trying to pipe these all out

- I doubled the recipe as it had to feed a crowd.

- I couldn't find the exact size piping tip Heather recommended anywhere (mine was 11mm rather than 14mm) so I got about 50 little churros from the double batch!

- I baked them in the afternoon then took them cold to the party. They reheated well in an oven (not a grill) and we rolled them in cinnamon sugar after that.

- I had to almost double the initial baking time to get any colour and crispiness on them

Overall these were fantastic! They tasted amazing, just as good as fried ones though perhaps with slightly less crunch. It made for a pretty special dessert for not that much effort and everyone loved them.

Chili Chocolate Sauce

250grams dark chocolate (70% cocoa), finely chopped
250ml pure cream
1 tbs brown sugar
1 ts chili powder
1 red chili to decorate

Place the cream and the chilli powder in a medium saucepan and heat until just before boiling. Add the sugar and chopped chocolate and stir gently until the chocolate has melted and the sauce is smooth. Pour into a serving dish and sprinkle with chopped fresh chilli.

Serve warm with the churros and maybe some vanilla ice cream.


Thursday, December 20, 2012

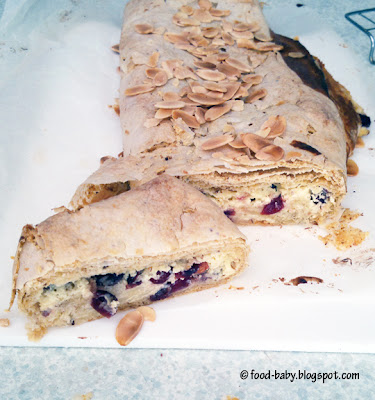
Cranberry & Cream Cheese Strudel

Cranberry & Cream Cheese Strudel © food-baby.blogspot.com All rights reserved

I love all the free Christmas magazines put out by supermarkets at this time of year. I mean I love food magazines any time but you gotta love free stuff! While there is a lot of advertising you can find little recipe gems and some great ideas for menu plans, table settings and gifts.

This recipe came from a freebie booklet from Coles called Recipes for Christmas Baking. I've no idea whether it is still available but just check your local Coles.

I made this intending to take it to our mother's group Christmas breakup but after baking I realised it is actually more of a dessert than a morning tea treat. No worries, I made a batch of brownies to take and saved this strudel for us!

It has gorgeous Christmas flavours with cranberries, almond and nutmeg but it would make a lovely dessert any time of the year. While it is meant to be served warm with ice cream, we ate most of ours sliced and cold from the fridge and it was delicious that way too.

Cranberry & Cream Cheese Strudel

250g cream cheese, softened
1 large egg
1/2 cup cream
1/4 cup caster sugar
1/2 ts ground nutmeg
100g dried cranberries
1/2 cup dry breadcrumbs
1/2 cup almond meal
6 sheets filo pastry
75g melted butter
1/4 cup flaked almonds

Preheat oven to 200 / 180 degrees fan-forced and line a baking tray with baking paper.

With an electric mixer, beat together the cream cheese, cream, egg, sugar and nutmeg until smooth and well combined. Fold in the cranberries and set aside.

In a small bowl mix together the almond meal and breadcrumbs. Lay one sheet of filo onto your prepared tray and brush with melted butter. Sprinkle over 1 tablespoon of the almond/breadcrumbs mixture. Lay another sheet of filo on top and repeat until all filo and almond mixture is used.

Spread the cream cheese mixture over the filo stack, leaving a 4cm border around all edges. Fold in the short sides of the pastry, then with the long side facing you roll up tightly into a log. Brush the top with remaining melted butter and sprinkle over the flaked almonds.

Bake for 5 minutes at 200 /180 degrees fan forced then reduce the temperature to 180 / 160 degrees and bake for a further 25-30 minutes or until crisp and golden on top and firmish to the touch.

Serve warm with ice cream and cold from the fridge. Serves 8-10.

Wednesday, June 20, 2012

Best Ever Custard

© food-baby.blogspot.com All rights reserved

There are probably a dozen different varieties of custard at the supermarket - full fat, low fat, skinny, extra thick, pouring, chocolate flavoured, brandy flavoured, snack size ... you name it. But do any of them even come close to homemade? Nope!

The beauty of a good custard is you can just eat it straight out the pot or serve it very simply with some passion fruit or sliced bananas and you have a little bowl of heaven.

I was inspired to make some yesterday afternoon after watching Gary make a gorgeous apple strudel with cream and custard on Masterchef. This is his recipe with only a few minor changes. It is seriously the best custard I have made. Ever. It will most definitely be served with our Christmas pudding this year, and probably quite a few times before then as well!

Custard
Recipe very slightly adapted from MasterChef

300ml pure cream
200ml low fat milk
5 egg yolks
1/4 cup caster sugar
25g corn flour
1 ts vanilla extract

Place the cream and milk in a saucepan over a medium heat and heat until just before boiling.

Whisk the egg yolks, sugar and vanilla in a large bowl until thick and pale before whisking in the corn flour. 

Pour half of the hot cream into the egg mixture whisking continuously. Pour this mix back into the saucepan with the remaining milk/cream and return to a medium low heat. Stir continuously with a wooden spoon or heatproof spatula until the mixture is thick and coats the back of the spoon. 

Strain the custard through a fine sieve to remove any stray bits of egg. Serve immediately or to serve later, place this bowl over another bowl of iced water and stir until cooled to room temperature.


Wednesday, May 9, 2012

Cranberry-Apple Crisp


Apple crumble is one of the easiest and tastiest things you can make for a quick dessert. And of course the bonus is that it makes a great breakfast the next day! 

Rather than make a standard apple crumble or crisp, I was inspired by Dorie Greenspan's version as we just happened to have one last lonely pack of frozen cranberries leftover from Christmas.

Cranberry-Apple Crisp
Recipe adapted from Dorie Greenspan's Baking from My Home to Yours, p422

Topping
3/4 cup plain flour
1/2 cup brown sugar
1/2 cup rolled oats
1/2 cup dessicated coconut
1 ts cinnamon
1 ts ground ginger
125g butter, chopped into small pieces

Filling
4 apples, peeled, cored and chopped into a fine dice
1 cup frozen cranberries
1/2 cup sultanas
1/3 cup sugar
1 tbs plain flour

Preheat oven to 180 degrees Celsius. Spray a 1.8 litre baking dish with oil and set aside.

To make the topping, combine the dry ingredients in a large bowl. Rub the butter into the flour mixture until it resembles coarse breadcrumbs and is clumping together.

To prepare the filling, combine all ingredients and mix well. Pour into prepared baking dish.

Spread the topping evenly over the fruit filling and bake for approx 1 hour or until the top is a deep golden brown and the fruit is bubbling up around the edges. Allow to cool slightly before serving with ice-cream or custard. Enjoy the leftovers (if there are any!) for breakfast the next morning.

Serves 6-8.

This was really, really good! Such a shame we can only buy frozen cranberries for a few weeks a year because they add such a special quality to things like this. Definitely a winner.

Tuesday, May 31, 2011

TWD - Caramel Pots de Creme

Well after my disastrous plastic-wrap-filled Chocolate Pots de Creme I knew I had to come through with the caramel version chosen by Peggy the Baker.

We definitely didn't need 8 of these sitting around so I adjusted the recipe to make 2 x /2 cup serves using 1/2 cup cream, 1/4 cup milk, 2 egg yolks and 2 tbs sugar.

I loved Cakelaw's idea of turning them out so I used metal dariole moulds and sprayed them with olive oil spray before filling. I also used alfoil instead of plastic wrap to prevent a repeat of last time.

The taste test ...

Very rich and very caramel with a touch of bitterness that came from taking my sugar right to a deep amber before adding the cream and milk. I served it with a dollop of unsweetened whipped cream and some crushed honey-roasted cashews. This little bit of crunch was the perfect addition. We really enjoyed these but I have to admit I rushed to brush my teeth afterwards from all that sugar.

Thanks for a great pick Peggy! I am well and truly over my fear of caramel now and it was great to have another opportunity to play around with it. Make sure you visit Peggy the Baker for the recipe.

Tuesday, June 29, 2010

Tuesdays with Dorie: Rum-Drenched Vanilla Cakes, a Trifle and some News

This week Wendy of Pink Stripes chose Dorie's Rum-Drenched Vanilla Cakes and as usual I tweaked the recipe. Honestly I can't remember the last time I actually made a recipe exactly as stated (apart from the Raisin Swirl Bread which was utter perfection!).

After realising these cakes were a variation on a standard pound cake I immediately thought trifle! We're not huge fans of rum (although I always have a stash for my Christmas baking) so I used just 1 ts in the batter. Surprisingly this was enough to create not only a great taste but a fabulous aroma while baking.

I made half the recipe (1 cake) and ended up with a mountain of perfect little cake cubes.

While in the past I have gone all out making a trifle, this time I went simple and no-fuss ... cake, jelly, tinned peaches and custard. I made a drenching syrup using some of the juice from my drained tin of peaches and this was a fabulous addition. I recently discovered Aeroplane jelly has a 25% reduced sugar variety with natural colours and flavours so that's what I used here in raspberry.
So regular readers may have noticed my blogging has become a little sporadic recently. I'm a little embarrassed to see just how long it has been since posting anything other than TWD, Daring Bakers or Daring Cooks.

My excuse? We've been cooking up anther little project around here. Due mid-November. Oh, and it's a boy! :-)

Sunday, June 27, 2010

Daring Bakers June - Chocolate Pavlovas with Chocolate Marscapone Mousse

Ahhh, pavlova ... the quintessential Aussie summer dessert. While I am more of a fruit and whipped cream pavlova girl, all the chocolate in this version made my husband a very happy man!

The June 2010 Daring Bakers’ challenge was hosted by Dawn of Doable and Delicious. Dawn challenged the Daring Bakers’ to make Chocolate Pavlovas and Chocolate Mascarpone Mousse. The challenge recipe is based on a recipe from the book Chocolate Epiphany by Francois Payard.

I have never made chocolate meringues before so this was a great challenge for me. I made 1/3 of the recipe and got 4 lovely meringues. I baked them a little differently than stated in the recipe because I wanted them to have soft and fluffy middles. 45 minutes at 130 degrees C did the trick.

The marscapone mousse was more flowing than mousse-like but was absolutely delicious anyway. The marscapone cream/creme anglaise seemed like overkill to me so I topped my meringues with sliced strawberries and grated dark chocolate. This is a VERY sweet treat but the strawberries did cut through the richness of the mousse and the plain sugariness of the meringues.

The hardest part was taking a photo without someone's little fingers getting in the way! (Normally not a problem but Oscar is dairy intolerant).

Thanks to Dawn for a choctastic challenge this month! You can download a PDF of this recipe here.

Saturday, March 27, 2010

Daring Bakers March - Orange Tian


Have you heard of a tian? I hadn't either but what a lovely dessert this turned out to be!

The 2010 March Daring Baker’s challenge was hosted by Jennifer of Chocolate Shavings. She chose Orange Tian as the challenge for this month, a dessert based on a recipe from Alain Ducasse’s Cooking School in Paris.

This dessert involved making several components including a citrus caramel, whipped cream filling and biscuit base, but the one that had me really excited was the marmalade. Yep, we had to make our own marmalade for this challenge!

I love jam and making it has been on my to-do list for years. I think the fact you need to sterilise jars and so on has scared me away but really, you can just make a small amount to store in the fridge and eat within a couple of weeks.

Almost everything for the tian came together really easily and I prepared all the components in one day. I opted to make just one small (4") tian as were in dessert overload that week.

In the end the only element I struggled with was the marmalade. I wasn't sure where to get pectin from but I had seen a jam setting sugar at the supermarket in the past so I went hunting for that. Once I had the sugar I needed oranges (obviously) and chose some lovely looking navel oranges. Now I think these were the wrong type to get because the pith was about 1cm thick on all of them. I blanched the oranges 5 times to hopefully remove any bitterness and it turned out fine. My issue was with the final taste. For some reason this tasted like jam that had been sitting around in a cupboard for too long. The sugar was still 1 year within the use-by date but I am not convinced. I still don't know whether it was the sugar or the oranges that gave the marmalade its strange aftertaste BUT I do know I am no longer scared of making jam!

The taste test ...

Surprisingly light! Lovely contrast between the crunchy base, smooth cream filling and fresh orange segments. I did add the citrus caramel after I took the photo but I think it was unnecessary and really dialled up the sweetness into excess.

This would be a wonderful dinner party desssert as not only does it look and taste spectacular, it can be totally prepared in advance.

Thank you Jennifer for a wonderful challenge!

Tuesday, January 5, 2010

TWD 2nd Anniversary - Tarte Tatin

This week marks the 2nd anniversary of Tuesdays with Dorie! Two years ago I didn't have a blog and had only just discovered that food blogs even existed. It didn't take long for me to stumble across the Tuesdays with Dorie bakers and to want a piece of the pie. And shortbread. And cheesecake. (Oh, the brown sugar apple cheesecake!)

Laurie's idea to bake her way through Dorie Greenspan's Baking From My Home to Yours was a great one. So many of us have cookbooks that sit on the shelf despite our best intentions to use them regularly. Baking and blogging together has been a fabulous experience for me and I am looking forward and letting us all have a turn selecting a recipe was inspired. I am number 133 in the list (we are up to 96 now) so I still have a little wait for my turn.

In honour of the anniversary we voted for our recipe this week and I was thrilled the Tarte Tatin won out! (I made the Cocoa-Buttermilk Birthday Cake for my 30th last year). As I mentioned a few days ago I am taking a baking hiatus for January, but I couldn't let this one slip by so I made it for our New Year's Eve dinner.

First off, the actual dinner was spectacular! We made a slow roasted pork belly with caramelised vinegar, sauteed pears and potatos and baby broccoli. Honestly if I ordered this in a restaurant I would have been thrilled. The photo really doesn't do it justice. You'll just have to trust me!

I was a little worried about making the tarte tatin but it was a breeze. I used a square baking dish so I didn't even have to trim my pastry sheet. The caramel cooked up beautifully, nothing burnt and it turned out of the dish easily as well. The only problem came with the eating...

The taste test

It was SOOOOOOO sweet. As in tooth-aching, I-don't-think-I-can-eat-my-whole-piece sweet. Which is such a shame! I did in fact manage to eat my piece but I didn't have any for breakfast the next day as I was hoping to. Hubby didn't mind though, he polished off the rest in no time flat.

Still, I can say that I have mastered the Tarte Tatin and now I know I can do it, I will be making it again, just with less sugar! (I have since looked at some other tartin recipes and they all use less than half the amount of butter and sugar as this one).

Thank you Laurie! I am proud to be a part of this fabulous group of bakers and I'm looking forward to another great year!

Tuesday, November 3, 2009

Tuesdays with Dorie: Cran-Apple Crisps

Well, first thing you'll notice is there are no cranberries in my crisps. I've bought frozen cranberries many times and although we are only 52(!) days away from Christmas, there were none to be found.

By the way, a big thank you to Laurie for being flexible with this month's posting days. I am saving the Chocolate Caramel Chestnut cake for my dad's birthday next week!

Em of The Repressed Pastry Chef chose Dorie's Cran-Apple Crisps this week and without the cranberries I don't know if I'm a good judge of these or not. Basically it was just an apple crumble. Tasty, but usually our fallback dessert if we haven't planned ahead.

The taste test ...

Like I said, your standard apple crumble. I'm sure the cranberries would elevate this to something more special and give a great contrast with the sweet crumble topping. Oh well, we did enjoy it with a big scoop of vanilla icecream. An easy Saturday night dessert! I'll stock up on cranberries next time I find them just to pop into something like this.

Thanks Em! You can find the recipe (and no doubt some gorgeous photos) on her blog.

Monday, October 12, 2009

Caramel Swirl Cheesecake

Maybe I should rename this blog cheesecake.baby instead, as I seem to make a lot of them! I realised I wanted cheesecake quite on the spur of the moment, having begun devouring a packet of butternut snap biscuits and thinking how perfect they would be for a crumb base.

I started with Dorie's Tall and Creamy Cheesecake recipe and then tweaked it a little. Can I just say again how much I adore this recipe? Seriously, the BEST one ever. That and the fact it calls for my little cheesecake to 'luxuriate in a waterbath'. Gets me every time!

Caramel Swirl Cheesecake - Cheats Version

Base

250g buttersnap biscuits (or your favourite plain sweet biscuit)
125g unsalted butter, melted

Caramel

1 tin of caramel top and fill (basically a premade condensed milk caramel - you can definitely make this yourself but with cats and a baby I don't want to worry about exploding tins!)

Cheesecake

500g cream cheese (2 packs) at room temp
2/3 cup sour cream at room temp
2 eggs at room temp
1/2 cup sugar
2 ts vanilla extract

Preheat oven to 160 degrees C. Grease an 8" springform pan and wrap the outside in 2 layers of alfoil. Set aside. For the base, blitz your biscuits in the food processor then pour in the melted butter and combine well. Press over the base of the pan and up the sides as much as you can (I got about 2cm).

Wipe out the food processor bowl to remove any crumbs.

Blitz the cream cheese and sugar together until smooth (about 4 minutes). Add the eggs, one at a time, beating for about a minute after each addition. Add the vanilla and sour cream and process for a few minutes. The mixture will become smooth and velvety.

Pour about half the cheesecake mixture into the prepared base. Spoon teaspoonfuls of caramel randomly over the top. Pour over the remaining cheesecake mix and dot with more caramel (it will sink during the baking). Drag a butterknife through the mixture to create swirls of caramel, being careful not to touch the biscuit base. (I totally forgot to do this step and ended up with blobs of caramel. Still delicious).

Place your springform pan inside a baking dish. Pour boiling water into the baking pan, until the water reaches about halfway up the side the springform pan. Carefully place in the oven.

Bake at 160 degrees C for about an hour. Turn the oven off and leave your cheesecake to 'luxuriate in its waterbath' for another hour. Remove the pan from the water, allow to cool then refrigerate for at least 4 hours or overnight.

Serve with an extra drizzle of caramel (not that it needs it). Delicious!!!

Sunday, June 21, 2009

Coffee Chocolate Fondants

I have a soft spot for chocolate fondants and seeing them made on Masterchef during the week reminded both N and I just how long it's been since we made any (maybe 3 years?!).

This is a Curtis Stone recipe which we found on the UK Good Food Channel website. My notes are in red.

Coffee Chocolate Fondants
Serves 4 (just 4 serves would have been ENORMOUS - there was enough mixture for 8 generous serves using 1 cup ramekins)

250 g dark chocolate, 70% cocoa solids broken into pieces
250g Butter
30g instant coffee (we had a 50g jar of Moccona and it seemed excessive to use more than half the jar! So we only added a few teaspoons and could barely taste it)
5 Eggs
5 egg yolks
125g Sugar
75g plain flour, sifted

1. Melt the chocolate in a heatproof bowl, suspended above a pan of simmering water.

2. Meanwhile, melt the butter in a small saucepan.

3. In a large mixing bowl, mix together the melted chocolate and butter. Add the coffee and stir until well-blended.

4. In a separate large mixing bowl, ideally using an electric whisk, whisk together the eggs, yolks and sugar until pale and fluffy.

5. Pour the egg mixture onto the chocolate mixture and whisk together until smooth.

6. Add the flour, whisking until well-mixed.

7. Transfer the chocolate mixture into 4 (8!) well-buttered ramekins or dariole moulds, cool and chill in the refrigerator for at least 2 hours.

8. Preheat the oven to 200ºC/gas 6.

9. Bake the chilled fondants for 10 minutes. (Ours needed 12 minutes and probably could have done with another minute or 2 to make them easier to remove from the moulds. Next time would grease and also line the bases of the remekins with baking paper as the centres stuck a little). Serve warm from the oven.

The taste test ...

In a word - decadent. Not something you'd want to eat everyday but as a treat it was absolutely divine. Rich and smooth with a deep chocolate flavour boosted by the coffee. The middles were fabulously oozy! Perfect served with a big scoop of vanilla icecream.

Monday, April 27, 2009

Daring Bakers April - Apple Crumble Cheesecake

The April 2009 challenge is hosted by Jenny from Jenny Bakes. She has chosen Abbey's Infamous Cheesecake as the challenge.

Mmmmmm cheesecake! I'm kind of known as the cheesecake girl and am inclined to make one whenever I'm asked to bring dessert. I made this for Easter Sunday and it was the perfect finish to a lunch of gorgeous roast lamb.

Apple Crumble Cheesecake ~
Modified from Abbey's Infamous Cheesecake

crust:
250g shredded wheat biscuits
125g melted butter
1 ts cinnamon

apple filling:
3 medium sized apples, peeled, cored and finely sliced
2 tbs butter
2 tbs brown sugar

cheesecake:
3 sticks of cream cheese, 8 oz each (total of 24 oz) room temperature
1 cup / 210 g sugar
3 large eggs
1 cup / 8 oz heavy cream
1 tbsp. lemon juice
1 tbsp. vanilla extract (or the innards of a vanilla bean)
1 tbsp apple juice concentrate
2 ts cinnamon
1/4 ts ground cloves
1/4 ts ground nutmeg

crumb topping:
1/2 cup plain flour
1/4 cup rolled oats
1/4 cup toasted walnuts, chopped roughly
1/2 cup brown sugar
100g melted butter
2 ts cinnamon

1. Preheat oven to 180C. Boil a large jug of water ready to use when baking.

2. Combine crust ingredients in a food processor and process and press into your preferred pan. You can press the crust just into the bottom, or up the sides of the pan too - baker's choice. Set crust aside.

3. Saute the apples, butter and brown sugar together over medium heat until tender and caramelised, approx 10 minutes. Set aside to cool.

4. Combine topping ingredients in a small bowl and stir to combine. It should be rough and lumpy. If it is too smooth leave in the fridge until you are ready to use and then roughly break up the pieces.

5. Combine cream cheese and sugar in the bowl of a stand-mixer and cream together until smooth. Add eggs, one at a time, fully incorporating each before adding the next. Make sure to scrape down the bowl in between each egg. Add heavy cream, vanilla, lemon juice, spices and apple juice concentrate and blend until smooth and creamy.

5. Pour half the batter into prepared crust and top with the apple slices. Pour over the remaining cheesecake batter and tap the pan on the counter a few times to bring all air bubbles to the surface. Place pan into a larger pan and pour boiling water into the larger pan until halfway up the side of the cheesecake pan. If cheesecake pan is not airtight, cover bottom securely with foil before adding water.

6. Bake for 20 minutes then remove from the oven and sprinkle over the crumble topping. Return to the oven and bake for a further 25-35 minutes until it is almost done - this can be hard to judge. The crumble topping will be firm and golden brown but there will still be a jiggle in the cheesecake underneath. You don't want it to be completely firm at this stage. Close the oven door, turn the heat off, and let rest in the cooling oven for one hour. This lets the cake finish cooking and cool down gently enough so that it won't crack on the top. After one hour, remove cheesecake from oven and lift carefully out of water bath. Let it finish cooling on the counter, and then cover and put in the fridge to chill. Once fully chilled, it is ready to serve.

The taste test ...

YUM!!! This was a near perfect cheesecake experience. My only gripe would be that the ratio of creamy cheesecakey goodness to crust/topping was a little off. Next time I would make this in a smaller, deeper pan so each piece was a little more balanced.

Thanks to Jenny for a fun and easy bake this month!

Tuesday, March 10, 2009

Tuesdays with Dorie: Lemon Cup Custards


Wow there was a lot of tension in the ranks about this one! Personally, I love lemon, love custard and love eggs so had absolutely no problem with it. Thanks to Bridget of The Way The Cookie Crumbles for choosing such a simple, delightful recipe!

After reading about the lack of lemonyness, I let the milk simmer for about 10 minutes before bringing it up to the boil and then let it steep for over an hour. I baked them for just over 45 minutes because I wanted firm not jiggly custard. They got a little browner on top than I anticipated but I really liked the effect!

The taste test ...

Luscious, creamy and exactly what you want from a baked custard. I thought it was brilliant to get this effect from a custard which doesn't contain any cream. The lemon flavour was subtle but definitely there and really elevated an otherwise very plain dessert. I was originally planning on topping these with some stewed blueberries but in the end decided they didn't need it.

We will definitely be making these again and playing around with other flavour combinations.

You will find the recipe on The Way The Cookie Crumbles.

Saturday, February 28, 2009

Daring Bakers February - Chocolate Valentino

The February 2009 challenge is hosted by Wendy of WMPE's blog and Dharm of Dad ~ Baker & Chef. We have chosen a Chocolate Valentino cake by Chef Wan; a Vanilla Ice Cream recipe from Dharm and a Vanilla Ice Cream recipe from Wendy as the challenge.

I have to say I wasn't hugely excited about this challenge. I mean I love chocolate, don't get me wrong, but I'm kinda over all those chocolate lava style desserts and this seemed a little too similar to things I have made before. That being said, my husband was thrilled! And seeing it was Valentine's I made it in a mini heart pan just for him :)

I am a little off my game at the moment. I think I've mentioned before how I have been misreading recipes a bit lately. This time I read everything correctly but I went ahead and stuffed up anyway!

I ended up with far too much batter for my little pan and clearly remember saying to N "the recipe says to fill the pan 3/4 full" as I blithely went on and scraped every last bit of batter into the pan so it was practically overflowing. I'm sure you can guess what happened. We had a chocolate volcano explode in the oven. I would show you the photo but I'm too embarrassed about our dirty oven.

So my cake is not the prettiest (it honestly never occurred to me until a week later that I should have just pulled off the lumpy lava edges and turned it upside down for the photos) but my husband assured me it was absolutely sublime and suggested several times that if I really wasn't happy I should just make it again. Isn't that sweet? He's always thinking of his stomach me.

Chocolate Valentino
from Sweet Treats by Chef Wan

16 ounces (1 pound) (454 grams) of semisweet chocolate, roughly chopped
½ cup (1 stick) plus 2 tablespoons (146 grams total) of unsalted butter
5 large eggs separated

1. Put chocolate and butter in a heatproof bowl and set over a pan of simmering water (the bottom of the bowl should not touch the water) and melt, stirring often.
2. While your chocolate butter mixture is cooling. Butter your pan and line with a parchment circle then butter the parchment.
3. Separate the egg yolks from the egg whites and put into two medium/large bowls.
4. Whip the egg whites in a medium/large grease free bowl until stiff peaks are formed (do not over-whip or the cake will be dry).
5. With the same beater beat the egg yolks together.
6. Add the egg yolks to the cooled chocolate.
7. Fold in 1/3 of the egg whites into the chocolate mixture and follow with remaining 2/3rds. Fold until no white remains without deflating the batter.
8. Pour batter into prepared pan, the batter should fill the pan 3/4 of the way full, and bake at 375F/190C
9. Bake for 25 minutes until an instant read thermometer reads 140F/60C.
Note – If you do not have an instant read thermometer, the top of the cake will look similar to a brownie and a cake tester will appear wet.
10. Cool cake on a rack for 10 minutes then unmold.


Easiest Creamiest Ice Cream Ever

600ml pure heavy cream
1 can condensed milk
vanilla extract to taste

Whip cream until it just starts to thicken then while still beating, drizzle in the condensed milk followed by the vanilla. Whip until it has at least doubled in volume. Freeze. Eat. Swoon.

Make sure you check out the other DBs posts for cakes far prettier than mine!

Friday, February 13, 2009

Classic Custard Tart

I've had custard on my mind ever since I decided not to make last week's TWD selection of Floating Islands. I absolutely adore custard and while I wholeheartedly avoid the bright yellow goop that passes for custard at the supermarket, strangely I don't make it very often at home.

I decided it would have to be baked to pass my food safety limitations at the moment, so custard tart it was!

What elevated this from the mundane was the fact I used whole fresh nutmeg for the first time. I know, where have I been?? Just like when first I tried a fresh vanilla bean, this was spectacular.


We loved this tart. So simple and elegant and not too sweet. You can find the recipe I used here. The only change I made was to the pastry - leaving out the egg yolk and water, replacing them with just enough apricot juice to bring it together. This added a lovely subtle flavour and most importantly, meant I could eat some uncooked. I love pastry!!!


Thursday, January 29, 2009

Daring Bakers January - Tuiles


This month's challenge is brought to us by Karen of Bake My Day and Zorra of 1x umruehren bitte aka Kochtopf. They have chosen Tuiles from The Chocolate Book by Angélique Schmeink and Nougatine and Chocolate Tuiles from Michel Roux.

What a lovely simply recipe! I was delighted to have something light to make this time around. And yet again this is something that I probably would never have gotten around to making on my own.

The recipe calls for the mixture to be either piped or stenciled. Having not solved the mystery of our missing piping bag I went for the stencil option. There was only one problem. I failed cutting in kindergarten (seriously!) and my skills haven't improved much since then!

I had managed to save an ice cream container from a week ago and decided to make a simple circle. Unfortunately I forgot that I was not actually after a perfect circle cutout, but rather the circular shape left behind and I butchered it. Bugger.

Then I went freehand to create some faintly circular shapes. These actually worked really well but the humidity was a killer. Within about 10 minutes my beautifully firmed up tuile bowls were as flat as pancakes (I managed to perk one up for the photos).

I also dug out some stencils I have which are designed to make pretty cocoa shapes on top of a cappuccino.


I made half the recipe because I only had 1 egg left when I started and got what you see in the above photo.

Tuiles
Yield: 20 small butterflies/6 large (butterflies are just an example)
Preparation time batter 10 minutes, waiting time 30 minutes, baking time: 5-10 minutes per batch

65 grams softened butter (not melted but soft)
60 grams sifted confectioner’s sugar
a dash of vanilla extract)
2 large egg whites (slightly whisked with a fork)
65 grams sifted all purpose flour
1 tablespoon cocoa powder
Butter/spray to grease baking sheet

Oven: 180C

Using a hand whisk or a stand mixer fitted with the paddle (low speed) and cream butter, sugar and vanilla to a paste. Keep stirring while you gradually add the egg whites. Continue to add the flour in small batches and stir to achieve a homogeneous and smooth batter/paste. Be careful to not over mix. Cover the bowl with plastic wrap and chill in the fridge for at least 30 minutes to firm up. (This batter will keep in the fridge for up to a week; take it out 30 minutes before you plan to use it).

Line a baking sheet with parchment paper or grease with either butter / spray and chill in the fridge for at least 15 minutes. This will help spread the batter more easily if using a stencil/cardboard template such as the butterfly. Press the stencil on the baking sheet and use an off sided spatula to spread batter. Leave some room in between your shapes. Mix a small part of the batter with the cocoa and a few drops of warm water until evenly coloured. Use this coloured batter in a paper piping bag and proceed to pipe decorations on the wings and body of the butterfly.

Bake butterflies in a preheated oven (180C) for about 5-10 minutes or until the edges turn golden brown. Immediately release from baking sheet and proceed to shape/bend the cookies in the desired shape. These cookies have to be shaped when still warm, you might want to bake a small amount at a time or maybe put them in the oven to warm them up again. Or: place a baking sheet toward the front of the warm oven, leaving the door half open. The warmth will keep the cookies malleable.

If you don’t want to do stencil shapes, you might want to transfer the batter into a piping bag fitted with a small plain tip. Pipe the desired shapes and bake. Shape immediately after baking using for instance a rolling pin, a broom handle, cups, cones….

I paired them with a gorgeous mango sorbet but the possibilities are endless.

My husband didn't bother with any niceties and ate his like a taco!

I think mine was prettier :)

Friday, January 2, 2009

Tall & Creamy Cheesecake - Take 2

So my last attempt at this delicious cheesecake resulted in a rather ugly (albeit tasty) concoction. But the fact that I didn't get to take any decent photos because we were at someone else's house, in poor light, with no time to prep and I didn't even get to cut it myself bothered me so much I made it again.

This time I decided to make minis and keep the flavours simpler. I halved the crust recipe and quartered the filling and this made 2 perfect minis (although they were very full and this amount of crust and filling could have stretched to 3).

I made 2 different types...

Lemon with Passionfruit (added juice and zest of 1/2 small lemon to basic filling)

Vanilla with Reese's Peanut Butter Cups (1/2 ts vanilla with chopped up Reese's)

Again no problems at all making these. I baked them for 40 minutes at 160 degrees and then let them 'luxuriate in their water bath' (oh how I wish that were me!) for another 30 minutes.

The taste test ...

In a word ... YUM!

I can see this recipe becoming my go-to cheesecake recipe. I didn't have any problems with browning or the crust cracking so they tasted just as good as they looked this time around!

Tall and Creamy Cheesecake
Adapted rom Baking From My Home to Yours, by Dorie Greenspan

Ingredients
For the crust:
250g plain sweet biscuits
Pinch of salt
100g unsalted butter, melted

For the cheesecake:
4 packs cream cheese, at room temperature
1 cups sugar
1/2 teaspoon salt
2 teaspoons pure vanilla extract
4 large eggs, at room temperature
1 1/3 cups sour cream or heavy cream, or a combination of the two

Procedure

To make the crust:

Butter a deep 9-inch springform pan and wrap the bottom of the pan in a double layer of aluminum foil, then put the pan on a baking sheet.

Blitz the biscuits and salt in a food processor then add the melted butter and whiz until well combined. Turn the ingredients into the prepared pan and use your fingers to pat an even layer of crumbs along the bottom of the pan and about halfway up the sides. Put the pan in the freezer while you preheat the oven. Wipe out the bowl and blade of the food processor with paper towel.

Center a rack in the oven, preheat the oven to 160 degrees celsius fan-forced and place the pan on a baking sheet. Bake for 10 minutes. Set the crust aside to cool on a rack while you make the cheesecake.

Reduce the oven temperature to 140 degrees celsius fan forced.

To make the cheesecake:

Put a kettle of water on to boil.

In the food processor beat the cream cheese at medium speed until it is soft, about 4 minutes. With the mixer running, add the sugar and salt and continue to beat another 2 minutes, until the cream cheese is light. Beat in the vanilla. Add the eggs one by one, beating for a full minute after each addition. Finally add the sour cream and/or heavy cream and process for another minute.

Put the foil-wrapped springform pan in the roaster pan.

Give the batter a few stirs with a rubber spatula, just to make sure that nothing has been left unmixed at the bottom of the bowl, and scrape the batter into the springform pan. The batter will reach the brim of the pan. (If you have a pan with lower sides and have leftover batter, you can bake the batter in a buttered ramekin.) Put the roasting pan in the oven and pour enough boiling water into the roaster to come halfway up the sides of the springform pan.

Bake the cheesecake for 1 hour and 30 minutes, at which point the top will be browned (and perhaps cracked) and may have risen just a little above the rim of the pan. Turn off the oven's heat and prop the oven door open with a wooden spoon. Allow the cheesecake to luxuriate in its water bath for another hour.

After 1 hour, carefully pull the setup out of the oven, lift the springform pan out of the roasting pan and very carefully remove the foil. Let the cheesecake come to room temperature on a cooling rack.

When the cake is cool, cover the top lightly and chill overnight.

Sunday, December 28, 2008

Daring Bakers December - French Yule Log

This month's challenge is brought to us by the adventurous Hilda from Saffron and Blueberry and Marion from Il en Faut Peu Pour Etre Heureux. They have chosen a French Yule Log by Flore from Florilege Gourmand.

Wow what a challenge! While I was tempted to say I was too busy to even attempt such a complicated recipe I'm very glad I had a go. And really after reading through the recipe a few times and deciding which variation of each component to do, it seemed achievable!

Really this recipe is 6 relatively straightforward recipes in one (or 7 if you count the praline I had to make from scratch for one of the components).

Despite making a huge mess and using practically every pot, pan, spoon, spatula and appliance I own, I only struck a few problems.

Firstly while making the Chocolate Mousse component. The basic technique was to make a sugar and glucose syrup which is heated to the soft ball stage and then to beat this into already whipped egg yolks. My first attempt resulted in this ...

a stringy sticky cobwebby tangle of sugar around the beater which was incredibly hard to remove! Being pregnant I was already concerned about this mix being hot enough to cook the egg yolks and I don't think even a single drop of the sugar mix actually touched the eggs at that point!

So I made 2 extra batches of the sugar syrup, hoping that enough of it would get in to do the job. It certainly thickened up beautifully and became incredibly glossy so I took that as a good sign.

My other main issue was weather related. It was a very hot and humid 33 degrees the day I made this and neither the mousse or ganache actually became firm despite hours in the fridge. In the end I just ladled my soupy mousse over each layer and drizzled in the ganache and it seemed to work.

I also ended up with nowhere near enough icing to cover the log. What I should have done was attempted to spread the icing over the whole log (like a crumb coat) and then made a second batch. But by that stage I was pretty much over it so left it with a relatively festive drizzle which ran down the sides.

The only other issue came with the praline layer. I used my homemade praline with crushed oat flake cereal and ended up with quite a thick slab. This ended up being easy to eat once it was in pieces but none of us had the strength to break it with a spoon in our bowls. 'Scuse fingers!

This was an incredibly impressive dessert which I served at our early Christmas Eve Dinner on the 21st. It was relatively easy to slice after 20 minutes in the fridge and definitely rich enough not to need any extra decoration or accompaniments.

From top to bottom the layers are:
  • Milk/Dark Chocolate Icing
  • Lemon Daquoise
  • Milk Chocolate Mousse
  • Vanilla Creme Brulee
  • Milk Chocolate Mousse
  • Dark Chocolate Ganache
  • Praline Crisp
  • Milk Chocolate Mousse
  • Lemon Daquoise
What a mouthful!

Thank you to Hilda from Saffron and Blueberry and Marion from Il en Faut Peu Pour Etre Heureux for choosing such an exciting and challenging recipe. There is no way I would have attempted this on my own otherwise and their advice in the forum over the past month was invaluable!

Friday, November 21, 2008

Key Lime Cheesecake with Candied Lime Slices

Could there be anything that screams 'Summer!' more than this? The instant I had this idea I knew I would be making it, it was just a question of when. That time came with Sunday lunch with N's mum and it was the perfect end to a meal of perfectly cooked roast lamb.

I've made a lime cheesecake for years now but this recipe will probably become the new go-to cheesecake. I didn't get a great shot of the layers due to bad light but the contrast between crunchy biscuit base, tangy lime custard, creamy filling and smooth sour cream topping was absolutely sublime. Then the candied lime slices on top gave it an extra zesty boost!

There are no other words ... just make it!!!

Key Lime Cheesecake

For the lime custard...
6 large egg yolks
3/4 cup sugar
6 tablespoons fresh Key lime juice (I used 4 tbs bottled)
1 teaspoon lime zest

For the crust...
250g plain sweet biscuits (I always use Nice)
125g unsalted butter, melted and cooled

For the filling...
500g cream cheese, softened at room temp
2/3 cup sugar
2 large whole eggs
3 tablespoons fresh lime juice w/pulp
1 tablespoons lime zest

For the topping...
500g carton sour cream
3 tablespoons sugar

Preheat oven to 175 degrees Celsius. Position a rack in the center of the oven.

In a small sauce pan, combine all ingredients for the lime custard and whisk over medium heat until it thickens and bubbles around the edges of the pan. Let bubble about 30 seconds then remove from heat to cool slightly before scraping into a bowl to cool to room temp.

In a food processor, crush the biscuits until they form fine crumbs. With the motor running drizzle in the melted butter and process until combined. Press mixture onto the bottom and about half way up the sides of a 9 x 3" springform pan which has been wrapped tightly with layers of aluminum foil. Place in the fridge to set.

In the bowl of a mixer, combine cream cheese, sugar, eggs, pulpy lime juice, and zest. Mix until smooth and creamy.

Once the crust is set (approx 20 minutes), carefully spoon the lime custard into the bottom and smooth evenly. Then spoon the filling over the lime custard, again carefully smoothing to completely cover the first layer.

Set the springform pan inside the large baking pan and then place on the oven rack. Slowly pour very hot water into the large baking pan until the level reaches about half way up the side of the springform pan. Bake for 45 minutes. It should not be puffy and center will move slightly when shaken. Combine the sour cream with the 3T of sugar and then carefully spread over the top of the cheesecake. Put it back in the oven and bake for an additional 10 to 15 minutes, just until the topping is set.

Remove the springform pan from the water bath and let cool on a rack for at least 10 minutes. Using a sharp knife, carefully run the knife around the edge of the pan to loosen it a bit. Then cool completely at room temperature. Cover the pan tightly, and refrigerate overnight. Release the sides before serving. Serve cold.

Candied Lime Slices
(I can't remember where I got this recipe from!)

3 limes, scrubbed to remove wax etc
1 cup white sugar
2 tablespoons white sugar, extra
1 cup water

Bring a medium pot of water to the boil. Slice the limes into thin rounds and blanch the slices in boiling water for 2 minutes. Drain and repeat.

Using the same pot, combine 1 cup sugar and 1 cup water. Bring to a simmer then add the lime slices. Simmer for 20-30 minutes or until the white pith becomes translucent. The thinner your slices the quicker this will happen.

Remove the lime slices and place on a cooling rack to drain and dry for a couple of hours.

Place the extra sugar on small plate. Once the limes are dry coat both sides of each slice with sugar. You may need more sugar.

Store in an airtight container, with greaseproof paper in between the layers to stop them sticking. The slices can also be frozen.
Related Posts Plugin for WordPress, Blogger...