Showing posts with label Caramel. Show all posts

Tuesday, May 31, 2011

TWD - Caramel Pots de Creme

Well after my disastrous plastic-wrap-filled Chocolate Pots de Creme I knew I had to come through with the caramel version chosen by Peggy the Baker.

We definitely didn't need 8 of these sitting around so I adjusted the recipe to make 2 x /2 cup serves using 1/2 cup cream, 1/4 cup milk, 2 egg yolks and 2 tbs sugar.

I loved Cakelaw's idea of turning them out so I used metal dariole moulds and sprayed them with olive oil spray before filling. I also used alfoil instead of plastic wrap to prevent a repeat of last time.

The taste test ...

Very rich and very caramel with a touch of bitterness that came from taking my sugar right to a deep amber before adding the cream and milk. I served it with a dollop of unsweetened whipped cream and some crushed honey-roasted cashews. This little bit of crunch was the perfect addition. We really enjoyed these but I have to admit I rushed to brush my teeth afterwards from all that sugar.

Thanks for a great pick Peggy! I am well and truly over my fear of caramel now and it was great to have another opportunity to play around with it. Make sure you visit Peggy the Baker for the recipe.

Tuesday, July 27, 2010

Tuesdays with Dorie: Chewy, Chunky Blondies

This week's TWD recipe was Nicole of Cookies on Friday and she picked Dorie's Chewy, Chunky Blondies. I don't think I've ever made or eaten a blondie so I wasn't really sure what to expect. Turns out these are supposed to be like cookies but in bar form.

We can't get butterscotch chips here but to keep the caramelly theme going I used dark brown sugar and some chopped up Violet Crumbles (chocolate covered honeycomb pieces) as well as extra chopped dark chocolate and some walnuts.

I made a half batch in an 8 x 8 pan and baked for 35 minutes. At that point they were puffed and a deep golden brown but after a few minutes on the bench the middle fell completely. So my blondies were a little on the flat and greasy side. But the taste?

The taste test ...

AMAZING. Especially warm from the oven when they're gooey and melty and oh so delicious. You'll see in the photo above there are 2 pieces missing, well a few more went missing immediately after. I wish we had some left!

Thanks for an awesome pick Nicole! You can find the recipe on her blog Cookies on Friday under today's date.

Tuesday, May 4, 2010

Tuesdays with Dorie: Burnt Sugar Ice Cream

This week Becky of Project Domestication chose a recipe I have long been drooling over ... Burnt Sugar Ice Cream! This is pretty much caramel ice cream on steroids.

I had no real problems making this apart from letting my custard cook a little long. See I was at the crucial 'stir until it thickens' stage when I realised I hadn't converted the 180 degrees F into celsius and so had no idea what temperature I was waiting for. By the time I yelled for husband to google it my custard had reached 92.5 degrees C, a smidgen too hot, but at least there can be no complaints about raw eggs!

My only other issue was trying to take a photo without someone sticking his little fingers into it!

I topped mine with crumbled anzac biscuits for an extra sugar hit and some texture.

Thanks for a great pick Becky! You can find the recipe on Becky's blog or for much better photos than mine, check out the TWD blogroll.

In other news today is our 2nd wedding anniversary! While we're not doing anything special today (other than eating burnt sugar ice cream of course) we had a lovely night away on Sunday while Oscar stayed home with his nanna. It was our first baby-free night! Did miss the little monkey though :-)

Tuesday, November 10, 2009

Tuesdays with Dorie: Chocolate-Caramel Chestnut Cake

Today is my dad's 60th birthday and to celebrate we had a big family bbq on Sunday. You can't have a birthday party without birthday cake and this week's TWD pick was perfect!

Chestnuts aren't at all common in Australia. My only experience with them prior to this was in Paris as a 17 year old, and what an eye opener that trip was for a budding foodie! One freezing cold day while wandering through the streets we came across a street vendor selling roasted chestnuts in paper bags. I still remember the rustle of the bag, the warmth and delicious taste of those chestnuts.

Here I had to make do with tins of chestnuts and unsweetened chestnut puree (which I sweetened by blitzing it with 3 ts vanilla extract and 3 tbs of sugar) sourced from a local deli.

This cake is definitely not for the faint of heart, with 1/2kg butter, 1/2 litre of cream and almost 3 blocks of chocolate. It didn't rise as much as I expected so I only sliced it into 2 layers instead of 3. Still managed to use all of that delicious ganache though!

The taste test ...

One word - RICH. Dorie said it serves 16 but I think you could double that easily. There aren't too many times where just 1 piece of cake is enough but this was it. The flavour of the cake itself was absolutely sensational and I will definitely make it again, just without all the chocolatey excess.

It was the perfect finish to a fabulous lunch of roast pork loin cooked on the bbq, lots of salad, breads, cheese and drinks. We just didn't eat much else for the rest of the day.

Thanks for a great pick Katya! You can find the recipe on her blog here.

Monday, October 12, 2009

Caramel Swirl Cheesecake

Maybe I should rename this blog cheesecake.baby instead, as I seem to make a lot of them! I realised I wanted cheesecake quite on the spur of the moment, having begun devouring a packet of butternut snap biscuits and thinking how perfect they would be for a crumb base.

I started with Dorie's Tall and Creamy Cheesecake recipe and then tweaked it a little. Can I just say again how much I adore this recipe? Seriously, the BEST one ever. That and the fact it calls for my little cheesecake to 'luxuriate in a waterbath'. Gets me every time!

Caramel Swirl Cheesecake - Cheats Version

Base

250g buttersnap biscuits (or your favourite plain sweet biscuit)
125g unsalted butter, melted

Caramel

1 tin of caramel top and fill (basically a premade condensed milk caramel - you can definitely make this yourself but with cats and a baby I don't want to worry about exploding tins!)

Cheesecake

500g cream cheese (2 packs) at room temp
2/3 cup sour cream at room temp
2 eggs at room temp
1/2 cup sugar
2 ts vanilla extract

Preheat oven to 160 degrees C. Grease an 8" springform pan and wrap the outside in 2 layers of alfoil. Set aside. For the base, blitz your biscuits in the food processor then pour in the melted butter and combine well. Press over the base of the pan and up the sides as much as you can (I got about 2cm).

Wipe out the food processor bowl to remove any crumbs.

Blitz the cream cheese and sugar together until smooth (about 4 minutes). Add the eggs, one at a time, beating for about a minute after each addition. Add the vanilla and sour cream and process for a few minutes. The mixture will become smooth and velvety.

Pour about half the cheesecake mixture into the prepared base. Spoon teaspoonfuls of caramel randomly over the top. Pour over the remaining cheesecake mix and dot with more caramel (it will sink during the baking). Drag a butterknife through the mixture to create swirls of caramel, being careful not to touch the biscuit base. (I totally forgot to do this step and ended up with blobs of caramel. Still delicious).

Place your springform pan inside a baking dish. Pour boiling water into the baking pan, until the water reaches about halfway up the side the springform pan. Carefully place in the oven.

Bake at 160 degrees C for about an hour. Turn the oven off and leave your cheesecake to 'luxuriate in its waterbath' for another hour. Remove the pan from the water, allow to cool then refrigerate for at least 4 hours or overnight.

Serve with an extra drizzle of caramel (not that it needs it). Delicious!!!

Tuesday, September 29, 2009

Tuesdays with Dorie: Chocolate-Crunched Caramel Tart

Boy it's been a pastry filled month around the food.baby household! While it hasn't been great for my waistline, between the turnovers, pufflets, vols-au-vent and now this tart, I can say I have well and truly conquered my fear of making pastry. Woo hoo!

I have been eyeing off the Chocolate-Crunched Caramel Tart since I first flicked through Baking, and yes, it was every bit as good (and as rich) as it looks!

I searched high and low (well on high shelves and low shelves in woolies) for honey roasted peanuts without success. Just as I'd given up we walked past the Christmas section and noticed some honey roasted cashews. Sold! I'm trying to ignore the fact there are Christmassy foods out already.

The pastry came together beautifully. I probably overcooked it slightly but it was still tender and crumbly and shortbready. Even the caramel behaved as it should (I added an extra pinch of sea salt along with the salted butter). My only issue was with the ganache.

Note to self - do not store chocolate on top of the oven. For any reason. Even if only for a few minutes while you wipe down the bench because you WILL forget to remove it. And then your husband will cook lunch in that oven without realising there is chocolate on top.

Exhibit A - my lovely block of Green & Blacks 70% ...

This happened the day before I was planning on making the tart, so rather than have to remelt it the next day and hope that it survived the process, I made the ganache and refrigerated it overnight.

I poured the warm cream over the chocolate and got a smooth, luscious looking ganache. Then I added the butter and got an oil slick. I think butter really has no place in ganache. I stirred it through as best I could but the next morning I got this ...

Exhibit B - ewwwwww

I scraped the butter off the top and it was exactly the amount I added in. I'm never adding butter to ganache again. After nuking my ganache was back to delicious.

The taste test ...

Wow. Seriously, wow. I just wish I'd been able to get a decent photo (my camera is in being repaired and the focus on my phone sucks). It sliced beautifully, the layers were really pretty and the taste was sensational. We will definitely be making this again.

Thanks to Carla of Chocolate Moosey (love that name!) for choosing this week's recipe. Make sure you visit her blog for the recipe along with the TWD blogroll to see much better photos than mine!

Thursday, August 27, 2009

Daring Bakers August - Dobos Torte

The August 2009 Daring Bakers' challenge was hosted by Angela of A Spoonful of Sugar and Lorraine of Not Quite Nigella. They chose the spectacular Dobos Torte based on a recipe from Rick Rodgers' cookbook Kaffeehaus: Exquisite Desserts from the Classic Caffés of Vienna, Budapest, and Prague.

I have to admit I was a little daunted by this recipe but wow, what a result! The Dobos Torte is a layered sponge and chocolate buttercream cake with caramel and hazelnuts. I only made some slight changes to the recipe, using flaked almonds and scorched (chocolate covered) almonds to decorate. I also brushed each layer with Pom Pomegranate and Cherry Juice which added a little burst of freshness to each bite.

I had a brainwave when it came to assembling the torte. Normally my layer cakes are pretty wonky, with each layer slip-sliding all over the place even when I try to hold them in place with skewers etc. This time I assembled the cake inside a springform pan. I used the base of an 8" pan as the template for my sponge layers. As they shrunk a little while baking they fit perfectly inside the pan leaving a slight gap around the edge. I spread the buttercream right to the edge on each layer so that when it came to unmold the sides were essentially iced already and my layers were perfect.

My only hiccup was with the caramel wedges for the top of the cake. The recipe said to use the best looking cake layer for the top but I chose my worst one because all the others were perfectly cooked and even and I wanted them for my layers. I sliced my cake into 12 even wedges and spaced them just a few millimeters apart on a baking sheet. My caramel was very foamy and didn't seem to spread out much as I poured it over the cake wedges so I just kept pouring more and more on. Suddenly there was way to much and it ran off the edges into a big toffee puddle. I decided to leave it exactly as was and break it into pieces including the extra bits.

Seemed like a good idea in theory, but it was really hot that day and my wonderfully majestic caramel fans wilted and sagged in the heat.

The taste test ...

I was worried this would be too rich but it was actually very light. Delicate sponge layered with fluffy, almost mousse-like buttercream. Our least favourite part was the caramel. Even though I adore citrus I didn't like the lemon flavour at all here - it didn't seem to complement the cake. Plus by the time we came to eat, the caramel had completely lost it and was a sticky, pull-your-teeth-out mess. Most of it got left on the plate. Nonetheless I would definitely make this again (minus caramel). It was fabulous!

Thanks to Lorraine and Angela for a great challenge. This is something I would never have attempted on my own! You can find the recipe here.

Tuesday, February 24, 2009

Tuesdays with Dorie: (Crunchless) Caramel Bars

Mmmmmm ... was anyone else drooling at the mere thought of these?!

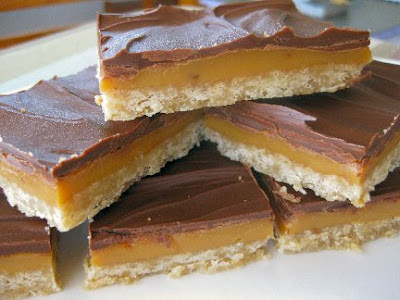
You will notice there is no 'crunch' with these bars. We can't get toffee bits in Australia and although I could have made my own English Toffee as someone suggested I decided to make a more traditional caramel slice instead. Purely because condensed milk caramel is one of my favourite things EVER.

I used Dorie's base (minus coffee and chocolate pieces) with caramel filling and melted chocolate on top. Recipe below!

Caramel Bars

Base-
1 ½ cup plain flour
½ tsp salt
¼ tsp ground cinnamon
240g unsalted butter, at room temperature
½ cup light brown sugar
¼ cup sugar
1 tsp pure vanilla extract

Condensed Milk Caramel-
60g butter
2 tablespoons golden syrup
1 can condensed milk

Preheat the oven to 160 degrees celsius fan-forced. Lightly grease a 9x13 inch baking pan and line the base with baking paper. Put the pan on a baking sheet.

To make the base, whisk together the flour, salt and cinnamon. Using a stand mixer beat the butter until smooth, about 3 minutes. Add the sugars and beat for another three minutes or until the mixture is light and creamy. Beat in the vanilla and turn off the mixer. Add all the dry ingredients, cover the stand mixer with a kitchen towel and pulse the mixer on and off at low speed about 5 times. Remove the towel, turn the mixer to low and mix until the dry ingredients are just incorporated and you have a very heavy, sticky dough. Scrape the dough into the buttered pan and smooth it into a thin, even layer.

Bake for 20 to 22 minutes, or until the base is bubbly and just starting to pull away from the sides of the pan. Transfer the pan to a rack.

To make the caramel, place all ingredients in a heavy based saucepan over medium high heat. Bring to the boil, whisking continuously for approx 8 minutes or until the mixture is thick, bubbling and a deep golden brown. Don't stop whisking for even a second or you will end up with a lumpy, black mess (my first batch ended up this way but steel wool works wonders).

Pour over the cooked base and return to the oven for 10 minutes. Remove and allow to cool completely. When cool top with melted chocolate. Once set, slice into bars and devour.


This is a great alternative to the traditional boiled-in-the-can condensed milk caramel which I am still too afraid to try!

The taste test ...

Oh. My. God. This slice is sinfully rich. Make sure you cut into bite sized pieces! There is no way this could be made into icecream sandwiches although ... maybe chopped up and stirred through vanilla icecream? Yum!

Big thanks to Whitney of What’s Left on the Table for this week's awesome pick.

On another note, we did a little shopping over the weekend.

"Awww, sock!"
(a reference to How I Met Your Mother from last night if you saw it)

So "little" obviously refers to the size of each piece rather than quantity because check out that stash! We went a bit crazy but I don't think we bought a single thing that wasn't on a great special. There was one little jacket in particular which was $50 full price and we got it for $12.50 (and seriously $50 for that? I don't think so)

Baby stuff is just so cute!!!

Saturday, November 29, 2008

Daring Bakers November - Caramel Cake with Caramelised Butter Frosting


With a recipe title like that is there anyone else whose arteries quivered at the mere thought of this cake??

This fabulous creation is Shuna Fish Lydon’s recipe which you can find at Bay Area Bites, and this month's hosts are Dolores of Chronicles in Culinary Curiosity, Alex (Brownie of the Blondie and Brownie duo) and Jenny of Foray into Food. Thanks guys, great pick!

This month's challenge was posted just in time for this to be my Dad's birthday cake back on 10th November. He loves caramel just as much as I do so it was the perfect pick.

The recipe is a little complicated in that it requires a caramel syrup to be made first which is then added to both the cake and the frosting.

My first attempt turned into a hideous blackened mess! Part of the problem was our 30 year old electric cooktop which is about a subtle as a sledgehammer. The other part was me being slightly distracted during which time the syrup went from amber to black and smoking while my back was turned (reading the recipe in my defence!)

My second attempt went better but I probably erred on the side of caution and didn't let it cook as far as it needed to. The taste was still a little sugary rather than caramelly, but it was still delicious and a gorgeous colour!

The cake itself came together beautifully. It did look a little curdled at one stage but I'm used to adding the milk and flour alternately and it always comes back together when the dry ingredients are added.

I tried out a slicone baking pan for the first time and I'm not sure why but it stuck to the bottom and was really difficult to remove. In retrospect it was probably good it happened because I was able to bend and stretch the pan to eventually release it without doing too much damage.

The only other issue I had was with the frosting, which was incredibly dry and crumbly. I ended up having to add double the amount of both cream and syrup to get it to a spreadable consistency. There was also far too much as I ended up with a full 1 1/2 cups leftover.

The taste test ...

The cake itself was incredibly good and one of the few 'caramel cakes' I've had which actually tasted like caramel rather than just sugar. I found the frosting incredibly, tooth-achingly sweet, which is probably the result of having to add extra syrup rather than the fault of the recipe itself. Now I love frosting but I ended up scraping a lot of it off my piece.

Overall a big thumbs up from all the taste testers. We had been out for dinner earlier and then came home to have cake and coffee for dessert. Despite being very full everyone ate their whole piece which is always a good sign!

Would I make it again? Probably, but not anytime soon because of the fiddlyness of the syrup. But for a special occasion it would absolutely be worth it.

Thanks to all the hosts for a great pick. It is something I wouldn't have tried otherwise!

Tuesday, October 7, 2008

Tuesdays with Dorie: Caramel-Peanut-Topped Brownie Cake

This week's recipe was chosen by Tammy of Wee Treats by Tammy and what a great choice! Considering how decadent Dorie's picture looked I decided we didn't need a whole cake, so I thirded the recipe and made 3 muffin sized cakes.

The cake mix worked perfectly. I lined a jumbo muffin pan and baked them for 25 minutes at 150 deg C. The texture was probably more cake than brownie but very soft, moist and intensely chocolaty. Maybe a few minutes less would have given a more fudge-like middle but I was totally happy with these.

The taste test ...

The cake was delicious! I will definitely be making this again. The muffin size works really well and I love doing individual serves. My only issue was with the caramel.

It took about 15 minutes to get a beautifully clear, deep amber toffee (I was tempted to make toffee apples at this stage) but when I added the cream and butter it all went wrong. The caramel went really milky and cloudy looking and cystalised as it cooled. The end result looks dull and uninviting. It tasted nice but a bit sugary rather than smooth as I had envisinged. While I did halve the recipe I've never had any trouble working with sugar before.

So if anyone out there can tell me where I went wrong I would be very grateful! My taste testers didn't care but the perfectionist in me really wants to make it, well ... perfect!

Related Posts Plugin for WordPress, Blogger...