Showing posts with label Mains. Show all posts

Monday, June 20, 2016

Garlic Chicken with Polenta (SRC)


Well, where has June gone?? I didn't mean for the blog to become a ghost town this month but between exams and assignments and just daily life with 3 children I've been really stretched this month!

But there is no way I would miss out on my Secret Recipe Club post! Each month members are assigned a blog in secret to peruse and choose something to share on the reveal day. This is my second month as a member of Group C and I am loving discovering all these new blogs!

This month I was assigned Where is my spoon? by Adina. Adina is Romanian but has lived in Germany for the past 10 years with her husband and 2 young children. Her recipes really reflect this European heritage and I spent many happy hours on her blog. There were literally dozens of very European recipes I would love to make - German Schnitzel, Transylvanian Yeast Cake and Linzer Torte just to name a few. But then I also loved her kid friendly recipes like homemade Chocolate Peanut Butter and the delightfully named Magical Soup for Children.

As Winter has finally arrived here I was looking for some serious comfort food and Adina's Garlic Chicken with Polenta ticks all the boxes. A simple but intensely flavourful meal, nothing fancy or complicated but so delicious that everyone is licking their fingers and asking for seconds. Adina describes it as a typical Romanian dish and something that her grandmother would have made. Perfect.

These photos really don't do it justice (it was pouring rain and very dark) but this was SO DELICIOUS! I made a few small changes to the sauce, just reducing it down a little and cooking out the garlic a little more to suit my kids' tastes.

I love simple food like this that when cooked with a little care become so much more than the sum of its parts.


Garlic Chicken with Polenta
Slightly adapted from Where is my spoon?

For the chicken:
8 chicken drumsticks
2 tbs extra virgin olive oil
2 cups chicken broth
1 ts sweet paprika
1/2 bunch flat leaf parsley, divided
4 cloves garlic, crushed
1 tbs butter
salt and pepper to taste

For the polenta:
1 litre water
1 tbs extra virgin olive oil
250g polenta
1 ts salt

Season the chicken with salt and pepper.

Heat the oil in a large, heavy based frying pan.

Fry the chicken pieces until browned on all sides.

Pour over the chicken broth, sprinkle on the paprika and half the chopped parsley.

Bring to the boil then lower the heat and simmer with the lid on but just ajar slightly to let some of the steam escape. Turn the chicken in the broth several times while cooking for about 30 minutes or until the chicken is cooked through.

(Start the polenta now).

Remove the chicken pieces to a dish and cover with foil to keep warm while you prepare the sauce.

Add the crushed garlic to the pan, increase the heat and simmer rapidly with the lid off for about 10 minutes or until it has reduced by half. Add the butter and stir to combine. Strain the sauce through a sieve into a jug, then return the sauce to the pan along with the chicken pieces.

Coat the chicken in the sauce, sprinkle over the remaining parsley and serve with polenta.

To make the polenta:

Bring the water and salt to the boil in a large heavy based pot. Once boiling add the polenta in a steady stream, along with the oil and cook over low heat, whisking often for 30-40 minutes or until cooked through.

Thank you for a wonderful month, Adina – this recipe is a keeper!

Thursday, March 17, 2016

My Vegetarian Chilli Bowls (Thermomix)


Whether you are vegetarian or not, there is definitely a place for vegetarian meals in your diet. We really enjoy meat and choose to buy it direct from the farm. But just 1kg of mince, 1kg paleo sausages and a big organic chicken does the 5 of us for a fortnight. The other nights? We tend to choose vegetarian meals which are still packed with protein and tons of flavour. Not only is it healthier to simply be eating more vegetables it's also much kinder on our budget.

One of my favourite places to grab meal ideas is from other blogs and one of my favourites is Vegie Head. Adele is vegan and she has created an amazing and inclusive community along with tons of great plant-based recipes. Being (mostly) dairy-free I have found vegan recipes to be a great place to start when looking to replace ingredients or to get inspiration.

We love Mexican food and these vegetarian chilli bowls were a huge hit, so much so that there wasn't any left for my lunch! Boo hoo. A few fresh ingredients and a handful of pantry staples and you could be having this for dinner tonight!

I have only included Thermomix instruction below but you could definitely make this on the stove top with a few simple alterations. Enjoy!

My Vegetarian Chilli Bowls
Inspired by Vegie Head

Quinoa:
200g quinoa
700ml water
1/2 ts salt
2 tbs extra virgin olive oil

Place the quinoa into a bowl, cover with water and leave to soak for 20 minutes while you prepare the sauce.

Add the water and salt into the thermomix bowl. Drain the quinoa into the simmering basket and place into the thermomix. Drizzle the oil over the quinoa.

Cook for 20 minutes / Varoma / SP 4.

Tip the quinoa into a thermoserver and set aside.

Sauce:
1 red onion
2 cloves garlic
1/2 bunch fresh coriander, roughly chopped
20g coconut oil
2 heaped ts cumin
1 heaped ts dried coriander
1/2 - 1 ts chilli flakes (to taste, or leave out entirely)
60g tomato paste
2 tbs vegetable stock paste
500g water
2 x 400g tins red kidney beans
1 x 400g tin corn kernels
juice 1 lime

to serve:
2 ripe tomatoes, chopped
1 avocado
lime cheeks
natural yoghurt

Chop onion, garlic and coriander stems 10 secs / SP 8, scraping down the bowl a few times if needed, until finely chopped. Add the coconut oil and cook for 3 mins / 100 degrees / SP 2. Add the cumin, dried coriander, chilli, tomato paste, stock paste and water and cook for 3 minutes / 100 degrees / SP 2.

Insert the butterfly, add the beans and corn and cook for 8 minutes / 100 degrees / reverse / SP 1.

Add the lime juice and check for seasoning.

Pour the sauce over the cooked quinoa, cover and leave to rest for 10 minutes or until most of the liquid has been absorbed.

Serve topped with fresh tomato, diced avocado and a dollop of yoghurt.

Serves 4-6

Do you do a meatless meal every week? Please share some of your favourites as I am always looking for inspiration!

Linking up with Domesblissity's Thriving on Thursdays

Monday, January 25, 2016

Crispy Southwest Chicken Bites (SRC)

Crispy Southwest Chicken Bites with Dairy Free Ranch Dressing from www.mywholefoodfamily.com

Happy new year everyone! What a long 2 months it's been since our last post for Secret Recipe Club. We had a wonderful Christmas, the kids are all set for school starting this week and it's Australia Day tomorrow. I love this time of year :)

Before I talk about the amazing recipe I chose this month, I need to let you know of some changes I've made around here. As you may have noticed my blog has a new look and a new name! I am now My Wholefood Family, which I think is much more reflective of the way we shop, cook and eat these days. I've also finally ventured onto Facebook a few days ago and I would love you to join me (it's a little quiet there at the moment!).

All done? Now back to the food. This month I was assigned the blog Burnt Apple. Traci is a married mum of 3 who cooks "healthy meals on a tight budget and on a tight schedule." Um yep sounds like I'm in the right place!

I got some great ideas from the roundup of AIP (auto immune protocol) dessert ideas, was intrigued by this non-dairy ice cream made using flax milk (I didn't know that was thing), drooled over these coconut sugar brownies, knew that with 3 boys a recipe for Fart Cookies would be a hit, on a hot summer day who wouldn't want some refreshing Watermelon Lemonade and for the perfect Christmas (or anytime) time snack how about Cinnamon Sugar Almonds?

In the end I settled on Traci's Crispy Southwest Chicken Bites. They were full of flavours I love and let me tell you, these did not disappoint. We loved them. No really, LOVED them! These are one the easiest and best tasting things I've made in ages. We can't buy ranch dressing here in Australia so after a bit of research I decided to make my own version which I adapted from here and here.

Crispy Southwest Chicken Bites filling www.mywholefoodfamily.com

Look at those colours! You just know that is going to taste amazing. I wasn't in my usual supermarket when I shopped for these and I couldn't find wonton wrappers anywhere. I settled for spring roll wrappers and while they were obviously a lot bigger they worked brilliantly.

I was amazed how good they tasted. With a simple brushing of egg white and baked in the oven they were super crispy and almost fried tasting. And dipped into that cool creamy dressing these were magic.


Crispy Southwest Chicken Bites
Recipe from Burnt Apple

2 cooked chicken breasts, shredded (mine was poached with garlic)
2 tbs olive oil
1/2 onion, finely diced
1/2 red capsicum, finely diced
2 cloves garlic, crushed
1/4 cup coriander, chopped
1/4 cup salsa verde
spring roll wrappers
2 egg whites
ranch dressing, to serve

Preheat the oven to 180 degrees Celsius / 350 degrees Fahrenheit. Lightly grease a large baking tray and set aside.

Add the oil to a frypan and sautee the onion and capsicum until tender (about 5 minutes). Add the garlic and cook for another minute or so. Remove from the heat and allow to cool slightly.

In a large bowl place the shredded chicken, coriander, salsa verde and cooled onion mixture and mix well.

Lay a spring roll wrapper on a board with the point facing you. Place a heaped spoon full of filling just below the middle and spread out slightly. Brush the edges with egg white. Fold over the bottom point, then fold in the sides then roll up into a spring roll shape.

Image source
Place onto the baking tray and repeat with remaining ingredients. Brush the rolls with egg white and bake for 15-20 minutes, flipping and brushing the other side with egg white halfway through cooking.

Remove from the oven and allow to cool for a few minutes before serving with ranch dressing.

Makes approximately 20

Thanks for a great month Traci! We loved this recipe and it's become a family favourite.

Friday, August 14, 2015

Delicious Dairy-free Lasagne

Dairy free Lasagne © www.foodbabylife.com

One of my all-time favourite meals is lasagne. Always has been and probably always will be! It has also been a favourite of my kids and I have some gorgeous photos of each of them on their first birthday pretty much covered in it from head to toe! Now that they are older they get to choose what they want to eat for their birthday dinner and Oscar, bless him, still always choose lasagne.

When I first had to give up dairy I really thought there was no way I could give up cheese. My husband used to call me a cheese-freak but now I haven't touched any for more than 18 months. Go me!

After so many dairy-free months I have perfected my dairy-free white sauce and use it for all sorts of recipes from tuna mornay to macaroni and 'cheese' and of course lasagne. I use the thermomix to make it because it's just so easy but you can of course do it on the stove top and I have included those instructions as well.

Go ahead and try it, I promise you won't miss the cheese at all!!!

Dairy free White Sauce

500ml rice milk (or any non-dairy milk)
50g olive oil
50g rice flour
2 tbs nutritional yeast
1 ts salt
1/8 ts nutmeg
pepper to taste

Thermomix - place all ingredients in the mixing bowl and cook for 7 minutes / 90 degrees / SP 4.

Stove top - heat the oil in a medium saucepan over medium heat. Add the rice flour and whisk  together. Cook for 2 minutes, stirring constantly then add the milk and whisk to combine. Once smooth add all remaining ingredients and cook over low heat for 5 minutes, stirring often. Use immediately.

To assemble the lasagne just alternate layers of Vegie-loaded Bolognaise sauce with lasagna sheets (gluten free work well) and dairy-free white sauce ending with lots of white sauce on the top. Bake for approx 45 minutes at 180 degrees C or until the pasta is tender and the top is bubbly and golden.

Monday, July 20, 2015

Winter Warmer - Beef, Bacon and Tomato Casserole


Slow Cooked Beef, Bacon and Tomato Casserole with Mashed Potato from www.mywholefoodfamily.com

 I know our winters here don't really compare with the rest of the world in terms of low temperatures but jeez it's been cold for the past week! We've had an antarctic vortex which brought snow to the southern parts of Queensland and dropped the nighttime temperature to as low as 3 degrees where I am.

The thing is, I'm not made for cold weather and our house certainly isn't either. We don't have heaters or reverse cycle air-conditioning or electric blankets. All we can do is rug up and keep warm on the inside with lots of cups of tea and hearty, warming fare like this casserole.

I love my slow cooker even in summer but it winter it is a lifesaver. I had this beef, bacon and tomato casserole simmering along for a full 8 hours and the house smelt amazing. Served with some buttery mashed potato it was the perfect dinner for a cold winter's night.

Beef, Bacon and Tomato Casserole
Serves 6

1kg gravy beef or chuck casserole steak
3 rashers bacon
1 x 700ml bottle tomato passata
2 medium onions, diced
6 medium carrots, sliced into the 2 cm circles
2 ts dried oregano
salt and pepper to taste
1 heaped ts homemade vegetable stock paste (optional)
2 tbs olive oil

Dice the beef into 4 cm pieces and fry off in batches in the olive oil in a large pan over medium-high heat until browned on all sides.

Place the browned beef into the bowl of your slow cooker. Add all remaining ingredients, stir, cover and cook on low for 8 hours. Check for seasoning.

Serve with mashed potato and steamed greens.

Wednesday, July 15, 2015

Pizza-Pasta


This is another of the kid-friendly meals I found on Better Homes and Gardens a few weeks ago. It sounded easy and delicious and was a nice twist on both pizza and pasta, both of which we eat about once a fortnight.

So this dish is pretty much exactly what it sounds like, all your favorite pizza toppings on bed of pasta. So simple I can't believe I've never thought of it before! As with last time there were no quantities available as I copied it down directly from the show but I have included what I used and my method.

I knew Mr 6 would love it - he eats pretty much anything except visible onion which absolutely must be picked off even if he can't taste it. Mr 4 would be a different matter. He has slowly come around to pizza but not with sauce. He generally has a plain base with olives, pineapple and cheese and calls it 'cheesy bread.' He is also just starting to come around to pasta but definitely not with any thing else touching it.  In the end he ate some pasta from around the edges of the plate (none with melted cheese on) and a few olives but wasn't particularly impressed. Anyone else with fussy kids? I would love to hear your tips and tricks!

Pizza-Pasta
Slightly adapted from Better Homes and Gardens

For the sauce:
2 stalks celery
2 onions
2 large carrots
2 cloves garlic, crushed
2 ts dried italian herbs
1 jar tomato passata
1 tbs tomato paste
1 tbs rice malt syrup
salt and pepper to taste
2 tbs olive oil

The toppings:
Pepperoni
Olives
Mozzarella cheese

The base:
Your favourite pasta (I used penne) cooked to al dente per packet instuctions

To make the sauce, finely chop the celery, carrot and onion and fry off with the olive oil in a large pan over medium-high heat. When it is just starting to soften, add the garlic and cook for another few minutes.

Add the remaining ingredients and simmer for about 15 minutes until the vegetables are completely cooked and the sauce is thick and smells amazing.

You can use the sauce as is or puree it like I did using a stick blender or food processor (you will need to let it cool down a bit first).

To assemble the dish, place a serve of pasta in each bowl (ovenproof), top with a generous amount of sauce then the pepperoni, olives and cheese. Place the bowls under the grill for a few minutes until the cheese melts. Make sure you let the bowls cool down before giving them to the kids!

Serves 6


Tuesday, June 30, 2015

Apricot Chicken

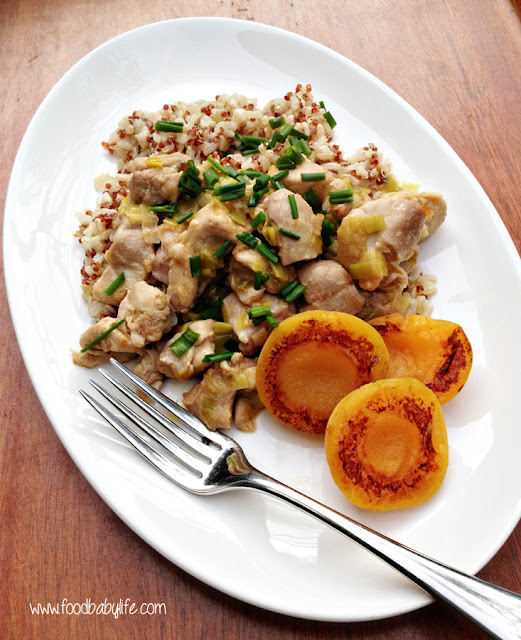
Apricot Chicken © www.foodbabylife.com

When I was growing up, apricot chicken was one of my favourite dinners. There's just something so delicious about that combination of sweet and savoury.

Last week on Better Homes and Gardens, Fast Ed did a series of 'kid-friendly' dishes which included apricot chicken and I realised my kids have never tried it. This is an updated version of the one I would have had growing up, which almost certainly would have included a packet of french onion soup mix!

The boys actually love watching BHG with me. Oscar really likes the gardening and pet segments, Charlie likes the building and of course we all love the cooking. So when we saw this recipe and the boys wanted to try it, of course we had to.

I copied it down directly from the show but you can view the video with the recipe here. It doesn't give all the exact quantities so I have included what I used below. The recipe said to use a rice and quinoa blend which I have seen around but never tried. As it was on special this week we got a bag and it was great. Really filling and much more interesting and nutritious than regular rice.

Fast Ed's Apricot Chicken
Serves 6

3 tbs butter
2 leeks, finely sliced
2 cloves garlic, crushed
1kg chicken thigh fillets, cut into 2cm pieces
1/4 cup flour
1 x 400ml tin apricot nectar
400ml chicken stock
1 x tin apricot halves
salt and pepper to taste
fresh chives
rice and quinoa to serve

Melt 1 tbs of the butter in a large pan over medium-high heat and saute the leeks until they are starting to soften. Add the crushed garlic and cook together until the leeks are tender and collapsed. Remove from the pan.

Dust the chicken pieces in flour and set aside. Cook your rice or quinoa using your preferred method and keep warm until ready to serve.

Add another 1 tbs of butter to the pan and fry off the chicken in 2 batches until it is well browned. Use the remaining 1 tbs of butter for the second batch of chicken pieces. Return the leek mixture and all the chicken to the pan and pour in the apricot nectar and chicken stock. Stir well and simmer, uncovered, for 15-20 minutes until the chicken is cooked through and the sauce has reduced and thickened a little. Check for seasoning and sprinkle in some fresh chopped chives just before serving.

In a separate non-stick pan over medium-high heat, place the apricot halves in, cut side down, and fry until golden brown. Remove and keep warm.

Serve the apricot chicken with rice or quinoa and the fried apricot halves.

The taste test ... we loved this! My 1yo and 6yo went absolutely nuts for it and wanted seconds and then thirds. This is definitely going into our rotation of meals.


Monday, June 15, 2015

Vegie-loaded Spaghetti Bologanise


I can't believe that in 7 years blogging I've never even considered posting my spaghetti bolognaise recipe before. I mean everyone and their mum has the best recipe out there, can you really improve on perfection? I changed my mind though as there has been a theme in my baking and cooking lately of surprise ingredients and hidden veggies and thought it might be interesting to others.

I just recently spilled the beans to my cauliflower-hating husband that he's been happily chowing down on cauliflower rice without even noticing! I did feel a little guilty about that but honestly if he enjoyed it then most kids will. But that's a recipe for another day.

The basic secret to my bolognaise sauce is pureeing a whole heap of veggies until they are very fine and cooking it very slowly for maximum flavour. By fully incorporating the vegetables into the sauce there are no weird textures or bits for the kids to pick. out. It is all just tomato saucy goodness!

To be honest this is easiest in the Thermomix as it chops, cooks and then purees all in the same pot however a food processor and stick blender will do the job as well.

I always make a big batch. The recipe below makes 2 full dinners plus leftovers for our family of 5 easily. We always use half on the night is made and freeze the rest for later. One will be spaghetti bologanise and then the next will be lasagne.

The rest of the family loves spaghetti but I will often have my bolognaise sauce on a pile of roasted pumpkin and greens. Makes my tummy happier and I get even more veggies in one meal which is a good thing.

If you have fussy kids (or husbands!) give this one a go :)

My Veggie-loaded Spaghetti Bolognaise

1 onion
3 cloves garlic
2 carrots
2 stalks celery
2 zucchinis
2 red capsicums
1-2 cups greens (kale, spinach, broccoli stems etc)
1kg beef mince (or a beef/pork/veal blend)
1 x 750ml jar tomato passata
2 tbs olive oil
a big handful of fresh herbs (basil/oregano/parsley) roughly chopped or 1tbs dried Italian herb mix
1 heaped tbs homemade veggie stock paste
salt and pepper to taste

-------------------------------

TMX - place the onion, garlic, carrots, celery and capsicum into the bowl and chop for 10 seconds / SP 5-8, using the spatula to stir if needed. Add the oil, herbs, stock paste and passata and cook for 20 minutes / 100 degrees / SP 2. Scrap down the sides and puree for 1 minute / SP 5-9. Check for seasoning. While the sauce is cooking, brown the mince in a large pan. When the sauce is done either add it to the pan and simmer together for at least 30 minutes, or place the mince and sauce plus an extra jar of passata into the slow cooker and cook on low for 4-5 hours.

-------------------------------

Using a food processor or by hand, grate the carrots, celery, zucchini and capsicums and then set aside.

Place a large pot over medium heat and add 1 tbs oil. Brown the mince and then remove it from the pan, draining the fat if you wish (I don't bother).

Add the remaining 1 tbs oil along with the chopped onion and garlic and saute until translucent.

Add the grated veggies, passata, stock and herbs and simmer for around 30 minutes, until the vegetables are cooked and it smells amazing.

Using a stick blender or food processor, blitz the sauce until it is completely smooth.

Return to the pot, add the browned mince, give it a good stir together and simmer for as long as you can (I usually do this step in the crockpot and allow it to cook on low for 4-6 hours) but even an hour would be good. Check for seasoning.

Serve with pasta or veggie noodles.

Makes LOTS.

Monday, January 26, 2015

Tater Tot Shepherd's Pie (SRC)

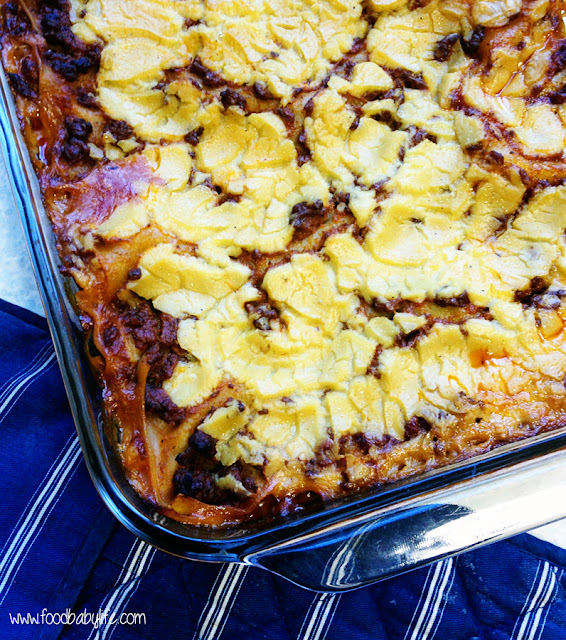
Tater Tots Shepherd's Pie © www.foodbabylife.com

Happy New Year! And happy Australia Day to all my fellow Aussies! Hard to believe we are already at the end of January. Christmas seems like a distant memory, school starts tomorrow and we have our first Secret Recipe Club post for 2015!

I am so excited for another year of SRC. For those who are new, each month we are assigned a blog in secret to peruse, choose a recipe from and post on the same day. Today is the reveal day for Group D.

This month I was assigned Baking and Creating with Avril. Avril describes her food as 'nothing too fancy but always made with love and happiness'. I love this! I headed straight to the kid-friendly section and found so many recipes that my kids would love like the Blueberry Pie Pancakes, Cookie Sticks and Yummy Zucchini Cookies and I've bookmarked them to try.

I'm always on the lookout for dinner ideas though and was really tempted by Avril's Risotto and Beef Stuffed Tomatoes but when I saw a recipe called (Carrie's Famous) Tater Tots Shepherd's Pie I just had to check it out. I mean who is Carrie and why is it famous? I also had no idea what tater tots were and quickly learned they are the same as potato gems here in Australia!

In her post Avril describes how her friend Carrie made this casserole while they were away for a week's holiday as a part of a group of 9 girlfriends and their 7 children. How awesome would that have been? I am definitely raising the idea of a girls' week away with my friends!

The classic shepherd's pie has mashed potato on top but strangely none of my kids are that keen on mashed potato, whereas I could eat it by the bowlful. They do however, absolutely adore potato gems/tater tots and we do get them as a treat every now and then. So how could we go wrong with a shepherd's pie topped with potato gems!

Tater Tots Shepherd's Pie © www.foodbabylife.com

I couldn't resist making one change to the recipe and that was to add something tomato-y to the meat. I used a tin of condensed tomato soup and loved the flavour but it did make the bottoms of the potato gems a little mushier than how they appeared to be in the original recipe. No matter, it was delicious! Rich savoury mince with corn, cheese and crunchy topped potato gems. Just divine and a perfect kids meal.

Tater Tots Shepherd's Pie © www.foodbabylife.com

(Carrie's Famous) Tater Tot Shepherd's Pie
Adapted from Baking and Creating with Avril

1.5kg beef mince
1 medium onion, chopped
1 tsp garlic salt
1/2 tsp ground pepper
1 can condensed tomato soup
2 tsp Worcestershire sauce
1 can creamed corn
1 can sweet corn, drained
1-2 cups grated cheddar cheese
1 bag frozen Tater Tots (Potato Gems)

Preheat oven to 180 degrees C / 350 degrees F.

Over medium heat, saute chopped onion in a little oil until soft. Add in the beef mince and cook until well browned, then turn off the heat and drain any extra grease. Stir in the tomato soup, garlic salt, pepper and Worcestershire sauce.

Pour the meat mixture into a 9 x13 baking dish, then spoon over the creamed corn and drained can of sweet corn. Sprinkle a layer of grated cheese over corn, layer frozen tater tots over grated cheese and then sprinkle with more cheese to finish.

Bake for 25-30 minutes (check after 20 minutes to make sure casserole is not getting too brown).

Thanks for a brilliant recipe Avril (and Carrie). We all loved it!

http://secret-recipe-club.blogspot.com.au/


Monday, January 27, 2014

Pistachio Crumbed Chicken with Raspberry Soy Sauce (Secret Recipe Club)


Happy new year everyone and welcome to my first Secret Recipe Club post of 2014!

So my blogging has been a little sporadic to say the least over the past couple of months. Who would have thought that 3 little boys would keep me so busy! My littlest boy is now 3 months old and sleeping pretty well so I am finally starting to feel more like myself and more motivated to get back into the kitchen.

This month for SRC I was assigned My Judy the Foodie by Shari. I love the idea behind this blog, with Shari cooking her way through her mother Judy's recipes as a way of remembering her and preserving her culinary prowess.

I can really relate to Shari as I lost my mum to cancer in 2008 and actually started this blog within a few weeks of her passing. While she didn't love cooking she certainly encouraged me and loved eating anything I made. I know she would have loved me blogging.

While Shari has some delicious sounding sweets on her blog I am on a healthy-eating kick at the moment to shift some baby weight so decided to stick with a main meal. The one I chose, Pistachio Crusted Chicken with Raspberry Soy Sauce, had me so intrigued I just had to make it!

I sent my husband out to buy the ingredients for this one and we both had mini heart attacks at the price of pistachios - about $60/kg!!! So we got just 1 cup of un-shelled pistachios and made up the rest of the quantity with mixed nuts. The end result was still really tasty with that gorgeous pistachio green colour. I would however recommend blitzing the nuts in a food processor for a smoother crumb. I crushed mine very carefully with a rolling pin so as not to wake the baby!

I was a little dubious about the sauce, I mean who mixes raspberry jam with soy sauce and horseradish? I will admit to having a little taste of the sauce on its own and wondering whether I'd made a huge mistake. But Judy was onto something because when it was poured over the chicken it was delicious! I served it with sweet potato mash and it made a really lovely dinner.

Recipe Pistachio Crusted Chicken with Raspberry Sauce
Adapted from My Judy the Foodie

500g chicken thigh fillets
garlic powder
olive oil for frying
sea salt
3 eggs, beaten
1 cup flour
1.5 cups crushed pistachio nuts
250g jar of raspberry jam (mine was St Dalfour 100% fruit)
90mls low salt soy sauce
2 ts of white horseradish from a jar

Preheat oven to 180 degrees Celsius.

Season the chicken with garlic powder and sea salt. Dip the chicken fillets into a bowl filled with flour, then into a bowl full of beaten eggs. After chicken is fully coated with egg wash, place in a bowl with the crushed pistachio nuts and cover completely.

In a large fry pan over medium high heat, fry the chicken pieces in about ¼ cup olive oil until both sides are golden, approximately 2-3 minutes per side.

Remove the pieces from the pan and place on a baking tray and bake for approximately 20 minutes or until cooked through.

To make the sauce, combine the raspberry jam, soy sauce and horseradish in a small bowl and mix completely to desired taste. Heat the sauce if you wish and pour over top baked chicken.


Secret Recipe Club


Monday, April 29, 2013

Secret Recipe Club - Mongolian Lamb

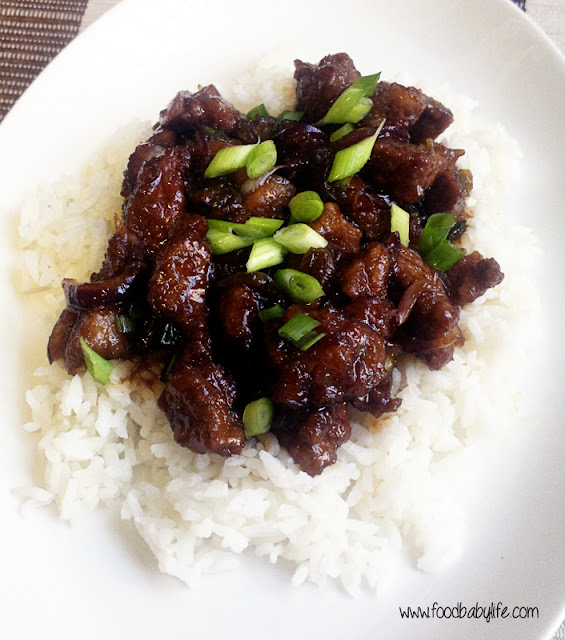
Mongolian Lamb © www.foodbabylife.com
This is now my third month with the Secret Recipe Club and I'm loving everything about it! From waiting expectantly for the email with my assigned blog inside, to spending many happy hours scouring that blog to find just the right recipe.

This month I was assigned Lynsey's blog called Lynsey Lou's. Despite living on the other side of the world I found we have lots in common from being married at around the same time in 2008 and starting to blog soon after, to just a general passion for food and cooking. I loved all of Lynsey's recipes and had a really hard time choosing just one! In the end I let my husband choose his favourite and that was Lynsey's Mongolian Beef. Not sure whether it's just in Australia but we used to get Mongolian Lamb whenever we had Chinese food so I of course adapted it to use lamb instead. 

I haven't eaten much Chinese food at all in recent years after figuring out I have a sensitivity to MSG aka Chinese Restaurant Syndrome. Hubby and I went to a Thai restaurant on our second date and I spent half the meal locked in the bathroom feeling faint with heart palpitations and a throbbing headache. Lucky for me he stuck around!

Anyway, no such problems this recipe! It was absolutely delicious, packed with flavour and probably the closest thing to takeaway Chinese food that I've ever made at home. It was the first time I've fried meat like this and it really gave the dish that authentic taste and texture. I did find it a little too sweet so next time I would reduce the brown sugar to just 1/2 cup. Otherwise this was a huge success.

Mongolian Lamb
Adapted from Lynsey Lou's Mongolian Beef

2 ts vegetable oil
1 tbs fresh minced ginger
3 cloves garlic, crushed
1/2 cup soy sauce
1/2 cup water
3/4 cup dark brown sugar
Vegetable oil, for frying (about 2 cups)
500g lamb steaks
1/4 cup corn flour
1 large red onion, thinly sliced
2 green shallots, sliced finely

To make the sauce, heat the oil in a medium saucepan over medium-low heat. Add the ginger and garlic to the pan, give it a quick stir then quickly add the soy sauce and water before the garlic scorches. Add the brown sugar, stir to dissolve, and then bring the sauce to the boil until it thickens and reduces, approx 5 minutes. Remove sauce from the heat and set aside.

To prepare the lamb, slice it thinly on the diagonal into ½ cm thick pieces. Tilting the blade of your knife to about 45 degrees will give wider cuts. Dust the pieces in corn flour then leave to rest for a few minutes so it sticks to the meat.

Heat 2 cups of oil in a wok or large deep fry pan until it's hot but not smoking (a wooden spoon dipped in the oil should start to bubble straight away).Carefully add the lamb in 2 or 3 batches to the hot oil and fry for two minutes, or until it just begins to darken on the edges. It doesn’t need to be cooked through at this stage. Stir the meat around a little so that it cooks evenly then remove with a large slotted spoon and drain on paper towel. Repeat with remaining batches of lamb. Tip the hot oil into a heatproof jug then return the pan to the stove over medium heat.

Add the red onion and shallots (reserving a small handful of the shallots for garnish) and sauté for a few minutes until it becomes soft and translucent. Add the beef and the sauce and cook, stirring for another few minutes until it is well combined and the sauce has thickened.

Remove the lamb and onions (leaving excess sauce behind as it is very rich) and serve with plenty of steamed rice and a sprinkle of shallots over the top. Serves 4-6.


Secret Recipe Club


Monday, April 30, 2012

Meatless Monday - Vegetarian Cottage Pie

Now I don't want to stir up any trouble but it seems there has always been a bit of confusion about the difference between cottage pie and shepherd's pie. To me, a shepherd's pie is a savoury mince mixture topped with mashed potato. A cottage pie on the other hand has a pastry shell topped with savoury mince and mashed potato. See? Worlds apart.

I have always loved cottage pies and they were my first choice at the school canteen back in the day.

If you're on a low-carb diet you will definitely want to skip this one!


Food.Baby's Vegetarian Cottage Pie

Shortcrust Pastry
265g plain flour
125g chilled butter, diced
1 egg yolk
2 tbs iced water

To the bowl of a food processor add the flour and butter. Using the dough blade (the plastic one) pulse until the mixture resembles very coarse breadcrumbs. Add the egg yolk and 1 tablespoon of the water and pulse again until it combines. The mix will start to clump and pull away from the sides. Stop immediately and turn the dough out onto a floured board. Press roughly together and put into the fridge to rest for at least 15 minutes.

Roll out the dough to about a pencil thickness, enough to cover the base and sides of a 25cm pan. Press into the pie dish and use a knife to trim away the excess. Patch any holes with the scraps. Place into the freezer for 30 minutes while the oven is preheating to 190 degrees Celsius.

Bake for 15 minutes. Don't worry if it shrinks a little as there should still be enough space for your fillings.

Or skip all this and use bought shortcrust pastry.

Savoury Mince Filling
1 x 300g packet Quorn veggie mince
1 can lentils, drained
1 can diced tomatoes
1 can water
1 large onion, diced
2 cloves garlic
1 vegetable stock cube
Salt, pepper and sugar to taste
2 tbs oil

Over medium-high heat, fry the onion and garlic in the oil until softened. Add the veggie mince and lentils and cook for about 2 minutes. Add the rest of the ingredients and bring to the boil. Reduce the heat to a fast simmer and cook for around 20 minutes or until most of the liquid has evaporated and you have a pie-filling-like consistency.

Mashed Potato Topping
1kg potatoes and/or sweet potatoes, peeled and chopped roughly
Salt
50g cheese
20g butter
Milk or hot water

Place the chopped potatoes in a large pot of cold water. Cover and bring to the boil. Once boiling cook for approx 15 minutes or until the potatoes are tender. Drain and tip back into the saucepan. Add the butter and a splash of milk and mash until smooth. Season to taste.

To assemble
Pour your mince filling into the prepared pastry shell. Top evenly with mashed potato. Sprinkle top with grated cheese and bake at 190 degrees Celsius for 20-25 minutes or until the top is golden and bubbling.

Serve with a green salad and plenty of tomato sauce!

Serves 6.

Monday, November 16, 2009

Meatless Monday - Ratatouille with Corn Cakes

Today marks what will hopefully become a regular thing - a week's worth of meals already planned and shopped for! In the interest of our waistlines and budget we have decided to make 2 or 3 of those meals vegetarian. Tonight's dinner was this Ratatouille with Corn Cakes. So fresh and packed with flavour, I thought it was delicious! Hubby thought it needed beef. Oh well!

Ratatouille with Corn Cakes
p102 'Almost Vegetarian' by The Australian Woman's Weekly Cookbooks, 1993

2 tbs olive oil
1 medium brown onion, finely sliced
1 clove garlic, crushed (I used 3 cloves - can't have too much garlic!)
3 baby eggplants (180g) sliced thinly
2 medium zucchini, sliced thinly
1 red capsicum, chopped finely
1 green capsicum, chopped finely
150g button mushrooms, halved
2 x 410g tins chopped tomatoes
2 medium tomatoes, chopped finely
1/3 cup fresh basil leaves
1/4 cup parmasan cheese flakes

Heat oil in a large saucepan; cook onions and garlic, stirring, until onion is soft.
Add all other vegetables and cook until tender.
Add both tins of tomatoes and the fresh tomato. Bring to the boil. Reduce the heat and simmer, incovered, for about 20 minutes or until the vegetables are soft and the sauce is thickened slightly. Season to taste with salt and pepper (and sugar, 1-2 ts depending on the acidity of your tomatoes).
Serve ratatouille with corncakes, topped with basil and cheese.

Corncakes:
2/3 cup wholemeal plain flour
1/2 cup white plain flour
130g tin corn kernels, drained
2 x 130g tins creamed corn
2 eggs
3/4 cup (180ml) milk

Sift flours into medium bowl; add combined corn, creamed corn, eggs and milk. Whisk until comined; stand 30 minutes.
Pour 1/4 cup mixture into heated, greased frying pan. Cook until bubbles appear on surface and underneath is browned. Turn; brown other side. Repeat with remaining mixture.

Do you have a favourite vegetarian meal? I'm looking for inspiration so would love to hear your ideas!

Tuesday, December 2, 2008

Giving Thanks

Hmmm about 6 days ago I said this post would be coming 'tomorrow'. Woops!

Even though Thanksgiving isn't celebrated in Australia we decided to have a special dinner, and of course we had Thanksgiving Twofer Pie for dessert. It obviously wasn't a holiday here so 'special' in this case meant a lovely roast chicken (which I never do midweek), real gravy (which I hardly ever do) and stuffing (which I only ever make for Christmas). It was really nice to sit down together and enjoy a meal a like this, for no real reason ... just to be together. Which is, I think, the point of Thanksgiving??

Despite a difficult year we do have a lot to be thankful for. Not the least of which being that after our 19 week scan last Wednesday we now know that we are having a healthy baby! Everything looked perfect and we could even count the little fingers on each hand.

We also know the gender because curiosity got the better of us and ...
Back to food for a moment seeing as this is a food blog. This is my recipe for Cranberry and Macadamia Stuffing (which never actually got stuffed anywhere but you can if you want to).

Cranberry and Macadamia Stuffing
a Food.Baby original

approx 200g day old bread, preferably sourdough
1/2 cup dried cranberries
1 cup macadamias, lightly toasted and roughly chopped
1 red onion, diced finely
2 cloves garlic, crushed
4 rashers of bacon, diced
a few good pinches of dried thyme and any other herbs you like
salt and pepper to taste
2 eggs

Tear the bread into large pieces then pulse in a food processor to form large crumbs. Set aside.

Heat a frypan over medium heat and fry the bacon until it starts to crisp, add the onion and garlic and cook until the onion is translucent. You shouldn't need to add any oil as the fat will render from the bacon.

Add the remaining ingredients (except the egg) and check for seasoning.

Add as much egg as you need to bind the mixture. It should hold together but not be stodgy.

Pour the mix onto a large piece of alfoil lined with baking paper. Shape into a rough log, roll up and twist the ends to seal.

Bake at 180 degrees C for approx 45 minutes.

Tuesday, November 4, 2008

Dinners

Despite the lack of posts over the past week or so I have actually been cooking. And I've managed to make some pretty tasty dinners despite the recent development of light headedness practically every evening. Blah.

So in no particular order (and without recipes because to be honest I just made this stuff up) ...

Chicken Caesar Salad with giant homemade croutons, bacon and lots of crispy cos lettuce

Quick ham and asparagus macaroni cheese

Herb and mustard marinated pork steaks with herbed couscous and greek yoghurt

Chargrilled greek style chicken with rice and coleslaw

Quick vegetable fried rice with bbq pork belly

Yummy!

Wednesday, October 29, 2008

Daring Bakers October - Pizza!

A big thank you to Rosa from Rosa's Yummy Yums because I loved this month's challenge! We make pizza at home pretty regularly but lately have resorted to pre-made bases because none of the dough recipes have been turning out very well. Until now that is!

We made 5 different types on 2 occasions and can honestly say the bases were some of the best I have ever eaten, at home or abroad. I am delighted to be able to add this recipe to my repertoire.

We also kept the toppings to a minimum on each - a maximum of 4 ingredients or flavours per pizza which is just how I like them usually. Light and simple and not overly weighed down with cheese.

Apologies for the bad photos. The light in our kitchen is shocking and I wasn't about to let my slices get cold while I played around!

Classic Ham and Pineapple

BBQ Chicken with Red Onion and Mushrooms

Tomato, Basil and Mozzarella

Cheesy Potato and Spring Onion

Dessert - Nutella with Flaked Almonds and Raspberries

BASIC PIZZA DOUGH
Original recipe taken from “The Bread Baker’s Apprentice” by Peter Reinhart.

Makes 6 pizza crusts (about 9-12 inches/23-30 cm in diameter).

4 1/2 Cups (20 1/4 ounces/607.5 g) bread flour or all purpose flour, chilled
1 3/4 Tsp Salt
1 Tsp Instant yeast (I used 1 1/2 ts)
1/4 Cup (2 ounces/60g) olive oil or vegetable oil
1 3/4 Cups (14 ounces/420g or 420ml) water, ice cold (40° F/4.5° C)
1 Tb sugar
Semolina/durum flour or cornmeal for dusting

DAY ONE

1. Mix together the flour, salt and instant yeast in a big bowl (or in the bowl of your stand mixer).

2. Add the oil, sugar and cold water and mix well (with the help of a large wooden spoon or with the paddle attachment, on low speed) in order to form a sticky ball of dough. On a clean surface, knead for about 5-7 minutes, until the dough is smooth and the ingredients are homogeneously distributed. If it is too wet, add a little flour (not too much, though) and if it is too dry add 1 or 2 teaspoons extra water.

NOTE: If you are using an electric mixer, switch to the dough hook and mix on medium speed for the same amount of time.The dough should clear the sides of the bowl but stick to the bottom of the bowl. If the dough is too wet, sprinkle in a little more flour, so that it clears the sides. If, on the contrary, it clears the bottom of the bowl, dribble in a teaspoon or two of cold water. The finished dough should be springy, elastic, and sticky, not just tacky, and register 50°-55° F/10°-13° C.

3. Flour a work surface or counter. Line a jelly pan with baking paper/parchment. Lightly oil the paper.

4. With the help of a metal or plastic dough scraper, cut the dough into 6 equal pieces (or larger if you want to make larger pizzas).

NOTE: To avoid the dough from sticking to the scraper, dip the scraper into water between cuts.

5. Sprinkle some flour over the dough. Make sure your hands are dry and then flour them. Gently round each piece into a ball.

NOTE: If the dough sticks to your hands, then dip your hands into the flour again.

6. Transfer the dough balls to the lined jelly pan and mist them generously with spray oil. Slip the pan into plastic bag or enclose in plastic food wrap.

7. Put the pan into the refrigerator and let the dough rest overnight or for up to thee days.

NOTE: You can store the dough balls in a zippered freezer bag if you want to save some of the dough for any future baking. In that case, pour some oil (a few tablespooons only) in a medium bowl and dip each dough ball into the oil, so that it is completely covered in oil. Then put each ball into a separate bag. Store the bags in the freezer for no longer than 3 months. The day before you plan to make pizza, remember to transfer the dough balls from the freezer to the refrigerator.

DAY TWO

8. On the day you plan to eat pizza, exactly 2 hours before you make it, remove the desired number of dough balls from the refrigerator. Dust the counter with flour and spray lightly with oil. Place the dough balls on a floured surface and sprinkle them with flour. Dust your hands with flour and delicately press the dough into disks about 1/2 inch/1.3 cm thick and 5 inches/12.7 cm in diameter. Sprinkle with flour and mist with oil. Loosely cover the dough rounds with plastic wrap and then allow to rest for 2 hours.

9. At least 45 minutes before making the pizza, place a baking stone on the lower third of the oven. Preheat the oven as hot as possible (500° F/260° C).

NOTE: If you do not have a baking stone, then use the back of a jelly pan. Do not preheat the pan.

10. Generously sprinkle the back of a jelly pan with semolina/durum flour or cornmeal. Flour your hands (palms, backs and knuckles). Take 1 piece of dough by lifting it with a pastry scraper. Lay the dough across your fists in a very delicate way and carefully stretch it by bouncing it in a circular motion on your hands, and by giving it a little stretch with each bounce. Once the dough has expanded outward, move to a full toss. ( My dough was too sticky and delicate to toss)

NOTE: Make only one pizza at a time. During the tossing process, if the dough tends to stick to your hands, lay it down on the floured counter and reflour your hands, then continue the tossing and shaping. In case you would be having trouble tossing the dough or if the dough never wants to expand and always springs back, let it rest for approximately 5-20 minutes in order for the gluten to relax fully,then try again. You can also resort to using a rolling pin, although it isn’t as effective as the toss method.

11. When the dough has the shape you want (about 9-12 inches/23-30 cm in diameter - for a 6 ounces/180g piece of dough), place it on the back of the jelly pan, making sure there is enough semolina/durum flour or cornmeal to allow it to slide and not stick to the pan.

12. Lightly top it with sweet or savory toppings of your choice.

13. Slide the garnished pizza onto the stone in the oven or bake directly on the jelly pan. Close the door and bake for about 5-8 minutes. (I needed 10 – 12 minutes)

Wednesday, September 17, 2008

Beef and Sweet Potato Samosas

It's been ages since we had Indian food. I'm always a little wary of trying new places because I have a major sensitivity to MSG and food dyes, and so many supposedly reputable restaurants cram their food full of artificial rubbish. It drives me crazy!

Ok, rant over.

Making your own Indian food can be a little time consuming but the results can be amazing. We have a Butter Chicken recipe which is out of this world good (I will definitely be posting about it soon!) that requires marinating overnight. This time around I was looking for something quicker but still with great flavours and that would be good for lunch the next day. These Beef and Sweet Potato Samosas fit the bill perfectly!

You can definitely play around with the type and quantity of spices here. I prefer warm, aromatic spices to anything that makes your mouth explode, so this recipe is tailored that way. It also makes a LOT of samosas, so they make wonderful party food.

Beef and Sweet Potato Samosas
A food.baby original

500g beef mince
1 large orange sweet potato, diced finely
1 large onion, diced finely
4 cloves garlic, chopped
1 thumb sized piece of fresh ginger, grated
1tbs mango chutney
2 ts ground coriander
2ts ground cumin
2 ts tumeric
4 ts garam masala
1/4 ts chilli powder
500 ml chicken stock
2 tbs plain flour
7 sheets puff pastry
1 egg, beaten
salt and pepper

Heat a large frypan over medium-high heat and add a tablespoon of ghee or vegetable oil. Once hot, add the onion and fry for a few minutes or until translucent. Add the garlic, ginger and the sweet potato and fry, stirring constantly for around 5 minutes until the sweet potato starts to soften slightly. Remove the mixture from the pan.

Add a little more oil if you need to, then add the beef mince and fry until cooked through, breaking up the lumps as you go. When it is about half cooked, add all the spices and continue to cook, stirring until the beef is done.

Return the vegetable mix to the pan and stir to combine. Sprinkle over the flour and stir well for a few minutes to cook out the raw flour. Pour over the chicken stock. This will deglaze the pan, picking up all the yummy spices and flavour stuck on the bottom. It will look like far too much liquid at this stage. Reduce the heat to low, stir in the chutney, cover and simmer for about 20 minutes.

If a lot of liquid remains, increase the heat and remove the lid. Cook stirring occasionally until the mixture is thick. This is basically like a pie filling and if it is runny your pastry will go soggy.

Once you are happy with the consistency, remove from the heat and allow to cool for at least 15 minutes.

To prepare the samosas, preheat the oven to 220 deg C. Place a sheet of puff pastry on a board and cut into 4 equal squares. Place about a tablespoon of filling into the centre of each square. It is always a bit of trial and error to see how much filling will fit. Using a pastry brush, brush beaten egg over the cut edges. Fold each square into a triangle, pressing down on the edges with a fork to seal in the filling. Place on a lightly greased baking tray. Brush the tops with beaten egg.

Bake for approx 20 minutes or until the pastry is puffed and golden brown.

This amount of filling will make about 30 samosas which is more than most people need. You can freeze the samosas uncooked. Just thaw in the fridge overnight before baking as usual.

Serve with your favourite sauces. We used spicy tomato and yoghurt & garlic. Yummy!

Monday, August 18, 2008

Quick Macaroni and Cheese

This to me is the ultimate in comfort food and this version is quick and easy. We had this last night with pan fried pork steak on the side. No veggies as we were too lazy!

Quick Macaroni and Cheese
A Food.Baby original

500g macaroni
1 tin of tomato soup
1 tin's worth of chicken stock
1 tin's worth of milk
1 onion, chopped finely
2 cloves garlic, crushed
50g butter
2 heaped tbs plain flour
2 cups grated cheese (gruyere, a sharp cheddar or a combination of both work well)

Cook the macaroni as per packet directions until just done, drain and return to the pan (off the heat). Meanwhile, prepare the sauce. Combine the soup, stock and milk and stir well, Set aside.

In a frypan melt the butter and when it starts to foam add the onion and garlic. Saute until translucent and fragrant. Add the flour and cook, stirring continuously for 2 - 3 minutes.

A little at a time, pour the soup/stock/milk mix into the pan, stirring continuously to prevent lumps. Continue until all the liquid has been added. The sauce will thicken quite a bit. Taste and season with salt and plenty of pepper.

Pour the sauce over the macaroni and stir to combine. If you want to eat straight away, add the cheese and stir over low heat for a few minutes until hot and melty. Alternatively, add about half the cheese and stir well, then pour the mix into a large baking dish and cover with remaining cheese. Add a generous sprinkle of paprika and bake at 220 deg C for about 20 minutes or until bubbly and golden brown.

Great served with a side salad or just on its own!
Serves 6.

Sunday, August 10, 2008

Sesame Chicken with Ginger Rice

This is one our favourite chicken dishes and the bonus is that it's light, healthy and full of flavour. But be warned, if you don't like ginger, DO NOT make this recipe! Or at least cut down the amount of fresh ginger. The ginger beer sounds strange but it creates beautifully sticky, fragrant rice that is tasty enough to eat on its own. We always make double the recipe so there is enough for lunch the next day.

Sesame Chicken with Ginger Rice
Adapted from Simply Healthy, 1999, p82

500g chicken breast
1 tablespoon sesame seeds
1 tablespoon rice wine
2 tablespoons honey
2 tablespoons soy sauce
2 tablespoons oyster sauce (I leave this out because it contains MSG)
1 tablespoon sesame oil
1 tablespoon of fresh ginger, chopped finely
1 tablespoon sesame oil
1 cup short grain rice
330ml ginger beer
1 teaspoon diced pickled ginger ( I leave this out because it is full of artificial colours etc)
1 tablespoon finely chopped spring onions

Toast the sesame seeds in a dry frying pan for 2-3 minutes.Combine sesame seeds, rice wine, honey, soy sauce, oyster sauce and sesame oil together in a large bowl to create the marinade. Cut the chicken into large strips and place in the marinade for 1 hour or overnight.

For the rice, place the fresh ginger and sesame oil in a large saucepan over a low heat. Cook, stirring occasionally for 5 minutes and then add the rice. Stir for 2 minutes. Stir in the ginger beer and the pickled ginger. Bring to the boil and then reduce the heat and cover. Cook for 10-15 minutes until the liquid is absorbed. (We always make ours in a rice cooker and it works perfectly. Just remember to follow the recommendations given in the manual - usually 1:1 rice to liquid for white rice).

While the rice is cooking, thread the chicken onto skewers and then BBQ or grill for 10-15 minutes, brushing with the marinade as they cook. (We don't normally skewer the chicken, just cook it in a large fry pan in batches).

To serve, spoon rice into serving bowls and top with chicken pieces. Sprinkle over sliced spring onions and tasted sesame seeds. Serve with greens. Yum!

Serves 4.

Saturday, August 9, 2008

Fettuccine with Mushrooms and Camembert

I love cheese. In fact I can't think of anything that can't be improved by the addition of cheese in one form or another! This pasta dish is incredibly rich and flavoursome, and yes, filled with cheese. It was absolutely divine!

Fettuccine with Mushrooms and Camembert
A Food.Baby original

500g fettuccine (we used curly fettucini which I think captures the sauce better - and for some reason it tastes better too!)
500g mushrooms of any variety you like, chopped
1 red onion, sliced finely
2 cloves garlic, crushed
500ml vegetable stock
3 or 4 sprigs of fresh thyme
1 x 250g pack of camembert, as ripe as possible, chopped into small chunks
Olive oil

Cook the fettuccine according to packet instructions. Meanwhile, prepare the sauce.

Add a glug of olive oil to a saucepan over medium heat. Add the onions, garlic and thyme leaves and fry until fragrant and the onion is translucent. Add the mushrooms and toss to combine. Cook, stirring occasionally until the mushrooms collapse. Add the stock a little at a time. It will deglaze the pan and form the bulk of the sauce.

Reduce heat to medium-low and add the camembert. Stir until the camembert has melted. It will thicken the stock slightly.

Once the pasta is cooked, drain and return to the cooking pot. Add the liquid from the sauce mixture, either dishing it out with a large spoon or straining the mixture into the pot. Toss the pasta with the sauce and divide into serving bowls. Top each serve with a generous spoonful of the mushroom mix. Scatter with thyme leaves.

Serves 6.

Related Posts Plugin for WordPress, Blogger...