Showing posts with label Chocolate. Show all posts

Tuesday, December 15, 2009

Tuesdays with Dorie: Cafe Volcano Cookies

A really interesting pick this week for TWD. MacDuff of The Lonely Sidecar chose Dorie's Cafe Volcano Cookies and without a photo, I had no idea what I was actually making! I had to laugh though when I read the storing instructions, essentially 'Humidity will make these go soggy.' Living in Brisbane in December, high humidity is pretty much a given!

So what are volcano cookies? Very similar to a coconut macaroon but with nuts instead of coconut, these cookies aren't exactly photogenic. Probably why there's no picture in the book! I used cocoa instead of espresso powder so my cookies are a rich chocolately colour.

I made a half batch and kept a close eye on them while baking. Just 16 minutes and they were done.

The taste test ...

Totally unexpected but absolutely delicious! I ate 3 before I could stop myself! Very light, the meringue disolves on your tongue leaving crisp toasty nuts and a hint of chocolate. I knew these would be really sweet so I'm glad I added just a pinch of salt. These were a real winner.

Thanks for a great pick, MacDuff! You can find the recipe at The Lonely Sidecar under today's date.

Wednesday, December 9, 2009

White Chocolate Gingerbread

I've been thinking a lot about traditions lately. Lots of my Christmas memories involve food so with each new recipe that I try, particularly as we get closer to Christmas, I wonder whether it will be something that Oscar remembers from his childhood.

I found the recipe for this White Chocolate Gingerbread in a free Christmas magazine from Coles (one of our major supermarkets). While there were lots of yummy things this one leapt off the page. White chocolate. Gingerbread. Need I say more?

White Chocolate & Gingerbread Slice
Recipe from Coles Christmas 2009 Magazine, p37

100g unsalted butter
3/4 cup golden syrup
3/4 cup brown sugar
2 tsp ground ginger
1 tsp cinnamon
2 eggs, lightly beaten
1/3 cup milk
2 cups plain flour
180g white chocolate, chopped
icing sugar for dusting

Preheat oven to 180 degrees C (350F). Grease and line a 19cm x 29cm slice pan with non-stick baking powder.

Place butter, golden syrup, sugar, ginger and cinnamon in a small saucepan. Stir on medium heat for 2-3 minutes, until butter has melted and mixture is smooth.. Remove from heat and allow to cool slightly. Add the eggs and milk and mix well.

Sift flour into a large bowl. Add the chocolate. Fold through the egg mixture and mix until combined.

Fill prepared pan. Bake for 30-35 minutes, until firm. Cool completely in pan. Dust with icing sugar and cut into fingers to serve. Makes 18 pieces.

The verdict?

While very tasty I found it a little solid. Next time I would add 1 teaspoon of baking powder to lighten it up a little, and maybe also some crystallised ginger for some extra spice. Otherwise this is a lovely morning or afternoon tea slice, perfect for this time of year!

Friday, November 27, 2009

Daring Bakers November - Cannoli

It's Daring Bakers time again, and again we are venturing into new territory. There was no baking this month but there was ... deep frying!

The November 2009 Daring Bakers Challenge was chosen and hosted by Lisa Michele of Parsley, Sage, Desserts and Line Drives. She chose the Italian Pastry, Cannolo (Cannoli is plural), using the cookbooks Lidia’s Italian-American Kitchen by Lidia Matticchio Bastianich and The Sopranos Family Cookbook by Allen Rucker; recipes by Michelle Scicolone, as ingredient/direction guides. She added her own modifications/changes, so the recipe is not 100% verbatim from either book.

I've never deep fried anything before - the thought of all that hot oil just waiting to tip over or catch alight scares me just a little bit. Ok a LOT. But this is the daring bakers after all so I was up for the challenge.

I didn't want to purchase cannoli forms just for this one challenge so I decided to cut out some shapes instead. I rolled the dough using my pasta machine (so easy) and then chose some cookie cutters in interesting shapes. Problem was, they didn't cut through the dough easily and when I tried to lift them out they tore and stretched out of shape. I did get one decent heart though ...

Oooh pretty!

I made the chocolate recipe exactly as stated and also used the traditional filling. However because I am a citrus nut I doubled the amount of orange peel and added in the zest of an orange as well.

The recipe is ridiculously long so I won't post it all here. You can find the recipe on Lisa's blog here. Link
The taste test ...

Never having had cannoli before I really wasn't sure what to expect, but these were really tasty! My first batch was a little oily as I don't think the oil was quite hot enough in spite of what my thermometer said. The shells were crunchy and definitely moreish. I could snack on those all day. The filling was what really made it for me though, it was a like a choc-orange flavoured Sicilian cheesecake. Yum!

I think I've conquered my fear of deep drying (I made beer battered fish last night for dinner) but it's still not something I will do regularly.

Thanks for a great challenge!

Tuesday, November 10, 2009

Tuesdays with Dorie: Chocolate-Caramel Chestnut Cake

Today is my dad's 60th birthday and to celebrate we had a big family bbq on Sunday. You can't have a birthday party without birthday cake and this week's TWD pick was perfect!

Chestnuts aren't at all common in Australia. My only experience with them prior to this was in Paris as a 17 year old, and what an eye opener that trip was for a budding foodie! One freezing cold day while wandering through the streets we came across a street vendor selling roasted chestnuts in paper bags. I still remember the rustle of the bag, the warmth and delicious taste of those chestnuts.

Here I had to make do with tins of chestnuts and unsweetened chestnut puree (which I sweetened by blitzing it with 3 ts vanilla extract and 3 tbs of sugar) sourced from a local deli.

This cake is definitely not for the faint of heart, with 1/2kg butter, 1/2 litre of cream and almost 3 blocks of chocolate. It didn't rise as much as I expected so I only sliced it into 2 layers instead of 3. Still managed to use all of that delicious ganache though!

The taste test ...

One word - RICH. Dorie said it serves 16 but I think you could double that easily. There aren't too many times where just 1 piece of cake is enough but this was it. The flavour of the cake itself was absolutely sensational and I will definitely make it again, just without all the chocolatey excess.

It was the perfect finish to a fabulous lunch of roast pork loin cooked on the bbq, lots of salad, breads, cheese and drinks. We just didn't eat much else for the rest of the day.

Thanks for a great pick Katya! You can find the recipe on her blog here.

Thursday, October 29, 2009

Triple Treat Chocolate Chip Cookies

After the hot weather we've had lately, it was a relief that yesterday was grey, misty and cool. The kind of day that is perfect for curling up with a good book, a hot drink and something sweet to nibble on.

Which brings me to these.

There is much debate on what consitutes the 'perfect' chocolate chip cookie but I say, to each their own. If your preference is for thin, crunchy or chewy these are not for you. Or they may just convert you!

Triple Treat Chocolate Chip Cookies
Adapted from 'Chocolate Chip Cookies' on p16 of Modern Classics Number 2 by Donna Hay

125g butter, at room temperature
1/2 cup white sugar
1/2 cup brown sugar
1ts vanilla extract
2 eggs, at room temperature
2 cups plain flour
1 ts baking powder
100g dark chocolate, roughly chopped
100g white chocolate, roughly chopped
2/3 cup roasted salted peanuts

Preheat oven to 180 degrees C. Line 2 baking trays with baking paper.

Beat together the butter, sugar and vanilla until thick and smooth. Add the eggs and beat to combine. Using a spatula, fold through the flour and baking powder until just barely combined. Add the chocolate and nuts and fold through.

Roll dessertspoonfuls of mixture into balls and place on prepared trays allowing room for each cookie to spread.

Bake at 180 degrees for 10 to 12 minutes, or until puffed and lightly golden. They will still be very soft. Remove from oven and allow to rest for a few minutes before transferring to wire racks to cool completely.

Tuesday, October 27, 2009

Tuesdays with Dorie: Cherry-Fudge Brownie Torte

This week's TWD selection was another decadent delight!

April of Short & Rose chose Dorie's Cherry-Fudge Brownie Torte and really the name says it all don't you think? Cherry, fudge, brownie, torte. I'm there!

I made only minor changes to the recipe, using dried cranberries instead of cherries, black cherry jam instead of cherry preserves and leaving out the kirsch (I just used all water instead and this really allowed the flavour of the fruits to shine through).

My topping was not even remotely pourable - it somehow managed to achieve to achieve the consistency of a baked New York cheesecake. Fluffy and delicious but not at all mousse-like!

I was all set to do the chevron pattern on the top so I still piped the jam on top.

The taste test ...


I think this would have to be in my top 5 TWD recipes so far! Exactly like a black forest cake but in brownie form and with (an unintentional) cheesecake topping. And of course a lot easier to make. Absolutely delicious.

The tartness of the fruit cut through the richness but I was happy to be able to give most of it away. My MIL was having a working bee on Sunday to give her backyard a makeover. N and I couldn't make it so I sent the torte down to feed the hungry horde. It apparently went down really well and there was none left over, that's always a good sign!

I will definitely be making this again, perhaps for Christmas. Thanks April! You can find the recipe on her blog.

Tuesday, October 6, 2009

Tuesdays with Dorie: Split Level Puddings

Garrett of Flavour of Vanilla chose Dorie's Split Level Puddings this week.

My very first TWD way back in July 08 was Chocolate Pudding which we absolutely loved, so I was curious to see how this chocolate and vanilla version would compare. Unfortunately, this fell into the liked not loved category.

The vanilla layer thickened nicely on the stove but when I blitzed it in the food processor it turned into vanilla soup and never really thickened up in the fridge. Think of the photo above as an action shot, taken before all the pudding slid off the spoon!

I also didn't really get any layers. The vanilla and chocolate parts blended together resulting in some random swirlyness.

The taste test ...

Not bad, just not something I would rush to make again even though I really do enjoy creamy desserts. Am curious though. Is it the addition of cornflour that makes this a pudding as opposed to a custard? Whatever you call it, hubby loved it and it was easy to make. That gets a thumbs up from me!

Thanks Garrett. You can find the recipe on The Flavour of Vanilla.

Thursday, October 1, 2009

Scrummy Six Layer Slice

My MIL mentioned this recipe a few weeks ago and I have been keen to give it a go. There's nothing particularly special about the ingredients, rather it is the method that is unique - nothing is mixed! You simply pour each ingredient into your baking pan, cook and somehow it transforms into a tasty slice.

The only change I would make for next time would be to add some dried fruit - maybe apricots or cranberries just to cut through the sweetness.

I baked the full recipe yesterday and sent most of it off to work with N this morning. Definitely don't want something this yummy sitting around at home with me all day!

Tuesday, September 29, 2009

Tuesdays with Dorie: Chocolate-Crunched Caramel Tart

Boy it's been a pastry filled month around the food.baby household! While it hasn't been great for my waistline, between the turnovers, pufflets, vols-au-vent and now this tart, I can say I have well and truly conquered my fear of making pastry. Woo hoo!

I have been eyeing off the Chocolate-Crunched Caramel Tart since I first flicked through Baking, and yes, it was every bit as good (and as rich) as it looks!

I searched high and low (well on high shelves and low shelves in woolies) for honey roasted peanuts without success. Just as I'd given up we walked past the Christmas section and noticed some honey roasted cashews. Sold! I'm trying to ignore the fact there are Christmassy foods out already.

The pastry came together beautifully. I probably overcooked it slightly but it was still tender and crumbly and shortbready. Even the caramel behaved as it should (I added an extra pinch of sea salt along with the salted butter). My only issue was with the ganache.

Note to self - do not store chocolate on top of the oven. For any reason. Even if only for a few minutes while you wipe down the bench because you WILL forget to remove it. And then your husband will cook lunch in that oven without realising there is chocolate on top.

Exhibit A - my lovely block of Green & Blacks 70% ...

This happened the day before I was planning on making the tart, so rather than have to remelt it the next day and hope that it survived the process, I made the ganache and refrigerated it overnight.

I poured the warm cream over the chocolate and got a smooth, luscious looking ganache. Then I added the butter and got an oil slick. I think butter really has no place in ganache. I stirred it through as best I could but the next morning I got this ...

Exhibit B - ewwwwww

I scraped the butter off the top and it was exactly the amount I added in. I'm never adding butter to ganache again. After nuking my ganache was back to delicious.

The taste test ...

Wow. Seriously, wow. I just wish I'd been able to get a decent photo (my camera is in being repaired and the focus on my phone sucks). It sliced beautifully, the layers were really pretty and the taste was sensational. We will definitely be making this again.

Thanks to Carla of Chocolate Moosey (love that name!) for choosing this week's recipe. Make sure you visit her blog for the recipe along with the TWD blogroll to see much better photos than mine!

Wednesday, September 9, 2009

Jaffa Cheesecake for Father's Day

My very savvy grandfather purchased a unit at Burleigh on the Gold Coast back in the 70s, before the Gold Coast had really become the place to be. Since then that unit has become the gathering point for our whole family and I can remember many happy christmases with aunts and uncles and my 4 cousins. Now we are all grown up and between us my cousins and I have 6 kids of our own.

This past father's day we all (18 of us) gathered again at the park over the road from our grandparent's unit (and right next to the beach). It was N's first father's day and a really special day all round.

Being the cheesecake queen I of course made a cheesecake to share. N wanted a jaffa cheesecake (choc-orange) and I was happy to oblige. I started with Dorie's Tall and Creamy Cheesecake and added the zest and juice of 1 orange to the filling, a chocolate biscuit base and decorated with whipped cream and jaffas. I totally forgot to take any pics on the day so I dressed up the mini I made with the leftovers. Yum!

I am such a fan of this particular recipe. Despite loads of cream cheese (4 packs!) it makes a soft, fluffy and somehow light cheesecake that doesn't weigh you down.

And for the all-important father's day pressie ...

Oscar and I had a fun afternoon at Inky Feet where we ended up with some lovely keepsakes including mugs, wall tiles and a clock. Lucky we didn't leave it any later than 3 months because his feet would have been too big. They only just made it as it was! Grandpa got a mug with red feet and they were each filled to the brim with homemade Espresso Chocolate Truffles.

Tuesday, September 8, 2009

Tuesdays with Dorie: Chocolate Souffle

Is it just me or is it really hard to photograph a souffle?? Nevermind, this was my first time making one and I'm more excited by the fact that it actually worked!

Souffles have always seemed really daunting and the sort of thing you would only ever order in a restaurant. I made a half recipe and that gave us 4 good servings. It puffed up beautifully but I think it would have looked more souffle-ish if I had collared the dish. Next time.

The taste test ...

Yum! Light, sweet, intensely chocolatey and definitely moreish. Next time I will try individual souffles and now that I have mastered the technique I would love to try a savoury version as well. Watch this space!

Thanks to Susan of She's Becoming DoughMessTic for a great pick this week. I probably wouldn't have made it on my own. You can find the recipe on her blog.

Thursday, August 27, 2009

Daring Bakers August - Dobos Torte

The August 2009 Daring Bakers' challenge was hosted by Angela of A Spoonful of Sugar and Lorraine of Not Quite Nigella. They chose the spectacular Dobos Torte based on a recipe from Rick Rodgers' cookbook Kaffeehaus: Exquisite Desserts from the Classic Caffés of Vienna, Budapest, and Prague.

I have to admit I was a little daunted by this recipe but wow, what a result! The Dobos Torte is a layered sponge and chocolate buttercream cake with caramel and hazelnuts. I only made some slight changes to the recipe, using flaked almonds and scorched (chocolate covered) almonds to decorate. I also brushed each layer with Pom Pomegranate and Cherry Juice which added a little burst of freshness to each bite.

I had a brainwave when it came to assembling the torte. Normally my layer cakes are pretty wonky, with each layer slip-sliding all over the place even when I try to hold them in place with skewers etc. This time I assembled the cake inside a springform pan. I used the base of an 8" pan as the template for my sponge layers. As they shrunk a little while baking they fit perfectly inside the pan leaving a slight gap around the edge. I spread the buttercream right to the edge on each layer so that when it came to unmold the sides were essentially iced already and my layers were perfect.

My only hiccup was with the caramel wedges for the top of the cake. The recipe said to use the best looking cake layer for the top but I chose my worst one because all the others were perfectly cooked and even and I wanted them for my layers. I sliced my cake into 12 even wedges and spaced them just a few millimeters apart on a baking sheet. My caramel was very foamy and didn't seem to spread out much as I poured it over the cake wedges so I just kept pouring more and more on. Suddenly there was way to much and it ran off the edges into a big toffee puddle. I decided to leave it exactly as was and break it into pieces including the extra bits.

Seemed like a good idea in theory, but it was really hot that day and my wonderfully majestic caramel fans wilted and sagged in the heat.

The taste test ...

I was worried this would be too rich but it was actually very light. Delicate sponge layered with fluffy, almost mousse-like buttercream. Our least favourite part was the caramel. Even though I adore citrus I didn't like the lemon flavour at all here - it didn't seem to complement the cake. Plus by the time we came to eat, the caramel had completely lost it and was a sticky, pull-your-teeth-out mess. Most of it got left on the plate. Nonetheless I would definitely make this again (minus caramel). It was fabulous!

Thanks to Lorraine and Angela for a great challenge. This is something I would never have attempted on my own! You can find the recipe here.

Sunday, August 16, 2009

Cappuccino Brownie Bites

Oh brownies, you have completely sucked me in with your dense, fudgy texture and amazing chocolately taste. One bite and I am immediately thinking of other flavour combinations to make you even more mind-blowingly delicious.

Although you are all gone now, we shall be meeting again soon little cappuccino brownie bites. Indeed we shall ...

Cappuccino Brownie Bites
Adapted from Brownie Buttons on p106 of Baking from My Home to Yours

1/4 cup plus 2 tablespoons plain flour
Pinch of salt
60g butter
60g dark chocolate, coarsely chopped
1/3 cup (packed) light brown sugar
1/2 teaspoon pure vanilla extract
1 large egg
1 heaped teaspoon instant coffee dissolved in 1-2ts boiling water

Preheat the oven to 180 degrees C. Lightly butter a miniature muffin pan. Whisk together the flour and salt. Melt the butter, chocolate and brown sugar in a medium heavy-bottomed saucepan over very low heat, stirring frequently with a heatproof spatula and keeping an eye on the pan so nothing overheats or burns. When the mixture is smooth, remove from the heat and cool for a minute or two.

Stir in the vanilla, egg and coffee into the chocolate mixture. When the mixture is well blended, add the flour and stir only until it is incorporated. You should have a smooth, glossy batter.

Spoon the batter equally into the muffin cups (they will be almost full). Bake for approx 14 minutes or until the tops of the buttons spring back when touched. Transfer the pans to racks to cool for 3 minutes before carefully releasing the buttons. Cool to room temperature on the racks.

Topping - whip 1/2 cup pure cream with 1 tbs icing sugar until peaks form. Use a piping bag to pipe onto the top of each brownie bit. Sprinkle the tops with cocoa.

Enjoy!

Tuesday, August 11, 2009

Tuesdays with Dorie: Brownie Buttons


How is it that some things just taste so much better in miniature form? This week Jayma of Two Scientists Experimenting in the Kitchen selected Brownie Buttons, and what fabulous little bites of deliciousness they are!

I've had my issues with brownies over the years and quite honestly they would be the last thing I would choose to make and eat. It's not that I dislike them exactly - they just don't excite me. Unlike Megan for example! When Dorie's book arrived, I wondered why there were so many brownie recipes taking up space.

However, I have finally seen the light! These cute as a button brownies were rich, fudgy and subtly flavoured by orange zest. I had zero issues with them. They even came out of the pan perfectly. The only problem was they disappeared too quickly so I need to make some more!

Because I only have 1 mini muffin pan I made just 12 brownies and baked them for 14 minutes.

The taste test ...

YUM!

Thanks Jayma, I will definitely be making these again.

Monday, July 27, 2009

Daring Bakers July - Milan Cookies

The July Daring Bakers’ challenge was hosted by Nicole at Sweet Tooth. She chose Chocolate Covered Marshmallow Cookies and Milan Cookies from pastry chef Gale Gand of the Food Network.

I love cookies so was really happy with this month's picks. I used to make marshmallows pretty regularly as a kid for school fetes etc so I opted to make the Milan Cookies first. Unfortunately I then ran out of time to make the Mallows this month.

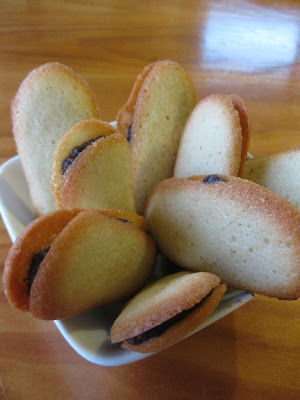
Let me just say, the recipe makes a lot of cookies. A LOT. I would suggest you make a half batch unless you are feeding an army or you will end up throwing out some mixture like I did.

While cookies don't seem particularly 'daring' these did test my piping skills - I ended up with lots of irregular blobby shapes but by the end was doing pretty well. The ganache was absolutely delicious but then I love fruit and chocolate together. The only change I made was to add just 2 ts each of the vanilla and lemon essences instead of 2 tablespoons (?!?!?).

The only thing I didn't like was just how cakey these cookies came after they cooled down. I was hoping for something with a bit of crunch. That said they were still yummy and got the thumbs up from my taste testers!

Milan Cookies
Recipe courtesy Gale Gand, from Food Network website

Prep Time: 20 min
Inactive Prep Time: 0 min
Cook Time: 1 hr 0 min
Serves: about 3 dozen cookies

12 tablespoons (170grams/ 6 oz) unsalted butter, softened
2 1/2 cups (312.5 grams/ 11.02 oz) powdered sugar
7/8 cup egg whites (from about 6 eggs)
2 tablespoons vanilla extract
2 tablespoons lemon extract
1 1/2 cups (187.5grams/ 6.61 oz) all purpose flour

Cookie filling:
1/2 cup heavy cream
8 ounces semisweet chocolate, chopped
1 orange, zested

1. In a mixer with paddle attachment cream the butter and the sugar.
2. Add the egg whites gradually and then mix in the vanilla and lemon extracts.
3. Add the flour and mix until just well mixed.
4. With a small (1/4-inch) plain tip, pipe 1-inch sections of batter onto a parchment-lined sheet pan, spacing them 2 inches apart as they spread.
5. Bake in a preheated 350 degree oven for 10 minutes or until light golden brown around the edges. Let cool on the pan.
6. While waiting for the cookies to cool, in a small saucepan over medium flame, scald cream.
7. Pour hot cream over chocolate in a bowl, whisk to melt chocolate, add zest and blend well.
8. Set aside to cool (the mixture will thicken as it cools).
9. Spread a thin amount of the filling onto the flat side of a cookie while the filling is still soft and press the flat side of a second cookie on top.
10. Repeat with the remainder of the cookies.

Tuesday, July 7, 2009

Tuesdays with Dorie: Katharine Hepburn Brownies


This week's pick was chosen by the fabulously talented Lisa who designed the new TWD logo! As an Australian I'm also excited to have discovered her blog Surviving Oz. Lisa chose Dorie's Tribute to Katharine Hepburn Brownies and I was keen to have a go at these, having sat out the last brownie challenge due to Oscar's arrival.

I consider brownies to be quintessentially American so they were the perfect pick for the fourth of July. As the 4th is also my grandma's birthday I killed 2 birds with 1 stone, so to speak. I really wanted to take something nice as she is in hospital at the moment and could do with some yumminess.

I don't have an 8" pan so had to go with a 9" metal one. To compensate I dropped the temperature by 10 deg C and baked for 25 minutes. Basically what I ended up with was a very flat chocolate slice, definitely not a brownie. It was cooked to almost dry on the edges and very well done in the middle.

It was too late to make anything else so I did take them down the coast to my grandma.

The taste test ...

The flavour was awesome - richly chocolate-y with a subtle cinnamon/coffee hit in the background. It was only the texture that was off. And to be honest if I'd just called it a chocolate slice and slathered some icing on the top no one would have known it was a stuff up! I would like to make these again sometime, tweaking the cooking temp and time. Despite my reservations they were a definite hit and a great addition to our birthday lunch of party sausage rolls, mini quiches, cupcakes and birthday cake in a surprisingly comfy visitor's lounge in the hospital.

Oscar even had a new outfit for the occasion!

Make sure you check out Lisa's blog for the recipe.

UPDATE - I made these again and they were awesome! Check it out here!

Sunday, June 21, 2009

Coffee Chocolate Fondants

I have a soft spot for chocolate fondants and seeing them made on Masterchef during the week reminded both N and I just how long it's been since we made any (maybe 3 years?!).

This is a Curtis Stone recipe which we found on the UK Good Food Channel website. My notes are in red.

Coffee Chocolate Fondants
Serves 4 (just 4 serves would have been ENORMOUS - there was enough mixture for 8 generous serves using 1 cup ramekins)

250 g dark chocolate, 70% cocoa solids broken into pieces
250g Butter
30g instant coffee (we had a 50g jar of Moccona and it seemed excessive to use more than half the jar! So we only added a few teaspoons and could barely taste it)
5 Eggs
5 egg yolks
125g Sugar
75g plain flour, sifted

1. Melt the chocolate in a heatproof bowl, suspended above a pan of simmering water.

2. Meanwhile, melt the butter in a small saucepan.

3. In a large mixing bowl, mix together the melted chocolate and butter. Add the coffee and stir until well-blended.

4. In a separate large mixing bowl, ideally using an electric whisk, whisk together the eggs, yolks and sugar until pale and fluffy.

5. Pour the egg mixture onto the chocolate mixture and whisk together until smooth.

6. Add the flour, whisking until well-mixed.

7. Transfer the chocolate mixture into 4 (8!) well-buttered ramekins or dariole moulds, cool and chill in the refrigerator for at least 2 hours.

8. Preheat the oven to 200ºC/gas 6.

9. Bake the chilled fondants for 10 minutes. (Ours needed 12 minutes and probably could have done with another minute or 2 to make them easier to remove from the moulds. Next time would grease and also line the bases of the remekins with baking paper as the centres stuck a little). Serve warm from the oven.

The taste test ...

In a word - decadent. Not something you'd want to eat everyday but as a treat it was absolutely divine. Rich and smooth with a deep chocolate flavour boosted by the coffee. The middles were fabulously oozy! Perfect served with a big scoop of vanilla icecream.

Tuesday, June 2, 2009

Tuesdays with Dorie: Cinnamon Squares

Tracey of Tracey's Culinary Adventures choses Cinnamon Squares this week. What a great recipe to ease back into TWD after a month off! It was made and out of the oven while Oscar was sleeping.

I was a little hesitant intially at just how much cinnamon was in them. Although being called 'Cinnamon' Squares that is just what you would expect! I made them exactly as per the recipes and had no problems with it being dry as some others did.

The taste test ...

I was a little 'meh' at the first tasting although my other taste testers gave enthusiastic thumbs up. However I had a second taste the next day straight out of the fridge and loved it! Somehow all the flavours had melded and mellowed. The chocolate icing was fabulous. I do think I should have cut it into 12 or even 16 squares rather than 9 as it was incredibly rich!

Thanks for a great pick Tracey! You can find the recipe on her blog.

Tuesday, April 21, 2009

Tuesdays with Dorie: 4 Star Chocolate Bread Pudding


This week's pick made me very happy as I love bread pudding! I hadn't tried a chocolate version before so was curious to taste the results.

As it was around Easter I decided to replace the challah/brioche with leftover hot cross buns. I made a smaller version than the recipe using 4 buns each sliced into 9 rough cubes which fit perfectly into the dish. I also figured this would add enough dried fruit and spice so I left out the raisins.

The taste test ...

I think I must be a bread & butter pudding purist, because while I liked this I didn't love it. We actually had a little piece leftover that ended up in the rubbish. That NEVER happens in this house! I think the chocolate flavour overwhelmed it. Maybe it was using hot cross buns rather than plain brioche. But then chocolate hot cross buns are fabulous. I just don't know!

Thanks to Lauren of Upper East Side Chronicle for this week's pick. You can find the recipe on her blog!

Sunday, March 8, 2009

Belated Chocolate Armagnac Cake

So clearly my tastes are fickle at the moment. Not 5 days ago I swore I was totally over chocolate cake and couldn't face making another one.

My reasons for relenting were threefold, firstly everyone else's cakes looked so fudgy and fantastic that I was already regretting my decision by last Tuesday night, secondly N's mum was coming over for lunch and we wanted something drool-worthy for dessert and thirdly, well, I'm pregnant dammit and if I want chocolate cake I want it now!

I subbed cranberry juice for the alcohol and let the prunes steep overnight. I also used ground almonds because it was easier though I imagine walnuts and pecans would complement the Armagnac (or regular brandy or scotch) perfectly.

How did it go? Actually it was the first unmitigated Dorie disaster I've ever had. It was a breeze to whip up and I even floured the tin (which I never do) just to make sure it would all work out. I gave it 35 minutes in the oven by which time it was puffed almost to the top of the tin, cracking on top, coming away from the sides and looking done for all intents and purposes. A skewer came out clean and I even used my snazzy new digital thermometer to check the internal temp (I stopped looking when it reached about 75 deg C).

The problems started when I went to lift it from the cooling rack onto a plate and it started to separate in the middle. I then realised just how underdone it was when I plonked the glaze in the middle and it started to sink. Seriously. There was a crackly topped cake tsunami effect going on with the glaze getting lower and lower in the centre and the cake being pushed out towards the edges. I persevered and spread it out anyway.

By this stage I knew it was rubbish so I cut a piece anyway and yep, it was liquid in the middle. Not chocolate lava cake but actual liquid cake mixture exactly like when it went in the oven. Ewww!

So it went back in the oven, glaze and all, for another 40 MINUTES! before it actually started to firm up. No photos of that, it would put you all off your food.

I have no idea what is going on. I haven't had any problems like this with our oven before. If anything it tends to cook faster because it is a convection oven.

I imagine if it had worked as intended it would have been fantastic. What we ended up with was 'meh'. While I am curious to see what would happen next time I can't see myself making this again.

Particularly when after one bite I decided I really am over chocolate cake. *sigh*
Related Posts Plugin for WordPress, Blogger...