Showing posts with label Kids. Show all posts

Monday, December 15, 2014

Long Winter Molasses Cookies (SRC Cookie Carnival)

Long Winter Molasses Cookies © www.foodbabylife.com

It's December so there is no Secret Recipe Club post for Group D but instead it's Cookie Carnival time! Members from all 4 groups have volunteered to do a cookie post today. I think this is the first time we have done this (certainly it's the first time I have participated) and I was so excited to find a new cookie recipe.

Christmas wouldn't be Christmas without cookies. Over the years I've made dozens of different types to give as gifts, to share when friends and family drop around and just to have something special in the cookie jar.

I was assigned Cheese Curd in Paradise by Ashley. Ashley lives in Green Bay, has a 2 year old son and is a serious Packers fan (and yes even here in Australia I have heard of the Green Bay Packers!). I actually did the final semester of my law degree at Marquette University in Milwaukee so am quite familiar with that part of the world.

Ashley has some amazing looking recipes including a Crispy Parmesan Chicken with Lemon Hollandaise which had my mouth watering and she even won a prize for her Brat and Beer Mac and Cheese in a tailgating recipe contest! - although it does always make me giggle because here tailgating is when you drive too close behind the car in front of you and they don't give prizes for that :)

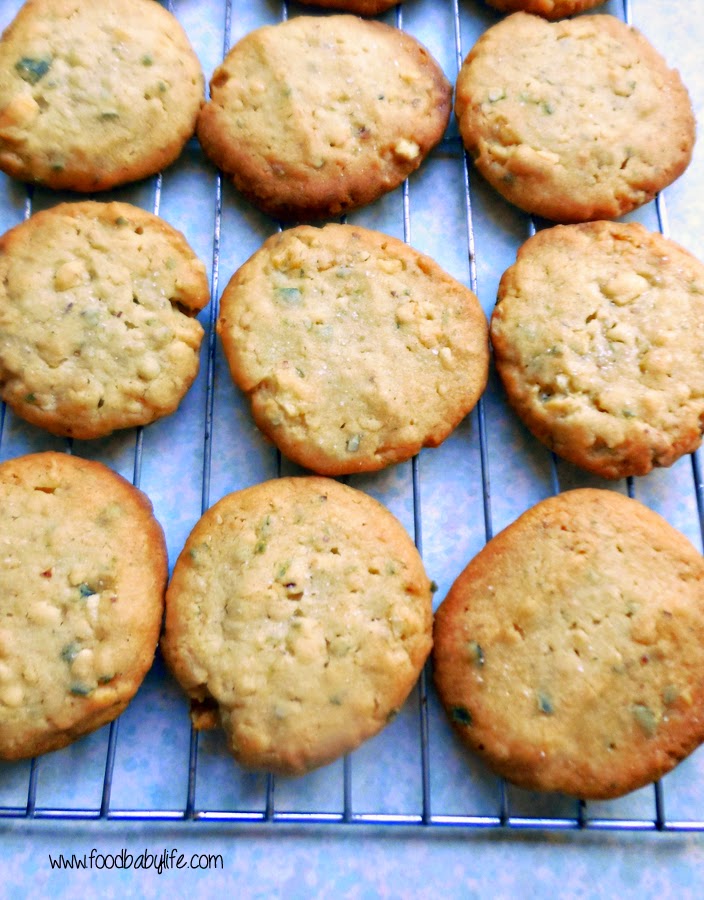
BUT this is all about the cookies and when I saw her Long Winter Molasses Cookies I was sold. Even though it is stinking hot here at Christmas time these cookies are so Christmassy it doesn't matter whether it is summer or winter! They are packed with spices like cinnamon, nutmeg, ginger and cloves (I added a few extra to the original recipe) and flavoured with rich, dark molasses. My boys went nuts for these and kept asking for 'more gingerbread!' I made 2 batches and each disappeared in record time.

'Santa' has already put in a request for a plateful of these to be left out with a glass of milk on Christmas Eve and I am more than happy to oblige.

Thanks for a great recipe Ashley, and Merry Christmas to all my fellow SRC members!

Long Winter Molasses Cookies
Adapted from Cheese Curd in Paradise

2 cups plain flour
1 egg
1/4 cup molasses
1 ts cinnamon
1 ts ground ginger
1/8 ts ground cloves
1/4 ts nutmeg
1/4 ts ground white pepper
1/2 tsp salt
1 cup white sugar
2 tsp bicarb soda
170 grams melted butter

In a medium sized bowl, whisk together the flour,spices, baking soda and salt and then set aside.

In a large bowl, mix together the melted butter, sugar, egg and molasses until well combined. Add the prepared dry ingredients to wet and stir to form a sticky dough.

Wrap the dough in greaseproof paper and chill in the fridge for at least 1 hour.

Preheat oven to 190 degrees Celsius / 170 degrees fan-forced / 375 Fahrenheit and line 2 trays with baking paper.

Roll out the dough on a floured surface and cut into cookies of whatever shape you like.

Bake for 8 minutes and leave to cool on the tray for 5 minutes before turning out onto a wire rack to cool completely. Try not to eat them all at once.


Friday, November 28, 2014

Sweet Potato Pancakes


While I am a very keen meal-planner, I tend not to plan anything much for Friday and Saturday nights. Sometimes we have leftovers and sometimes I just try to use up whatever odds and ends are left in the fridge before we do the grocery shopping on the weekend. We also often have breakfast for dinner (aka dinner) with pancakes, waffles, bacon and eggs and the like.

When we happened to have a large sweet potato that was fast approaching it's use-by, I saw it as the perfect opportunity to try out these sweet potato pancakes that I found on Weelicious a few months ago.

They are a little more time consuming than regular pancakes in that you need to steam and puree the sweet potato first but if you happened to have leftover vegetables from dinner that would make it really easy.

I was amazed at how much my kids loved these. Even my notoriously picky Mr 4 devoured them - in fact he ate 7! The recipe made 16 and I was expecting my husband and I to be able to have some but nope, my 3 boys gobbled up all 16 in record time.

If you don't have sweet potato then pumpkin, carrot or swede would also work brilliantly.

The pancakes have a very soft texture, to the point  you might be wondering if they are actually cooked. They are! Check out the original post and all the comments for more info on that.

Easy Sweet Potato Pancakes
Adapted from Weelicious

1 cup spelt flour
3 teaspoons baking powder
1 teaspoon ground cinnamon
1/4 teaspoon ground nutmeg
1/2 teaspoon salt
1 large egg
1/2 cup coconut milk
3/4 cup rice milk
1 tablespoon rice malt syrup
1 tablespoon coconut oil
1 cup sweet potato puree

Place the flour, baking powder, cinnamon, nutmeg and salt in a large bowl and whisk to combine.

In a separate bowl, whisk together the remaining ingredients until smooth

Gradually add the dry ingredients to the wet ingredients and stir until just combined. Don’t overmix.

Heat a large pan over medium heat and add a little butter or coconut oil.

Pour large spoonfuls of the mixture into the pan, making as many pancakes as will fit, and cook for 2-3 minutes before flipping and cooking for a further minute or so until cooked through and golden brown.

Makes 16 pancakes. Serve with butter and rice malt syrup.


Thursday, November 20, 2014

Sweet and Salty Potato Chip Cookies


I am a sucker for the combination of sweet and salty, be it popcorn, pastry or salted caramel. When I saw these pop up on Laws of the Kitchen and I happened to have half a bag of potato chips sitting in the pantry their fate was sealed!

The little green pieces in my cookies are actually pumpkin seeds. I didn't have enough of any one type of nuts to make up the 1/2 cup needed for the recipe but I did have a bag of Lucky Smart Snax Recovery which has oven roasted peanuts, almonds, cashews and pepitas. It was perfect for these cookies and using a mixture of nuts made them especially tasty.

My cookies were no where near as chunky looking as the original so I think I overprocessed the nuts and chips but they were still packed with crunchy bits and were deliciously sweet and salty. They were a real hit with the kids and they disappeared in record time. Sorry for the blurry photo, I think someone's little sticky fingers have been playing with my camera!

Oh and there's only 1 day left to win the #luckysmartsnax hamper so if you're an Australian resident and want to win some nuts visit my post here to enter!

Sweet and Salt Potato Chip Cookies
Adapted from The Caker via Laws of the Kitchen

225g butter
1 cup dextrose (or 100g sugar)
1/2 cup nuts, finely chopped
250g plain flour
1/2 cup crushed salty potato chips
1 ts vanilla extract

Preheat oven to 180 degrees celsius. Line 2 baking trays with baking paper and set aside.

In a stand mixer cream together the butter and sugar until smooth and pale. Add the vanilla and beat to combine. Fold in the flour and when mostly combined add the nuts and potato chips and stir until well mixed through.

Roll the dough into balls and place on the prepared trays. Flatten with the bottom of a glass or your palm.

Bake for approximately 15 minutes or until just golden brown around the edges. Remove from the oven and allow to cool on the tray for 5 minutes before turning out onto a wire rack to cool completely.

Makes 24.


Wednesday, November 12, 2014

Grain-Free Banana Cupcakes

Grain Free Banana Bread Muffins © www.foodbabylife.com

I'm never really sure on the difference between a muffin and cupcake. I mean sure, a cupcake usually has icing but if you take that away, they are both still cake! These cupcakes (muffins?) are the first grain free cupcake I've made that is also free of any sweetener. I was worried they wouldn't be quite sweet enough but the extremely (think nearly black all over and very mushy) ripe bananas did their job.

These are moist, sweet and intensely banana-y. The perfect afternoon tea with a big glass of milk. My boys loved them and have been asking me to make more.

I managed to snap a photo of the last one before it was quickly snaffled up too. Now I just have to manage to leave some bananas long enough and then I will definitely be making these again.

Grain and Dairy Free Banana Cupcakes
Very slightly adapted from Wellness Mama

5 Eggs
3 medium very ripe bananas
¼ cup coconut oil
½ cup coconut flour
1 tsp bicarbonate soda
1 tsp vanilla
small amount of milk to thin (may not need)

Preheat oven to 190 degrees celsius. Grease a muffin tin or lay out silicone liners on a tray. You will need 12-15.

Place all ingredients into food processor or blender and mix until smooth and well combined. If batter is too thick, add a little milk to thin it out but don't let it get runny at all (mine was quite runny without adding any milk but this made for a very moist cupcake).

Spoon into the prepared pans and bake for 13-18 minutes until lightly browned and set in middle. Allow to cool in the pans for 5 minutes before turning out onto a wire rack to cool completely. Enjoy!


Thursday, September 4, 2014

Product Review - Vileda Premium 5 Mop System

Image source
OK, so I know it might seem a little odd to be reviewing a mop on what is essentially a food blog. But if your house is anything like mine, the kitchen is the heart of the home and the kitchen floor gets literally covered in muck. Every. Single. Day. Seriously, it's like a magnet.

Between the crumbs, spilt cups of milk and muddy footprints from two little boys who love playing outside but always forgetting to wipe their feet, it gets pretty gross by the end of the day. My youngest is 10 months and crawling on this floor, putting every little speck he finds into his mouth. Yuck.

So when I got the chance to review the Vileda Premium 5 mop system thanks to Product Talk by Nuffnang I jumped at the chance. I am currently using a Vileda strip mop and its been pretty effective but I have been convinced there is something even better out there. Especially as we have light-coloured tiles which show every little drip and spill.

I hate having to drag out the vacuum all the time but sweeping with a regular broom never quite gets the job done. What's special about the Vileda Premium 5 system is that it includes two floor padsone for wet mopping and the other one for sweeping and dusting.

Image Source

Image Source

This is the information I was given about the Vileda Premium 5 Flat Mop System and Premium 5 Wringer Bucket:
  • Wide frame covers more surface area
  • Microfibre pads for a streak-free floor
  • Thorough cleaning with less chemicals
  • Swivel head to clean hard-to-reach places
  • Ergonomic telescopic handle

I gave both the dry and wet pads a thorough workout over the past week or so and have been really impressed! The dry microfibre pad does a great job picking up dust and crumbs and is a brilliant alternative to the vacuum cleaner for those in-between cleans. The wet pad did a great job on our tiles and because the pad is so wide it was much quicker than my usual mop. On the downside though,  it wasn't as good at squeezing into nooks, like next to the fridge and around the toilet. I also found it a little fiddly getting the mop flattened and in and out of the bucket.

The Premium 5 wringer bucket was a huge hit with my kids once they discovered you could press the button on the side and make the wringer spin around. Lots of toys went for a ride in the wringer! It is quite a big and substantial-feeling bucket but it feels a little lopsided (and annoyingly it is too long to fit in the spot where my current mop bucket lives).

Overall I was really happy with this mop and feel much happier about the state of our floors!

To see the Premium 5 in action check out Episode 5 of Where's Julia and for more information (and the occasional giveaway!) visit Vileda's Facebook page, Help Me Clean.

*This is not a sponsored post. I received the Vileda Premium 5 mop and bucket for review. All thoughts and opinions are my own.
 

Wednesday, July 2, 2014

Raspberry and Coconut Muffins

Raspberry and Coconut Muffins © www.foodbabylife.com

The last month or so has been really busy with things on at Oscar's school, Charlie starting kindy and me starting my Naturopathy course. Yep I am now officially a student for the first time in 15 years and loving it! 

But it's school holidays here now which means I have all three of my monsters munchkins home with me which is making it tricky to find time to study. It also means lots of noise, mess and 'I'm hungry mummy!' 

I've been a little more organised this time around and had a bit of plan for the holidays before they started. Nothing set in stone just a rough idea of what was happening, which days we would be home and who was around for a playdate and when. I also planned what I wanted to cook and bake. Yesterday was a really chilly day and it was wonderful to be in the kitchen with my big boys making some delicious biscuits and muffins next to the warm oven while my little one slept upstairs. A picture of domestic bliss!

In all seriousness I am not only trying to have some qualtity time in the kitchen with the kids but also build up a stash of snacks and meals for the freezer so life will be a little easier once school goes back. Afternoon tea time can be particularly busy because Noah is ready for a feed as soon as we pick up the big boys and really isn't happy to wait while I prepare anything for the older ones! 

Yesterday we made some Cornflake Biscuits which I have blogged about before and also these yummy Raspberry and Coconut Muffins. The recipe comes from a fellow Brisbane mum who has self-published her own sugar-free recipe book! You can find her website at Hungry Tums or she is also on facebook.

In other exciting news we have just ordered a ... thermomix!!! The price has put us off for years but the more I see and hear about them and just what you can do with one, the more convinced I've become that it will be a great investment. Being able to make our own rice and nut milks, ground almonds and flours etc will be amazing. Not to mention all the wonderful meals. I've been reading the Quirky Cooking blog for a few years and ordered her gorgeous cookbook as well so keep an eye out over the coming weeks and months for lots of thermomix recipes!

Raspberry and Coconut Muffins
Very slightly adapted from Hungry Tums

1 cup dextrose
1 ¾ cups self-raising flour (or plain flour with 2 1/2 ts baking powder sifted through)
1 cup dessicated coconut
2 eggs
¾ cup coconut milk
150g olive oil
pinch of salt
1 ts vanilla extract
1 ½ cups frozen raspberries

Preheat oven to 170°C fan-forced. This recipe makes 16 muffins so either grease and line 1 and a bit muffin trays or use 16 individual silicone muffin cases on a baking tray (what I do).

In a large bowl, use a whisk to stir together the dextrose, flour, salt and coconut. Add the raspberries and toss through.

Place the eggs, vanilla, oil and coconut milk in a small mixing bowl or jug and whisk to combine. Add this mixture to the dry ingredients and stir only until just combined. Do not over-mix!

Spoon the mixture evenly into the muffin trays and then bake for 20-25 minutes or until cooked (they will be golden brown and spring back when pressed lightly in the middle).

Remove from the oven and allow to cool in the tins for 5 minutes before turning out onto a wire rack. Delicious warm from the oven but they also thaw out beautifully after being frozen. 

Thursday, April 24, 2014

Almond and Chia Bliss Balls

Almond and Chia Balls © www.foodbabylife.com

I have become a huge fan of bliss balls in recent months. I love that I can whip up something so tasty, filling and nutritious and just have it stashed in the freezer to grab whenever I want.

Life has become extra busy since Oscar started school and most days I don't have time to eat a proper breakfast before we leave. But there is always time to eat a bliss ball or 2 on the run which keeps me going until we get home and I can take a few minutes to sit down and eat properly. Not exactly ideal when you are breastfeeding but it's certainly better than nothing!

I have made literally dozens of types recently but this one was especially delicious and both the boys love them too.

Bliss ball recipes are very forgiving so if you don't have a particular ingredient you can easily substitute for something else eg, honey for the rice malt syrup, peanut butter for tahini etc.

Almond and Chia Balls
Recipe by me

200g toasted almonds
1/2 cup chia seeds
1 cup rolled oats
1 cup dessicated coconut
1/4 cup tahini
2 ts vanilla extract
1 heaped tbs coconut oil
2 tbs rice malt syrup
generous pinch sea salt

Place all the dry ingredients into the food processor and blitz to a fine crumb. Add the remaining ingredients and process until it comes together in a sticky ball. If the mixture is too dry you can add some extra syrup or a splash of rice milk. Roll tablespoons of mixture into balls and store in the fridge or freezer. Makes approx 20.

Sunday, April 20, 2014

Oscar turns 5 and a delicious dairy free number 5 cake!

Number 5 cake dairy free chocolate cake © www.foodbabylife.com

This year Easter Sunday was extra special as it was also my Oscar's 5th birthday! Hard to believe how quickly that chubby little bundle from 5 years ago has turned into the handsome, chatty and all-around awesome 5 year old that he is today.

Oscar had his heart set on a big party this year but after we realised that his birthday fell not only in the school holidays but on Easter Sunday it seemed silly to arrange a party that a lot of our friends would not be able to come to. He will get his party next year but this year was all about family and we had a really lovely day.

One of our birthday traditions for the boys is that they get to choose what we have for lunch. Oscar, bless him, chose to have a simple BBQ lunch at home with sausages, marinated chicken, corn and lots of salad. Yep he really asked specifically for salad!

Our other tradition is that I will make whatever cake they choose from our collection of Woman's Weekly kids' cake books. After much deliberation over the past few months Oscar chose a classic number 5 cake and even wanted the same colours they had used.

I felt a little selfish but I didn't want to make a big cake that I couldn't eat so the cake had to be dairy-free. Well it took a LOT of research to find the perfect dairy-free chocolate cake that would be the right texture to carve into a number 5 shape and taste good and possibly be converted to sugar free as well. Whew.

I eventually found one on The Crafting Foodie and it turned out so well we will definitely be using it again in the future. The original recipe was for a 3 layer 9 inch cake but I converted it into a sheet cake and made it sugar free by using rice malt syrup instead of sugar. I also used decaf coffee so the kids weren't bouncing off the walls!

Dark, Rich, Moist Chocolate Cake - Dairy Free
Recipe slightly adapted from The Crafting Foodie

330g plain flour
1 x 500g jar rice malt syrup (1 1/2 cups)
135g cocoa powder
1 tbs bicarb soda
1 1/2 tsp baking powder
1 1/2 tsp salt
3 eggs, at room temperature
1 1/2 cups rice milk
1 1/2 tbs white vinegar
1 1/2 cups strong black coffee, hot
3/4 cup extra virgin olive oil
1 1/2 tbs vanilla extract

Preheat the oven to 180 degrees Celsius / 160 degrees fan-forced. Prepare a 23cm x 33cm baking pan by lining it with baking paper then greasing and flouring it.

Sift the flour, cocoa, bicarb soda, baking powder and salt into a large bowl or the bowl of a stand mixer.

Combine the syrup, rice milk, vinegar, coffee, oil and vanilla extract in a medium bowl. Beat in the eggs.

Pour the wet ingredients into the dry ingredients then mix on low speed until well combined. The batter will be very thin.

Pour the batter into the prepared tin and bake for approximately 50 minutes or until the cake springs back in the middle and skewer comes out cleanly.

Remove from the oven and cool on a wire rack for 20 minutes before inverting the pan to release the cake. Allow it to cool completely before icing.

I also did a lot of research on icing, trying to find something healthy that would also work to decorate the cake as I intended. Unfortunately I couldn't find anything quite right and so ended up with a traditional sugar-filled icing made with Nuttelex instead of butter to keep it dairy free. The search will continue for the next birthday cake.

Dairy-free Icing

185g nuttelex
360g icing mixture
1 tbs vanilla extract
food colouring

Place the nuttelex in a food processor or stand mixed and beat until smooth and creamy. Add remaining ingedients and process until smooth and well combined, and the icing is the right consistency to cover your cake. Add a little more icing mixture if it is too runny, or a little non-dairy milk (a few teaspoons at a time) if it is too thick.  This amount made enough to do a crumb coat and a top coat with only about 1/3 cup leftover.

For the stars I bought a pack of white icing and just tinted them to the colours I wanted.

Overall this was a really easy cake which made preparations for the day stress-free and Oscar loved it too which is the most important thing!

dairy free chocolate number 5 cake © www.foodbabylife.com

I'm actually going to reintroduce dairy in the next few weeks to see how Noah reacts (I've only cut it out while breastfeeding) but until then it's nice to know I can still made a great cake and not feel like I'm missing out.


Tuesday, March 25, 2014

Breakfast Bars

Breakfast Bars © www.foodbabylife.com

Lately it's been really hard to fill up my kids. At 3 and almost 5 these boys eat a LOT.  Even my 5 month old who has just started on solids has already eaten kilos of fruit and vegetable purees. Heaven help us when they're teenagers!!!

I spend a lot of time looking for new recipes for snacks and quick meals that will fill them up for longer. My main criteria are high protein, low/no sugar and wholegrain. I've been reading Bianca's Wholefood Simply blog for ages but last week I splurged and bought her gorgeous cookbook of the same name. It is a treasure trove of favourites from the blog and so beautifully photographed and put together. The boys spent a good half an hour last night before bed flicking through and deciding what they would like me to make.

For me these breakfast bars were an immediate winner in terms of both ingredients and being so easy to make. My boys loved them for afternoon tea with a glass of milk and it keeps them going until dinner.

Breakfast Bars
Very slightly adapted from Wholefood Simply

1 cup raw macadamias
1 cup dessicated coconut
2 ripe bananas, mashed
2 ts vanilla extract
pinch salt

Preheat oven to 180 degrees celsius. Line a loaf pan with baking paper and set aside.

If you have a high speed blender or food processor simply throw in all the ingredients and blitz until smooth. If you think your blender would struggle (like mine did), use it to process the nuts then simply mix with the remaining ingredients in a bowl.

Tip the mix into the prepared pan, smooth the top and bake for approx 25 minutes or until it is golden around the edges and skewer comes out clean.

Allow to cool on a wire rack then slice into bars and enjoy!

Saturday, July 27, 2013

Sprinkles Biscuits

Sprinkles Biscuits Stack © www.foodbabylife.com
This is second of the yummy goodies I made for a cake stall at Oscar's kindy this weekend. You can see the Triple Chocolate Brownies here.

To me these biscuits/cookies just scream childhood. I mean, what kid doesn't love sprinkles??

These hundreds & thousands contained no artificial colours or flavours, and this is something I cam starting to notice more and more. Such a good thing although I know some kids (and adults) do react to natural colours and flavours as well.

I adapted the recipe for these beauties from Averie Cooks. Hers were for Chewy Sprinkles Cookies. They were much smaller and baked for less time so they come out of the oven very blond. However, my perfect biscuit is crispy on the outside and chewy in the middle so that's how I made them. I love the golden brown colour and their sweet buttery aroma was incredible.

I think I showed great restraint not tasting even one of these, but I gave one to my littlest taste tester Charlie and he gave it a huge thumbs up.

Why not make these this weekend? You won't be disappointed!

 
Sprinkles Biscuits
Makes 18 large biscuits/cookies
Adapted from Averie Cooks

250g unsalted butter
1 cup white sugar
1 tbs dark brown sugar, packed
1 large egg at room temperature
2 ts vanilla extract
2 cups plain flour
1/2 ts baking powder
1/4 teaspoon salt
1/2 cup hundreds & thousands (plus 1/2 cup extra to decorate, optional)

Place the flour, salt and baking powder in a medium bowl and whisk together to combine. Set aside.

In a stand mixer or large bowl using a hand mixer, cream together the butter and sugars at medium-high speed until light and fluffy. Stop and scrape down the sides of the bowl and add the egg and vanilla. Beat for 30 seconds, until just combined.

Switch to a spatula and fold through the flour and sprinkles until just combined. Wrap the dough in plastic wrap and refrigerate for at least 2 hours (or up to 5 days) before baking.

Preheat oven to 180 degrees C / 160 degrees fan-forced. Line 3 baking sheets with baking paper and set aside.

Divide the dough into 18 balls (my batch of dough weighed 968g so I got 18 x 54g pieces from the batch). Roll each ball in the extra sprinkles and place on the prepared trays, 6 per tray leaving plenty of room for spreading. Use your hand or lightly grease the bottom of a glass to flatten each ball to about 1cm thick.

Depending on your oven size you can bake these all at once or in batches. I did 1 tray at a time, with the remaining trays waiting in the fridge.

Bake for 12 minutes, rotating the trays halfway. They will be just golden brown around the edges and pale golden in the middle. Remove and allow to cool on the tray for at least 5 minutes before carefully lifting them onto a wire rack to cool completely. They will firm up as they cool.

Store the biscuits in an airtight container at room temperature for up to 5 days or in the freezer for up to 3 months. You can also store unbaked cookie dough in an airtight container or plastic wrap in the fridge for up to 5 days before baking.


Monday, June 24, 2013

Snow White Popcorn Treats (Secret Recipe Club)

Snow White Popcorn Treats © www.foodbabylife.com

SRC time again! This month I was assigned Life and Kitchen by Lindsay. I love that Lindsay posts so many veggie and meatless meals but after doing something savoury for the past few months of SRC I had already decided to do something sweet this month, and was delighted that she had so many to choose from!

The instant I saw these Snow White Popcorn Treats I was sold. It actually is winter here, but this is as close as my boys will get to snow!

We make popcorn a few times a week using our air popper. I like mine with a little melted butter and sea salt but the kids are totally happy having it plain. But let me tell you they were very excited about their special sticky popcorn!

The recipe called for 1 large or 2 small bags of popcorn but I have no idea what size that would actually be. I just did the usual 1/4 cup we always do and hoped for the best. It was pretty much spot on.

So how did it taste? Totally amazing as you would expect! I did find it VERY sweet though and added extra salt to mine (love that sweet and salty contrast). This would be perfect bagged up and given as gifts at Christmas and I will be doing just that this year.

Thanks for a great recipe Lindsay!

Snow White Popcorn Treats
From Life and Kitchen

1/4 cup popping corn
20 white marshmallows
2 tbs butter
1/4 cup white chocolate
sea salt

Pop the corn and spread it out on a lightly greased baking tray, making sure to remove any unpopped kernals.

In a medium pan over lowish heat gently melt the butter and the marshmallows, stirring constantly. Once they are completely melted and liquidy, add in the white chocolate and stir until smooth.

Quickly pour the mixture over the popcorn using a silicone spatula to toss it all together, coating as much of the popcorn as you can.

Sprinkle generously with sea salt and leave to set for about 10 minutes before devouring.


Secret Recipe Club

Saturday, January 26, 2013

Lamington Cupcakes for Australia Day

Lamington Cupcakes for Australia Day © www.foodbabylife.com

 Happy Australia Day! The rain has put an end to our normal Australia Day activities of bbqs and catching up with friends so we are instead we at home just hanging out, watching kids movies and of course, baking!

Lamington Cupcakes with jam for Australia Day © www.foodbabylife.com
Last year I made real lamingtons with the kids but it was a bit fiddly for little fingers. This year I decided lamington cupcakes were the go. Much easier. We did most of this while Charlie was having his nap. We still ended up with 1 smashed plate and 3 smashed cupcakes but such is the joy of cooking with kids!

At almost 4 years old Oscar loves to help in the kitchen. He can pour in ingredients, stir and is even getting quite adept at cracking eggs! For these cupcakes he also placed the paper cases in the muffin tray, spread icing and sprinkled on coconut.

Some of my fondest memories of childhood are helping to cook and of course licking the spoon. I really hope to pass on such memories to my boys.

One of my goals for this year is to get both boys more involved with daily tasks. They both help a lot but don't really have any little jobs that are always just for them. I have already started getting them to help set the table with their own plates, bowls and cutlery. They have been their things in the sink almost since they could walk.

Anyway, back to the cupcakes. I won't bother posting a recipe here as it is a basic vanilla cupcake with chocolate icing, raspberry jam and dessicated coconut. A quick google search will give you a recipe.

These lamington cupcakes were absolutely delicious and the perfect sweet treat this Australia Day. Hope you're all having a good one!

Wednesday, December 19, 2012

Tim Tam Balls

Tim Tam Balls © food-baby.blogspot.com All rights reserved

It seems I have been missing out because I hadn't even heard of these little beauties until last week!

Apparently they are the most popular recipe on the Stay At Home Mum blog and I can see why. I mean everyone loves tim tams and having them in ball form makes them even more appealing. But be warned, you won't be able to stop at one!

These are just one of the tasty little homemade morsels our family and friends will be receiving this year. I will also be making my famous Rum Balls, mini Christmas Cakes and Peanut Butter squares as well as a few other things which I will post soon.

This is half the original recipe which you will find here on Stay At Home Mum.

Tim Tam Balls

1 packet of Tim Tams, any flavour
125g cream cheese (1/2 a block) at room temperature
1 cup dessicated coconut OR hundreds & thousands

Place the tim tams into the food processor and blitz until they turn into crumbs. Add the cream cheese and pulse until the mixture forms a clump around the blade. Roll teaspoonfuls of mixture into balls and then roll in the coconut or hundreds & thousands (I did 1 batch of each). Makes approx 20. Chill until ready to serve.

Tuesday, November 13, 2012

Happy Birthday Charlie!

Digger Cake © food-baby.blogspot.com All rights reserved

Hard to believe but my baby turned 2 last week! Quite honestly it has been the fastest 2 years of my life and my boys are growing up so very quickly.

To celebrate we had a party on Sunday for friends and family. It was supposed to be at the park but rain the day before (the first real rain in months) put an end to that. I had visions of muddy toddlers sliding all over the place! So Plan B was at our place and amazingly we fit 19 adults and 13 children in our lounge/dining room and little backyard. We must live in the Tardis.

Here is the birthday boy checking out his new cubby and opening his presents ...


And onto the important stuff, the food!

As you will have seen above I made Charlie a digger cake. He is obsessed with all things truck and I just I would have to do some sort of truck cake for him. I have 3 kids birthday cake books but unfortunately there was nothing quite right. I was thinking I would have to just wing it (a dangerous idea because cake decorating is really not my strength!) when I came across a digger cake on Cake 2 the Rescue.

This is a local business which sends out cake kits complete with everything you need to make a brilliant cake - cake mix, icing mix, pre-coloured fondant icing in the right amounts, food colouring, a rolling pin, cake lifter and cake board. While I wouldn't normally go for something so pre-packaged it was a real time saver and a lot of fun! And just for the record this is not a sponsored post, I paid for own cake kit and just wanted to give them a shout-out.

Digger Cake © food-baby.blogspot.com All rights reserved

Here is the finished cake with M&Ms 'dirt' and lots of little fingers waiting (or not) to dig in! It was a real hit on the day and Charlie loved it. Everyone loved the taste of the cake but as the decorator I found the cake a bit too spongy. Despite being in the fridge first it still crumbled in parts when I iced it whereas a slightly denser buttercake may have held together better. No big deal really but still.

Keeping with the truck theme I also had a go at decorating some biscuits. I found this cute cutter at Matchbox and used Charlie's favourite colour orange to decorate. This was my first ever attempt at decorating biscuits and I think I did ok. My only real issue came with the tyres. I completely underestimated how much black food colouring I would need to make a real black and of course my icing was far too runny by them and began to ooze and run off the edges of a few of the biscuits. Luckily no one cared!

Truck Cookies © food-baby.blogspot.com All rights reserved

I used a sugar cookie recipe from Sweetapolita which you can find here and an icing recipe from I Am Baker which you can find here. I was really happy with both of these and would definitely recommend them. I also used Wilton gel colours.

So that's it! Another birthday done and dusted. Oscar is already asking for a dinosaur cake for next year so I will have another opportunity to work on my cake decorating skills.

Thursday, October 18, 2012

Finger Buns


Another trip down memory lane with these! I can vividly recall being in a particular bakery as a child - rows and rows of sweet treats, the smell of sugar mixing with fresh bread and piping hot sausage rolls. What always caught my eye though were the finger buns with their vivid pink icing and sprinkles. What could be more attractive to a little girl?

Although I have boys I knew these would go down a treat. The buns themselves are made from a simple sweet bread dough with some dried fruit. Nothing wrong with that! Add some pretty icing and sprinkles and you have something really special.


Finger Buns
Recipe from Frills in the Hills

475g plain flour
35g milk powder
75g caster sugar
2 1/2 tsp instant dry yeast
1 egg, lightly beaten
150ml lukewarm water
40g butter, cubed
1/2 cup currants (or sultanas or cranberries)

Place the flour, milk powder, sugar, yeast and currants into the bowl of your stand mixer and mix to combine. Add in the water and egg and mix using the dough hook for about 4 minutes. Add in the butter, one cube at a time, and mix for another 6 minutes or until the dough is sticky and elastic.

Remove the dough from the mixer and place into a large greased bowl. Cover with plastic wrap and leave in a warm place for 1 hour until the dough has doubled in size.

Punch down the dough, give it a quick knead by hand and divide it into 12 even pieces. Roll each piece into a sausage then place them on a greased or lined baking tray. Leave to prove for another hour or until doubled in size.

Bake the buns in a preheated 190 degree oven (170 degrees fan-forced) for about 12-15 minutes. The buns should be risen, golden brown and sound hollow when tapped on the bottom. Remove from the oven and allow to cool on a wire rack.


I find most food colourings pretty scary in terms of both the colour and ingredients, so for these I used some all-natural colours. They made some lovely pastel shades which is just what I was after. I guess to get the really bright colours you need the nasty stuff.

Icing

1 cup pure icing sugar, sifted
2tbs soft butter
Few drops of food colouring
Coconut, sprinkles, nuts etc to decorate

In a large bowl beat together the icing sugar and butter until smooth. You may need a teaspoon or so of milk to get the consistency you want. Divide the mix into small bowls and add a few drops of food colour to each. Mix well to incorporate the colour evenly. Spread over the top of the cooled finger buns and top with decorations of your choice.

with slivered almonds

with cachous

with coconut

with chopped walnuts

Making these would be a great rainy-day project (not that we've had any rain much for months) and kids would have lots of fun decorating their own!

This recipe is a keeper.

Thursday, September 6, 2012

Peanut Butter Ice Cream

Peanut Butter Ice Cream © food-baby.blogspot.com All rights reserved

I blogged a few days ago about the amazing Aztec "Hot" Chocolate Ice Cream I made for our Father's Day dinner. Well I also made a more kid-friendly ice cream. Both my boys love peanut butter so when I saw this recipe it was perfect. It's also such an easy recipe with no cooking involved at all that older kids would be able to make it themselves!

If you love peanut butter you will LOVE this ice cream. I served it with hundreds and thousands but I think having it in a sundae with hot chocolate fudge sauce and a scattering of roasted salted peanuts would be divine. Yum!

Peanut Butter Ice Cream
From The Perfect Scoop by David Lebovitz p50

180g smooth peanut butter
180g sugar
330ml full cream milk
330ml pure cream
Pinch of salt
1/2 ts vanilla extract

Puree all ingredients in a food processor until smooth. Chill thoroughly in the fridge then churn in your ice cream machine according to the manufacturer's instructions.

Makes approx 1 litre.

Sunday, June 3, 2012

Sunday Baking - Cornflake Biscuits


Does anyone else remember these fondly from their childhood? They were always a favourite of mine and now with young kids, they are perfect for lunchbox treats or a rainy day baking project.

You can experiment with different add-ins. I generally use sultanas but any dried fruit would work, as would chocolate chips or nuts. Just go crazy!

Cornflake Biscuits

125g softened butter
1/3 cup raw sugar
1 1/4 cups self-raising flour
1 tbs milk
1 ts vanilla extract
1/2 cup sultanas or chocolate chips
2 cups cornflakes, lightly crushed

Preheat oven to 180 degrees celsius (160 degrees fan-forced). Line 2 baking trays with baking paper and set aside.

Using an electric mixer, beat the butter, sugar and vanilla together until creamy. Sift in the flour, add the milk and mix until the mixture forms a dough. Add the sultanas/choc chips and 1 cup of the cornflakes and fold together until well combined.

Place remaining 1 cup of cornflakes into a bowl. Roll tablespoons of mixture into the cornflakes then place onto baking trays, allowing some room for spreading. Press each biscuit down with the back of a fork. 

Bake for 12-15 minutes or until golden brown. Allow to cool on the trays for 5 minutes before carefully placing them on a wire rack to cool. Makes approx 22.

Monday, May 21, 2012

Minestrone Soup

We've been having gorgeous Autumn weather lately with cool nights and lovely warm sunny days. This is the perfect time of year for soup and really is there anything more comforting than a big bowl of steaming hot soup served with crusty bread on a cold night? Unfortunately hubby does not share my enthusiasm. Oh well, more for me and the kids!

This is my version of a minestrone soup. You can use absolutely any vegetables you like or happen to have on hand. The more the better. Add some beef stock, kidney beans and tomatoes and you have a hearty and warming winter meal. You can of course easily use vegetable stock for a vegetarian version that is just as yummy.

My Minestrone Soup

2 onions
2 medium carrots
2 stalks celery
2 medium potatoes
2 corn cobs, kernels removed
1 large zucchini
1 parsnip
1 swede
1 large wedge of pumpkin
1 bunch asparagus
1 tin diced tomatoes
1 tin red kidney beans, drained and rinsed
1 tbs Gourmet Garden Chunky Garlic Paste
1 tbs Gourmet Garden Basil Paste
2 ts Gourmet Garden Thyme Paste
2 bay leaves
1 - 1/2 litres beef stock
2 tbs oil

Dice all the fresh vegetables to roughly the same size and set aside. Heat the oil in a very large saucepan over medium-high heat. Add all your vegetables at once and stir to coat in the oil. Cook for about 5 minutes. 

Add the tomatoes, beans, herbs and enough stock to cover the veges. Cover the pot and bring to the boil. Spoon off the froth/scum that has risen to the surface then reduce the heat to low and simmer gently for an hour or so, or until the vegetables are cooked through. 

Add salt and pepper to taste. Remove bay leaves. Serve with crusty bread and some grated Parmesan cheese.

To make it more kid friendly, simply puree the soup and serve with grated cheese and lots of hot buttered toast.


Enjoy! This makes enough to feed an army so be prepared to freeze it in smaller batches to pull out later for an easy dinner.
Related Posts Plugin for WordPress, Blogger...