Showing posts with label Pastry. Show all posts

Tuesday, September 22, 2009

Tuesdays with Dorie: Cottage Cheese Pufflets


TWD time again! Jacque of Daisy Lane Cakes chose Dorie's Cottage Cheese Pufflets this week.

First thought ... what on earth is a pufflet!?? Second thought ... what on earth are they going to look like? Despite reading through the recipe several times I still had no real idea of how these were going to turn out. And now after making them I'm still not sure!

It seems a pufflet is a teeny tiny jam-filled pastry, made from a dough that is quite similar to last week's turnover dough. The main difference was that this dough was the softest, stickiest dough I have ever made! Despite multiple chills in the fridge between every stage it was really hard to manage. I rolled it out between sheets of baking paper and had to freeze it in order to peel off the top layer of paper. After cutting I then had to scrape each piece off the paper with a knife.

End result?

Tasty but definitely not puffy. I will call them flatlets instead. The boysenberry jam I used was brilliant. I only rolled about 1/6th of the dough (the rest is frozen) and I got 7 flatlets. I think I will roll them a bit thicker next time and will make them at night when it is (slightly) cooler.

Thanks for picking the pufflets Jacque! You can find the recipe at Daisy Lane Cakes.

Tuesday, September 15, 2009

Tuesdays with Dorie: Flaky Apple Turnovers

This week Jules of Someone's in the Kitchen chose Dorie's Flaky Apple Turnovers and boy was I worried. Pastry and I are very rarely on speaking terms. Don't get me wrong, I love eating it, it's just making it that drives me crazy. In fact whenever there is pastry to be made, N conveniently makes himself scarce! But ...

This was without doubt, the best pastry I have ever made. EVER!

I had the same issue as a lot of others with my mix being quite dry and crumbly but after its rest it came together beautifully. And it was even delicious raw, I kept snagging pieces as I worked.

We were in the midst of moving furniture the day I made these so while I made a full batch of dough, I only rolled 4 turnovers plus a mini apple pie and froze the rest. I got a little impatient with the rolling out (ie. my arms got sore). So I cut out 3" rounds from the dough and rolled each one out to 4 1/2" individually. Much easier!

The taste test ...

Fantastic! This was the pastry so many recipes had promised but none had ever delivered. Crisp, flaky and delicious. I used a mixture of fuji apples, slivered almonds and raisins to fill these but you really could use anything you liked. The perfect afternoon or anytime treat. I think this will be my go-to pastry from now on. Thanks Jules!

Saturday, June 27, 2009

Daring Bakers June - Bakewell Tart…er…Pudding

The June Daring Bakers' challenge was hosted by Jasmine of Confessions of a Cardamom Addict and Annemarie of Ambrosia and Nectar. They chose a Traditional (UK) Bakewell Tart... er... pudding that was inspired by a rich baking history dating back to the 1800's in England.

I love this sort of recipe - homey and a little bit old-fashioned. The type of thing that doesn't take too long to whip up but looks and tastes absolutely delicious. A good thing too because I didn't get around to making it until tonight!

I used chunky black cherry jam and a little less almond essence than the recipe said. We served it with big dollops of thick custard, but cream or icecream would work well too.

The taste test ...

I was a little worried about the tart being too almond-y because while we love almonds both N and I hate amaretto. I left out the almond essence in the pastry and used only 1/4ts in the frangipane and that amount was spot on for us. The cherry jam was the perfect complement to the other flavours. My only complaint would be that the pastry didn't cook through properly. I was surprised the recipe didn't call for it to be blind baked. It also took longer to cook than stated but I blame that on our dodgy oven. All in all, a tasty end to our dinner!

Bakewell Tart

Sweet shortcrust pastry :

225g plain flour
30g sugar
2.5ml (½ tsp) salt
110g unsalted butter, cold
2 egg yolks
2.5ml (½ tsp) almond extract (optional)
15-30ml (1-2 Tbsp) cold water

Sift together flour, sugar and salt. Grate butter into the flour mixture, using the large hole-side of a box grater. Using your finger tips only, and working very quickly, rub the fat into the flour until the mixture resembles bread crumbs. Set aside. Lightly beat the egg yolks with the almond extract (if using) and quickly mix into the flour mixture. Keep mixing while dribbling in the water, only adding enough to form a cohesive and slightly sticky dough. Form the dough into a disc, wrap in cling and refrigerate for at least 30 minutes.

Frangipane :

125g unsalted butter, softened
125g icing sugar
3 eggs
2.5ml (½ tsp) almond extract
125g ground almonds
30g all purpose flour

Cream butter and sugar together for about a minute or until the mixture is very fluffy. Scrape down the side of the bowl and add the eggs, one at a time, beating well after each addition. After all three are in, pour in the almond extract and mix for about another 30 seconds and scrape down the sides again. With the beaters on, spoon in the ground nuts and the flour. Mix well. The mixture will be soft, keep its slightly curdled look (mostly from the almonds) and retain its pallid yellow colour.

To assemble:

Preheat the oven to 200 degrees celsius. Roll out the pastry to line a 23cm tart tin. Trim the excess pastry then place in the freezer for 15 minutes. As soon as you remove it, spread the base with 250ml of jam or curd of your choice. Top with frangipane and bake for 30 minutes. Five minutes before the tart is done, remove it from the oven and top with a handful of flaked almonds, then return to the oven for the last five minutes of baking. Allow to cool slightly before serving (you want warm not hot).

Tuesday, June 9, 2009

Tuesdays with Dorie: Parisian Apple Tartlet

Oh what a great month of TWD picks! The lovely Jessica of My Baking Heart chose the Parisian Apple Tartlet this week. It is a dessert that you can whip up in just a few minutes using ingredients you will likely already have on hand. With just puff pastry, apples, butter and brown sugar, this is definitely a case of the results being greater than the sum of its parts!

The taste test ...

You can probably already tell I was a fan of this one! Simple, elegant and truly delicious. We served ours with a scoop of french vanilla ice cream. I love having both hot and cold elements to a dessert. We will be making this again!

Thanks to Jessica for a fab choice. Make sure you check out her blog for the recipe.

Tuesday, April 7, 2009

Tuesdays with Dorie: Banana Cream Pie

As an Aussie, to me a Banana Cream Pie conjures images of 1950s America. However like lots of recipes while it may be retro, it is definitely delicious!

I decided to make minis using my brand new baby tart tins purchased on a whim a few weeks ago. Because they are so shallow, I knew I wouldn't be able to layer the pastry cream and banana and decided instead to combine the two. By mashing the banana and folding it through I ended up with the most luscious banana custard you can imagine. Sure it looks like baby food but I would eat this straight out of the bowl any day!

I'm sure you can guess what happened though - the mashed banana really affected the consistency of the pastry cream and it oozed everywhere when I cut it. Bummer.

I then simply piped the whipped cream on top (I actually forgot I needed sour cream for this so mine was plain cream). I really need to work on my piping skills but a sprinkle of cinnamon and a banana slice for decoration makes all the difference!

The taste test ...

Fabulous! I loved the contrast between the crisp buttery crust, sweet spiced custard and smooth cream. Even a mini was a bit too much for one serve but I gave it a good go. These were pure comfort food and incredibly easy to make. I can see this becoming a real family favourite.

Thank you to Amy of Sing for Your Supper for this week's pick. We loved it! You can find the recipe on Amy's blog.

Friday, February 13, 2009

Classic Custard Tart

I've had custard on my mind ever since I decided not to make last week's TWD selection of Floating Islands. I absolutely adore custard and while I wholeheartedly avoid the bright yellow goop that passes for custard at the supermarket, strangely I don't make it very often at home.

I decided it would have to be baked to pass my food safety limitations at the moment, so custard tart it was!

What elevated this from the mundane was the fact I used whole fresh nutmeg for the first time. I know, where have I been?? Just like when first I tried a fresh vanilla bean, this was spectacular.


We loved this tart. So simple and elegant and not too sweet. You can find the recipe I used here. The only change I made was to the pastry - leaving out the egg yolk and water, replacing them with just enough apricot juice to bring it together. This added a lovely subtle flavour and most importantly, meant I could eat some uncooked. I love pastry!!!


Tuesday, January 6, 2009

Tuesdays with Dorie: French Pear Tart

This week's recipe was chosen by none other than Dorie herself! How cool is that? And even better she selected a recipe I have been eying off for ages - the French Pear Tart.

I absolutely adore pears. I have some on my cereal every single morning, fresh when available and canned for the rest of the time. Being the middle of summer fresh pears aren't available so I went for the best quality canned ones I could find.

This recipe was a cinch to pull together, although the pastry was slightly tricky. I hate blaming everything on the weather but the heat and humidity really do play havoc with pastry! It took 3 attempts to roll it out properly (with chilling time in between) but I eventually got there. I pre-baked it as per the recipe and although the crust got a littler darker than I would have liked the end result was perfect.

The taste test ...

Absolutely divine. I lost count of the number of times N said 'this is really good. you should make this again.' Admittedly it was very sweet but I think this sweetness comes from the pears themselves. Perhaps there would be more contrast with fresh pears? Either way, we loved it and will definitely be making this again sometime. Thanks Dorie!

Thursday, November 27, 2008

Thursday with Dorie: Thanksgiving Twofer Pie

Despite not being in America and not normally celebrating Thanksgiving, we decided to do so this year. I will be posting about our dinner tomorrow because this post is all about the pie!

This week's Thanksgiving inspired recipe for Twofer Pie was chosen by Vibi of La Casserole Carree.

Pumpkin Pie and Pecan Pie aren't very common in Australia so I always order them whenever I see them on a menu. As with everything else it seems there are delicious versions and horrible pallid stodgy versions. So I was very curious to see what a blend of the 2 would be like!

This is only the second time I have used Dorie's pastry. The last time was for my peach and raspberry galette. We really enjoyed it at the time but I was disappointed with the lack of flakiness. Deb of SmittenKitchen very conveniently posted lots of pastry tips this week and while I tried to incorporate some of her techniques I still ended up with a very shrunk pastry shell! So frustrating!

I initially thought there would be far too much filling but it only spilled over the crust in a few spots, and they were the spots where the crust had shrunk considerably.

I made a few changes to the recipe, using fresh steamed pumpkin as canned is not available here, replacing the corn syrup with golden syrup and using cream instead of melted butter in the pecan filling because I was too lazy to melt any butter! I know all of these things could have affected the cooking/setting time so I wasn't worried about that at all.

It did take far longer to cook than suggested - 1 hr 25 minutes all up - but it definitely needed it and I didn't have any problems with the crust getting too brown like some others did.

The taste test ...

Wow. This was really tasty. The texture was a lot lighter than I expected and it smelt divine. My piece was just warm in the middle which made the icecream start to melt. Yum! I'm really hoping this freezes ok (I know custards can be a problem). There's no way we can (or should!) eat this between just the 3 of us!

Next week: Linzer Sables

Wednesday, September 17, 2008

Beef and Sweet Potato Samosas

It's been ages since we had Indian food. I'm always a little wary of trying new places because I have a major sensitivity to MSG and food dyes, and so many supposedly reputable restaurants cram their food full of artificial rubbish. It drives me crazy!

Ok, rant over.

Making your own Indian food can be a little time consuming but the results can be amazing. We have a Butter Chicken recipe which is out of this world good (I will definitely be posting about it soon!) that requires marinating overnight. This time around I was looking for something quicker but still with great flavours and that would be good for lunch the next day. These Beef and Sweet Potato Samosas fit the bill perfectly!

You can definitely play around with the type and quantity of spices here. I prefer warm, aromatic spices to anything that makes your mouth explode, so this recipe is tailored that way. It also makes a LOT of samosas, so they make wonderful party food.

Beef and Sweet Potato Samosas
A food.baby original

500g beef mince
1 large orange sweet potato, diced finely
1 large onion, diced finely
4 cloves garlic, chopped
1 thumb sized piece of fresh ginger, grated
1tbs mango chutney
2 ts ground coriander
2ts ground cumin
2 ts tumeric
4 ts garam masala
1/4 ts chilli powder
500 ml chicken stock
2 tbs plain flour
7 sheets puff pastry
1 egg, beaten
salt and pepper

Heat a large frypan over medium-high heat and add a tablespoon of ghee or vegetable oil. Once hot, add the onion and fry for a few minutes or until translucent. Add the garlic, ginger and the sweet potato and fry, stirring constantly for around 5 minutes until the sweet potato starts to soften slightly. Remove the mixture from the pan.

Add a little more oil if you need to, then add the beef mince and fry until cooked through, breaking up the lumps as you go. When it is about half cooked, add all the spices and continue to cook, stirring until the beef is done.

Return the vegetable mix to the pan and stir to combine. Sprinkle over the flour and stir well for a few minutes to cook out the raw flour. Pour over the chicken stock. This will deglaze the pan, picking up all the yummy spices and flavour stuck on the bottom. It will look like far too much liquid at this stage. Reduce the heat to low, stir in the chutney, cover and simmer for about 20 minutes.

If a lot of liquid remains, increase the heat and remove the lid. Cook stirring occasionally until the mixture is thick. This is basically like a pie filling and if it is runny your pastry will go soggy.

Once you are happy with the consistency, remove from the heat and allow to cool for at least 15 minutes.

To prepare the samosas, preheat the oven to 220 deg C. Place a sheet of puff pastry on a board and cut into 4 equal squares. Place about a tablespoon of filling into the centre of each square. It is always a bit of trial and error to see how much filling will fit. Using a pastry brush, brush beaten egg over the cut edges. Fold each square into a triangle, pressing down on the edges with a fork to seal in the filling. Place on a lightly greased baking tray. Brush the tops with beaten egg.

Bake for approx 20 minutes or until the pastry is puffed and golden brown.

This amount of filling will make about 30 samosas which is more than most people need. You can freeze the samosas uncooked. Just thaw in the fridge overnight before baking as usual.

Serve with your favourite sauces. We used spicy tomato and yoghurt & garlic. Yummy!

Sunday, August 31, 2008

Daring Bakers August: Chocolate Eclairs

You should probably grab a cup of tea ... this is going to be a long post!

This month Meeta from What’s For Lunch, Honey? and Tony Tahhan challenged us to make Pierre Hermé’s éclairs. My first thought ... yum! However, my first Daring Bakers Challenge was an almost complete disaster as I didn't get a single edible eclair from the recipe.

First of all I knew I was going to have oven issues. My two choices are a 30 year old electric oven with base elements that cooks unevenly and lets a lot of heat escape. Or the convection setting on our microwave (the only time we use it) which is fan forced, has limited temperature settings and tends to cook very quickly.

I decided I would follow the recipe exactly, and as it stated that after a certain amount of cooking the door had to left ajar, clearly I had to use the older oven. I don't know of any microwaves that start with the door open!

I prepared all 3 chocolate components first thing Saturday morning and they were a breeze. At the time I thought the quantities were excessive and I was right. I definitely should have halved (or third-ed?) the amounts.
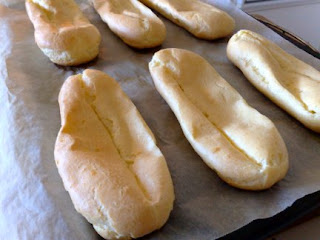
Eclairs Round #1

I was keen to try out my new piping bag and nozzle and carefully piped out 9 chubby lengths onto the baking tray. The mixture seemed a bit thinner than I thought it would be and some oozed out the end as I filled the bag. They also spread a lot on the tray once they were piped.

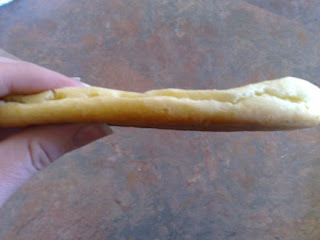
After 7 minutes baking as instructed, I propped the door open and continued to cook. After 20 minutes, they were puffed and slightly golden and I felt quite chuffed! It didn't last long though. As soon as I removed them I noticed the bottoms were very dark, almost burnt, and they weren't as golden on top as I had thought. They also began to sink before our eyes and within minutes were as flat as pancakes.

Once they were cool I attempted to slice off the top (the whole thing was only about 1cm high so it wasn't easy!) only to discover a stodgy middle that released a disgusting scrambled eggs smell. Ewww! Not cooked!

As I naively thought this batch would work, I had piped the rest into rounds to make profiteroles. I decided to check online for other eclair/profiterole recipes to see if there were any tips. This is a summary of what I found:

1. a cooking time of eat least 30 minutes, whereas this one said only 20
2. prick the tops with a knife once the cooking was finished to release the steam and prevent them from going soggy
3. leave them in the turned off oven for at least 15 minutes to dry out before removing them to cool

All of this is logical so I decided to incorporate the advice.

Profiteroles Round #1

This time I decided to use the convection setting and fiddle with the time and temps. I put them in for 10 minutes at 180 deg C then dropped it to 160 deg for 20 minutes. At this stage they were puffed and beautifully golden so I left them in the turned off oven for 15 minutes and then left them to cool for another 15.

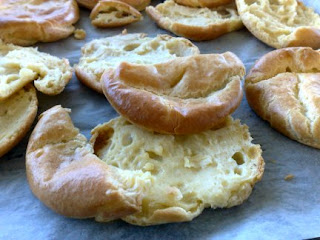
When I came back they were again flat as pancakes and when I sliced the top off one I found more doughy, stodgy, egginess. Aaaaaah!!!!!!

In a fit of temper I threw them back in the oven at 180 for a further 15 minutes not really caring what would happen.

Yet again, when cooled and sliced, they were still eggy and uncooked.

Clearly there is something going on here and I think it was that there was just far too much egg to begin with. Perhaps if I wasn't a choux pastry virgin I would have been able to assess it and leave 1 or 2 eggs out and make it work. The mixture did come together beautifully, it folded in thick ribbons at the end but still it didn't work for me. (the photo below was about half way through - it was thicker by the end!)

By this stage it was nearly 5 pm and I was totally over it. I also had 3 separate containers filled with chocolate glaze, chocolate sauce and chocolate pastry cream and nothing to do with it. What was annoying me more was having to throw all of those eclairs in the bin. Such a waste of ingredients!

Having now almost run out of eggs I hunted online for another recipe. I decided this was a better option than trying to doctor the original recipe which I have never been able to do very well. This time ... success!

Choux Pastry
recipe from Taste.com.au

80ml water
40 g butter, cubed and at room temperature
50g plain flour
2 eggs, at room temperature

Place water and butter in a saucepan over medium heat. Cook, stirring, for 3-4 minutes or until butter melts and mixture just comes to the boil. Add all the flour to the butter mixture at once and use a wooden spoon to beat until well combined. Place over low heat and cook, stirring, for 1-2 minutes or until the mixture forms a ball and begins to come away from the side of the saucepan. Set aside for 5 minutes to cool slightly.

Whisk 1 egg in a small bowl and set aside. Whisk the remaining egg in a small bowl, then add it to the flour mixture, beating well with a wooden spoon. Gradually add a little of the reserved egg and beat until the mixture just falls from the spoon but still holds its shape.

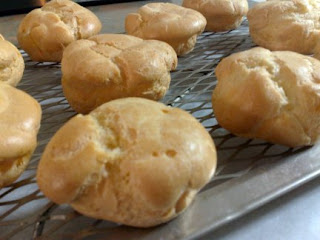
Preheat oven to 200°C. Brush a baking tray with oil to lightly grease. Spoon 25-30 teaspoonsful of the mixture onto tray, about 3cm apart (I made 15 larger ones). Alternatively, use a pastry bag fitted with a 1.5cm-diameter plain piping nozzle to pipe the profiteroles onto the baking tray. Brush the tops with a little of the remaining egg. Bake in preheated oven for 25 minutes or until the profiteroles are puffed and golden.

Remove from oven and turn the oven off. Using a skewer or a small knife, pierce the base (or top) of each profiterole to release the steam. Return the profiteroles to the oven and leave them for 15 minutes to dry out. Remove the profiteroles from the oven and transfer to a wire rack to cool.

The results of the 2 recipes could not be more different. This time around the mixture was a lot thicker and didn't ooze out of the piping bag. They were puffed, golden brown and dry to the touch. They also felt as light as air when cooked, whereas the others were heavy and solid.

Having said all that there are about a thousand other Daring Bakers and from reading the forums it seems this recipe worked brilliantly for 90% of them, so make sure you check out their results!

Overall this was a major challenge. But that's why I joined the Daring Bakers ... to stretch myself, try new things and not ignore recipes that look too hard. The fact is I can now add choux pastry to my repertoire, even if it is not Pierre Hermé’s éclairs. Bring on September!

Wednesday, August 27, 2008

Chicken Pie

I love pie. There is something so homey, so comforting, so rustic about a pie. At least the way I make them anyway! They never taste the same twice but you can't go too far wrong whatever filling or flavours you decide upon. Buttery, flaky shortcrust pastry encasing a warm, savoury filling. Yum!

Basic Shortcrust Pastry
Recipe from Modern Classics No1 by Donna Hay, p155

2 cups plain flour
145g (5oz) cold butter
2-3 tbs ice cold water

Blitz the flour and butter together in a food processor until it resembles course breadcrumbs. With the mixer on low, drizzle in enough cold water to form a smooth dough.

Turn out onto a floured board and knead very lightly. Wrap in plastic wrap and refrigerate for 30 minutes. When ready to use, roll out until 3mm thick. This quantity will line up to a 25cm (10in) pie dish.

(I normally need 1 1/2 times this quantity for my pie dish)

Chicken Pie
A Food.Baby original

There really isn't a recipe as such for this. You choose whatever vegetables and herbs you like. The only thing to watch is that you cook the filling until it is thick enough and cool it slightly before using. Here is what I used for this particular pie:

750g chicken thigh fillets, cut into small chunks
6 large field mushrooms, diced
2 large carrots in small dice
1 onion, chopped finely
3 cloves of garlic
2 leeks, quartered and chopped finely
500ml chicken stock
1 tbs plain flour
1 bouqet garni
corn flour to thicken

Heat some oil in a heavy based pan over medium-high heat. Toss the chicken pieces with the flour and then cook until they are browned on all sides. Remove and place the pan back on the heat. Add a little more oil if needed and fry the onion, garlic, carrots and leeks until they are starting to soften.

Return the chicken to the pan with the vegetables. Add the bouquet garni and any other herbs you like. Pour in the stock. Bring to the boil then reduce heat to low and simmer for around 30 minutes.

After 30 minutes, add the chopped mushrooms and stir well. Simmer for another 15 minutes. Season with salt and pepper to taste. If the mixture is too liquid at this stage, add a few teaspoons of cornflour mixed with a small amount of water. When you are happy with the taste and consistency, remove from the heat and allow to cool slightly.

Preheat the oven to 200 deg C. Roll out 1/2 the pastry to line the base of your pie dish. Pour in the cooled filling then roll out the other half of the pastry to cover. Pinch the edges to seal and make a few slits in the middle to allow some steam to escape. Brush lightly with beaten egg.

Bake for approx 45 minutes or until the pie is puffed, bubbling and golden. Cool for 10 minutes before serving with a green salad or vegetables.

Serves 6.

Tuesday, July 29, 2008

Tuesdays with Dorie: Inspired by Summer Fruit Galette

I love fruity desserts so i'm really enjoying the last couple of picks! This week Michelle of Michelle in Colorado Springs chose Dorie's Summer Fruit Galette. As I don't have Dorie's book I have been relying on either finding the recipe online or waiting until it is posted by the host. Given the host is on the other side of the world that wasn't going to happen until Wednesday my time. And that wasn't gonna get us any dessert tonight!

So I have made something inspired by this week's recipe. It is a cross between a galette and a pizza but with my own twist and using ingredients I already had on hand.

I decided to use Dorie's Good for Almost Everything Pie Crust which I haven't made before. Even though the recipe uses some lard, I went with all butter as it's what I had and I thought it would be dangerous having a pack of lard in the fridge waiting to be used for something else!

Apricot and Raspberry Galette

1 quanity of Dorie's pie crust (I found it on South in Your Mouth)
1/2 cup apricot jam
100g ground almonds
1 x 400g tin apricot halves
2/3 cup raspberries (I used frozen)
Demerara sugar to decorate

Preheat oven to 200 degrees C.

Roll out the pastry into a large round and scrunch/fold in the edges to form a rough pie. Spread the base with apricot jam then sprinkle over the ground almonds. This will absorb some of the juice from the fruit and prevent the crust from getting soggy. Layer the apricots over the top, cut side up, and fill in the gaps with raspberries. Sprinkle with demerara sugar.

Bake for approx 45 minutes or until the fruit is bubbly and the crust is cooked and golden brown.

I also made my own custard to serve with it.

Stirred Custard
From The Original Cookbook by the Australian Women's Weekly, 1977, p220. This is my go-to recipe and it's never failed me yet!

3 eggs
2 tbs sugar
1/2 ts vanilla extract
2 cups milk (reduced fat works fine)

Beat eggs, sugar and vanilla together in the top of a double boiler. Warm milk in a separate pan then stir into egg mixture. Stir constantly over simmering water until custard thickens slightly and coats the back of a spoon. This could take 15 minutes or longer. Remove from heat IMMEDIATELY. (Sorry, don't mean to shout there but honestly it will start to curdle if you're not really quick).

Makes 2 cups (I normally do a double batch).

The taste test ...

This was absolutely delicious and after years of stomping and swearing, I have finally found a pastry that works for me! It was easy to throw together in the food processor and after a long rest in the fridge it rolled out to perfection. The texture was great too - crisp, buttery and flaky. It looked more like a fruit pizza when it came out of the oven but whatever you call it, it's a keeper!

Next week we have The Black and White Banana Loaf thanks to Ashlee of A Year in the Kitchen. Yum!

*I am not an official member of Tuesdays with Dorie - just playing along at home!

Monday, July 28, 2008

Steak, Guinness and Cheese Pie with Mushy Peas


This is another fabulous Jamie Oliver recipe and it's perfect for the arctic weather we are experiencing in Brisbane at the moment. Ok, so maybe not 'arctic' exactly but it's definitely pie weather!

Steak, Guinness and Cheese Pie
From Jamie at Home by Jamie Oliver, p342

Olive oil
3 red onions, sliced
3 cloves of garlic, minced
2 carrots, peeled and chopped
2 celery sticks, finely sliced
4 field mushrooms, peeled and chopped
1kg stewing beef, cut into 2cm cubes
a few sprigs of fresh rosemary
Sea salt and freshly ground black pepper
1 x 440ml can Guinness
2 heaped tbs plain flour
200g tasty cheese
Enough puff pastry sheets to cover the top and bottom of your pie dish
1 large egg

Preheat oven to 190 deg C.

On the stovetop, heat some olive oil in a large ovenproof pot over low heat. Add the onions and fry gently for about 10 minutes trying not to colour them too much. Turn up the heat and add the garlic, butter, carrots, celery and mushrooms. Fry for a few minutes then add the beef, rosemary, a pinch of salt and a level teaspoon of pepper. Once the beef is starting to colour, pour in the Guinness, the flour and enough water to cover (I don't normally need any water).

Bring to a simmer, cover with a lid and place in the preheated oven for about 1.5hrs. Give it a stir then place back in the oven to cook for another hour or until the meat is very tender and the stew is dark and rich looking. If there's still a lot of liquid at this point, put it back on the stove top and simmer until the sauce reduces. Remove from the heat, stir in half the cheese and leave to cool while you prepare the pastry.

Butter your pie dish and line with puff pastry, leaving the edges hanging over the sides. Tip the stew into the dish, even it out and top with the remaining cheese. Brush the edges of the pastry with beaten egg. Top with another sheet or 2 of puff pastry and fold in all the edges so the filling is sealed. Make a slit for the steam to escape.

Brush the top with beaten egg then bake for 45 minutes until the pastry is puffed and golden brown. Delicious served with mushy peas or veg of your choice.

Serves 6

Mushy Peas
A food.baby original

1 litre water or chicken stock
1 packet frozen baby peas
2 cloves garlic, whole but skin removed
60g butter
1/4 cup cream
Salt & freshly ground black pepper to taste

Bring water or stock to the boil with the garlic. Add the peas, bring back to the boil and cook for approx 5 minutes or until done. Drain well and pour into food processor or blender. Add butter and cream and blend well. Season well with salt and pepper. Enjoy!

Monday, July 14, 2008

Beginnings

This is my first post and I'm not quite sure how to begin. Basically this blog will be a place for me to record my recipes and my thoughts, both mundane and momentous, in what is already a pretty significant year (more on that later). So without any fanfare, welcome to food.baby!

As today is Bastille Day, here is my take on Palmiers which are flaky and delicious French pastries.

Palmiers

2 sheets ready made Puff Pastry (I may progess to homemade at some point but not today!)
1/2 cup raw sugar
2 ts cinnamon

Combine sugar and cinnamon in a small bowl then sprinkle a quarter of the mixture on a chopping board or bench roughly in the shape of the puff pastry. Place 1 sheet of the pastry on top and press to make the sugar mixture stick. Sprinkle another quarter of the sugar mix on top and coat thoroughly.

Now to shape them. Starting with the left hand side, gently roll up the pastry into a log but only as far as the middle. Then roll the right hand side in towards the middle. Using a sharp knife cut the log into 12 even pieces. Turn each individual piece on its side (cut side facing up) and flatten slightly. Repeat with the other sheet of pastry.

Arrange on a baking tray lined with baking paper. Bake in a preheated oven at 200 deg C for 15 minutes, turning each one half way through.

Golden puff pastry with caramelised sugar and cinnamon ... what could be better!
Related Posts Plugin for WordPress, Blogger...