It's time for a change around here. What do you think of the new header?
Please bear with me over the coming weeks as I tweak the blog. I have zero skills in web design and am flying blind here. Help and comments greatly appreciated!

Thursday, October 22, 2009
Tuesday, October 20, 2009
Tuesdays with Dorie: Sweet Potato Biscuits
 Erin of (one of my favourite blogs) Prudence Pennywise chose Dorie's Sweet Potato Biscuits this week and they definitely had me intrigued. Basically they are an American version of our Aussie classic, the pumpkin scone. Unfortunately I've never made a scone I've been totally happy with, and over the years I've tried dozens of different recipes!
My other concern was using fresh sweet potato when recipe specified canned. I know Dorie said just use 1 cup of fresh mash, but that didn't seem to equate to 2 x 15 ounce cans. And I was right, because these were dry.
The taste test ...
Golden, flaky and great flavour but like I said, DRY. I knew at the time the mix was too crumbly. It did cross my mind to add some extra moisture but I second guessed myself and we ended up with hockey pucks. Boo. No time for a redo this week but I would love to have another go sometime.
After last month I feel like I've conquered my fear of pastry, maybe now I will work on perfecting the scone!
And now for something totally off topic but my sweet Oscar is 6 months old today!
Happy half birthday baby!

Wednesday, October 14, 2009
Daring Cooks October - Vietnamese Pho
 Daring Cooks time again!
The October 2009 Daring Cooks’ challenge was brought to us by Jaden of the blog Steamy Kitchen. The recipes are from her new cookbook, The Steamy Kitchen Cookbook.
I was really excited about this month's pick, not only because it was chosen by Jaden but also because I love Vietnamese food! It is definitely my favourite Asian cuisine - fresh, fragrant and flavoursome. That being said, I've never actually had pho before.
We were given the option of doing either a long or short version of the dish. I originally chose the short version (which uses a premade stock) because I intended to make it again later in the month. Unfortunately I ran out of time but no matter, we will definitely be having this again!
I only made minor changes to the recipe, using chicken thighs because I feel they have more chickeny flavour, and using vermicelli noodles instead of the wider rice stick ones.
The taste test ...
 Well, I didn't pick the best day to make soup for dinner. It was a hot and sticky 35 degrees in Brisbane that day, definitely not soup weather but it didn't matter. This was AMAZING! For really very little effort and a short list of ingredients we had a phenomenal meal. Light, fragrant and absolutely packed with flavour. I was also impressed with how clear the broth remained even after simmering the chicken. All I can think is if it tastes this good using purchased stock, it must be unbelievably good with homemade. I can't wait to try!
Vietnamese Chicken Pho
For the Chicken Pho Broth:
2 tbsp. whole coriander seeds
4 whole cloves
2 whole star anise
2 litres store-bought or homemade chicken stock
1 whole chicken breast (bone in or boneless)
½ onion
7.5 cm chunk of ginger, sliced and smashed with side of knife
1 to 2 tbsps. sugar
1 to 2 tbsps. fish sauce
500 grams dried rice noodles (about ¼ inch/6 mm wide)
Accompaniments:
2 cups bean sprouts, washed and tails pinched off
Fresh cilantro (coriander) tops (leaves and tender stems)
½ cup shaved red onions
½ lime, cut into 4 wedges
Sriracha chili sauce
Hoisin sauce
Sliced fresh chili peppers of your choice
Directions:
To make the Chicken Pho Broth: heat a frying pan over medium heat. Add the coriander seeds, cloves and star anise and toast until fragrant, about 3-4 minutes. Immediately spoon out the spices to avoid burning.
In a large pot, add all the ingredients (including the toasted spices) and bring to a boil. Reduce the heat to medium-low and let simmer for 20 minutes, skimming the surface frequently. Use tongs to remove the chicken breasts and shred the meat with your fingers, discarding the bone if you have used bone-in breasts.
Taste the broth and add more fish sauce or sugar, if needed.
Strain the broth and discard the solids.
Prepare the noodles as per directions on the package.
Ladle the broth into bowls. Then divide the shredded chicken breast and the soft noodles evenly into each bowl.
Have the accompaniments spread out on the table. Each person can customize their own bowl with these ingredients.
A big thank you to Jaden for introducing us to pho!
You can find the long version of the recipe here.
Tuesday, October 13, 2009
Tuesdays with Dorie: Allspice Crumb Muffins
 Last week's pudding was a nice change but for this week I was happy to get back into baking. Kayte of Grandma's Kitchen Table chose Allspice Crumb Muffins, yet another recipe I really liked the look of. (Wondering what will be left for my pick in oh, 50 weeks time!)
I much prefer muffins to cupcakes because you can whip them up in a matter of minutes and they don't need any accompaniments, other than maybe a smear of butter when they are still warm from the oven.
These muffins with their crunchy streusel topping didn't need anything else at all. Dorie said they taste better the next day but I loved them fresh. The next day they had dried out a little bit.
I made half the recipe and got 16 mini muffins.
The taste test ...
 Allspice is so underrated. Every time I use I wonder why I don't use it more often! Same with star anise. These tasted like Christmas to me, warm, buttery and lightly spiced. I'm sure I'll be making these again.
Thanks for a great pick Kayte! You can find the recipe on her blog.
Monday, October 12, 2009
Caramel Swirl Cheesecake
 Maybe I should rename this blog cheesecake.baby instead, as I seem to make a lot of them! I realised I wanted cheesecake quite on the spur of the moment, having begun devouring a packet of butternut snap biscuits and thinking how perfect they would be for a crumb base.
I started with Dorie's Tall and Creamy Cheesecake recipe and then tweaked it a little. Can I just say again how much I adore this recipe? Seriously, the BEST one ever. That and the fact it calls for my little cheesecake to 'luxuriate in a waterbath'. Gets me every time!
Caramel Swirl Cheesecake - Cheats Version
Base
250g buttersnap biscuits (or your favourite plain sweet biscuit)
125g unsalted butter, melted
Caramel
1 tin of caramel top and fill (basically a premade condensed milk caramel - you can definitely make this yourself but with cats and a baby I don't want to worry about exploding tins!)
Cheesecake
500g cream cheese (2 packs) at room temp
2/3 cup sour cream at room temp
2 eggs at room temp
1/2 cup sugar
2 ts vanilla extract
Preheat oven to 160 degrees C. Grease an 8" springform pan and wrap the outside in 2 layers of alfoil. Set aside. For the base, blitz your biscuits in the food processor then pour in the melted butter and combine well. Press over the base of the pan and up the sides as much as you can (I got about 2cm).
Wipe out the food processor bowl to remove any crumbs.
Blitz the cream cheese and sugar together until smooth (about 4 minutes). Add the eggs, one at a time, beating for about a minute after each addition. Add the vanilla and sour cream and process for a few minutes. The mixture will become smooth and velvety.
Pour about half the cheesecake mixture into the prepared base. Spoon teaspoonfuls of caramel randomly over the top. Pour over the remaining cheesecake mix and dot with more caramel (it will sink during the baking). Drag a butterknife through the mixture to create swirls of caramel, being careful not to touch the biscuit base. (I totally forgot to do this step and ended up with blobs of caramel. Still delicious).
Place your springform pan inside a baking dish. Pour boiling water into the baking pan, until the water reaches about halfway up the side the springform pan. Carefully place in the oven.
Bake at 160 degrees C for about an hour. Turn the oven off and leave your cheesecake to 'luxuriate in its waterbath' for another hour. Remove the pan from the water, allow to cool then refrigerate for at least 4 hours or overnight.
Serve with an extra drizzle of caramel (not that it needs it). Delicious!!!
Tuesday, October 6, 2009
Tuesdays with Dorie: Split Level Puddings
 Garrett of Flavour of Vanilla chose Dorie's Split Level Puddings this week.
My very first TWD way back in July 08 was Chocolate Pudding which we absolutely loved, so I was curious to see how this chocolate and vanilla version would compare. Unfortunately, this fell into the liked not loved category.
The vanilla layer thickened nicely on the stove but when I blitzed it in the food processor it turned into vanilla soup and never really thickened up in the fridge. Think of the photo above as an action shot, taken before all the pudding slid off the spoon!
I also didn't really get any layers. The vanilla and chocolate parts blended together resulting in some random swirlyness.
The taste test ...
Not bad, just not something I would rush to make again even though I really do enjoy creamy desserts. Am curious though. Is it the addition of cornflour that makes this a pudding as opposed to a custard? Whatever you call it, hubby loved it and it was easy to make. That gets a thumbs up from me!
Thanks Garrett. You can find the recipe on The Flavour of Vanilla.
Thursday, October 1, 2009
Scrummy Six Layer Slice
 My MIL mentioned this recipe a few weeks ago and I have been keen to give it a go. There's nothing particularly special about the ingredients, rather it is the method that is unique - nothing is mixed! You simply pour each ingredient into your baking pan, cook and somehow it transforms into a tasty slice.
The only change I would make for next time would be to add some dried fruit - maybe apricots or cranberries just to cut through the sweetness.
I baked the full recipe yesterday and sent most of it off to work with N this morning. Definitely don't want something this yummy sitting around at home with me all day!

Tuesday, September 29, 2009
Tuesdays with Dorie: Chocolate-Crunched Caramel Tart
Boy it's been a pastry filled month around the food.baby household! While it hasn't been great for my waistline, between the turnovers, pufflets, vols-au-vent and now this tart, I can say I have well and truly conquered my fear of making pastry. Woo hoo!
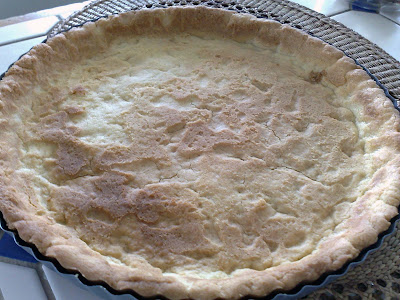
I have been eyeing off the Chocolate-Crunched Caramel Tart since I first flicked through Baking, and yes, it was every bit as good (and as rich) as it looks!
I searched high and low (well on high shelves and low shelves in woolies) for honey roasted peanuts without success. Just as I'd given up we walked past the Christmas section and noticed some honey roasted cashews. Sold! I'm trying to ignore the fact there are Christmassy foods out already.
The pastry came together beautifully. I probably overcooked it slightly but it was still tender and crumbly and shortbready. Even the caramel behaved as it should (I added an extra pinch of sea salt along with the salted butter). My only issue was with the ganache.
 Note to self - do not store chocolate on top of the oven. For any reason. Even if only for a few minutes while you wipe down the bench because you WILL forget to remove it. And then your husband will cook lunch in that oven without realising there is chocolate on top.
Exhibit A - my lovely block of Green & Blacks 70% ...
 This happened the day before I was planning on making the tart, so rather than have to remelt it the next day and hope that it survived the process, I made the ganache and refrigerated it overnight.
I poured the warm cream over the chocolate and got a smooth, luscious looking ganache. Then I added the butter and got an oil slick. I think butter really has no place in ganache. I stirred it through as best I could but the next morning I got this ...
Exhibit B - ewwwwww
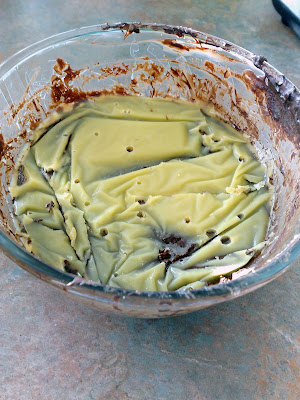 I scraped the butter off the top and it was exactly the amount I added in. I'm never adding butter to ganache again. After nuking my ganache was back to delicious.
 The taste test ...
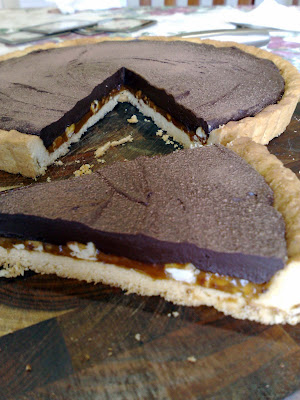 Wow. Seriously, wow. I just wish I'd been able to get a decent photo (my camera is in being repaired and the focus on my phone sucks). It sliced beautifully, the layers were really pretty and the taste was sensational. We will definitely be making this again.
Thanks to Carla of Chocolate Moosey (love that name!) for choosing this week's recipe. Make sure you visit her blog for the recipe along with the TWD blogroll to see much better photos than mine!
I have been eyeing off the Chocolate-Crunched Caramel Tart since I first flicked through Baking, and yes, it was every bit as good (and as rich) as it looks!
I searched high and low (well on high shelves and low shelves in woolies) for honey roasted peanuts without success. Just as I'd given up we walked past the Christmas section and noticed some honey roasted cashews. Sold! I'm trying to ignore the fact there are Christmassy foods out already.
The pastry came together beautifully. I probably overcooked it slightly but it was still tender and crumbly and shortbready. Even the caramel behaved as it should (I added an extra pinch of sea salt along with the salted butter). My only issue was with the ganache.

 Note to self - do not store chocolate on top of the oven. For any reason. Even if only for a few minutes while you wipe down the bench because you WILL forget to remove it. And then your husband will cook lunch in that oven without realising there is chocolate on top.
Exhibit A - my lovely block of Green & Blacks 70% ...
 This happened the day before I was planning on making the tart, so rather than have to remelt it the next day and hope that it survived the process, I made the ganache and refrigerated it overnight.
I poured the warm cream over the chocolate and got a smooth, luscious looking ganache. Then I added the butter and got an oil slick. I think butter really has no place in ganache. I stirred it through as best I could but the next morning I got this ...
Exhibit B - ewwwwww
 I scraped the butter off the top and it was exactly the amount I added in. I'm never adding butter to ganache again. After nuking my ganache was back to delicious.
 The taste test ...
 Wow. Seriously, wow. I just wish I'd been able to get a decent photo (my camera is in being repaired and the focus on my phone sucks). It sliced beautifully, the layers were really pretty and the taste was sensational. We will definitely be making this again.
Thanks to Carla of Chocolate Moosey (love that name!) for choosing this week's recipe. Make sure you visit her blog for the recipe along with the TWD blogroll to see much better photos than mine!
Sunday, September 27, 2009
Daring Bakers September: Vols-au-Vent
 Wow, this month's DB challenge was awesome! When I started my blog last year it was because I was inspired by all the amazing things the Daring Bakers (and TWDers) were turning out. At that point I didn't even realise it was possible to make puff pastry at home, let alone good puff pastry! So for me this challenge marks a real turning point. After all, if I can make puff pastry and vols-au-vent then I am up for the challenge of just about anything!
The official line - The September 2009 Daring Bakers' challenge was hosted by Steph of A Whisk and a Spoon. She chose the French treat, Vols-au-Vent based on the Puff Pastry recipe by Michel Richard from the cookbook Baking With Julia by Dorie Greenspan.
As my husband was heading to Adelaide for a conference and would be away for a few days, I decided to make these for his going away lunch the day before. With the weather being so warm, it was an easy decision to have a cold filling.
The puff pastry was actually surprisingly easy to make. The instructions were clear and it all worked really well. I did have to pop the dough back in the fridge a few times though as it started to ooze.
 I used half the dough (froze the rest) and cut 6 discs using a 4 1/2" cutter.
 The finished product was puffed and golden and so exciting to see! I found they needed a little longer than stated to cook, and even then the insides were a little underdone. I think this was probably because I pushed them down with spoon during the cooking a little too often, and it stopped the layers separating.
 I made a cold prawn and avocado salad for the filling with diced avocado, celery, spanish onion, lemon and prawns in a light cream dressing. Delicious!
 I used the caps of the vols-au-vent to top the Eton Mess I made for dessert. This is a scrummy mixture of whipped cream, fresh strawberries and crushed meringue.
 (my very messy presentation - but very yummy!)
Michel Richard’s Puff Pastry Dough
From: Baking with Julia by Dorie Greenspan
Yield: 2-1/2 pounds dough
Pastry Ingredients:
2-1/2 cups (12.2 oz/ 354 g) unbleached all-purpose flour
1-1/4 cups (5.0 oz/ 142 g) cake flour
1 tbsp. salt (you can cut this by half for a less salty dough or for sweet preparations)
1-1/4 cups (10 fl oz/ 300 ml) ice water
1 pound (16 oz/ 454 g) very cold unsalted butter plus extra flour for dusting work surface
Mixing the Dough:
Check the capacity of your food processor before you start. If it cannot hold the full quantity of ingredients, make the dough into two batches and combine them. Put the all-purpose flour, cake flour, and salt in the work bowl of a food processor fitted with a metal blade and pulse a couple of times just to mix. Add the water all at once, pulsing until the dough forms a ball on the blade. The dough will be very moist and pliable and will hold together when squeezed between your fingers. (Actually, it will feel like Play-Doh.)
Remove the dough from the machine, form it into a ball, with a small sharp knife, slash the top in a tic-tac-toe pattern. Wrap the dough in a damp towel and refrigerate for about 5 minutes.
Meanwhile, place the butter between 2 sheets of plastic wrap and beat it with a rolling pin until it flattens into a square that's about 1" thick. Take care that the butter remains cool and firm: if it has softened or become oily, chill it before continuing.
Incorporating the Butter:
Unwrap the dough and place it on a work surface dusted with all-purpose flour (A cool piece of marble is the ideal surface for puff pastry) with your rolling pin (preferably a French rolling pin without handles), press on the dough to flatten it and then roll it into a 10" square. Keep the top and bottom of the dough well floured to prevent sticking and lift the dough and move it around frequently.
Starting from the center of the square, roll out over each corner to create a thick center pad with "ears," or flaps. Place the cold butter in the middle of the dough and fold the ears over the butter, stretching them as needed so that they overlap slightly and encase the butter completely. (If you have to stretch the dough, stretch it from all over; don't just pull the ends) you should now have a package that is 8" square.
To make great puff pastry, it is important to keep the dough cold at all times. There are specified times for chilling the dough, but if your room is warm, or you work slowly, or you find that for no particular reason the butter starts to ooze out of the pastry, cover the dough with plastic wrap and refrigerate it . You can stop at any point in the process and continue at your convenience or when the dough is properly chilled.
Making the Turns:
Gently but firmly press the rolling pin against the top and bottom edges of the square (this will help keep it square). Then, keeping the work surface and the top of the dough well floured to prevent sticking, roll the dough into a rectangle that is three times as long as the square you started with, about 24" (don't worry about the width of the rectangle: if you get the 24", everything else will work itself out.)
With this first roll, it is particularly important that the butter be rolled evenly along the length and width of the rectangle; check when you start rolling that the butter is moving along well, and roll a bit harder or more evenly, if necessary, to get a smooth, even dough-butter sandwich (use your arm-strength!). With a pastry brush, brush off the excess flour from the top of the dough, and fold the rectangle up from the bottom and down from the top in thirds, like a business letter, brushing off the excess flour. You have completed one turn.
Rotate the dough so that the closed fold is to your left, like the spine of a book. Repeat the rolling and folding process, rolling the dough to a length of 24" and then folding it in thirds. This is the second turn.
Chilling the Dough:
If the dough is still cool and no butter is oozing out, you can give the dough another two turns now. If the condition of the dough is iffy, wrap it in plastic wrap and refrigerate it for at least 30 minutes. Each time you refrigerate the dough, mark the number of turns you've completed by indenting the dough with your fingertips. It is best to refrigerate the dough for 30 to 60 minutes between each set of two turns. The total number of turns needed is six.
If you prefer, you can give the dough just four turns now, chill it overnight, and do the last two turns the next day. Puff pastry is extremely flexible in this regard. However, no matter how you arrange your schedule, you should plan to chill the dough for at least an hour before cutting or shaping it.
Thank you Steph for a wonderful challenge this month! I feel very proud of myself :-)
Tuesday, September 22, 2009
Tuesdays with Dorie: Cottage Cheese Pufflets

TWD time again! Jacque of Daisy Lane Cakes chose Dorie's Cottage Cheese Pufflets this week.
First thought ... what on earth is a pufflet!?? Second thought ... what on earth are they going to look like? Despite reading through the recipe several times I still had no real idea of how these were going to turn out. And now after making them I'm still not sure!
It seems a pufflet is a teeny tiny jam-filled pastry, made from a dough that is quite similar to last week's turnover dough. The main difference was that this dough was the softest, stickiest dough I have ever made! Despite multiple chills in the fridge between every stage it was really hard to manage. I rolled it out between sheets of baking paper and had to freeze it in order to peel off the top layer of paper. After cutting I then had to scrape each piece off the paper with a knife.
End result?
Tasty but definitely not puffy. I will call them flatlets instead. The boysenberry jam I used was brilliant. I only rolled about 1/6th of the dough (the rest is frozen) and I got 7 flatlets. I think I will roll them a bit thicker next time and will make them at night when it is (slightly) cooler.
Thanks for picking the pufflets Jacque! You can find the recipe at Daisy Lane Cakes.
Tuesday, September 15, 2009
Tuesdays with Dorie: Flaky Apple Turnovers
 This week Jules of Someone's in the Kitchen chose Dorie's Flaky Apple Turnovers and boy was I worried. Pastry and I are very rarely on speaking terms. Don't get me wrong, I love eating it, it's just making it that drives me crazy. In fact whenever there is pastry to be made, N conveniently makes himself scarce! But ...
This was without doubt, the best pastry I have ever made. EVER!
I had the same issue as a lot of others with my mix being quite dry and crumbly but after its rest it came together beautifully. And it was even delicious raw, I kept snagging pieces as I worked.
We were in the midst of moving furniture the day I made these so while I made a full batch of dough, I only rolled 4 turnovers plus a mini apple pie and froze the rest. I got a little impatient with the rolling out (ie. my arms got sore). So I cut out 3" rounds from the dough and rolled each one out to 4 1/2" individually. Much easier!
The taste test ...
 Fantastic! This was the pastry so many recipes had promised but none had ever delivered. Crisp, flaky and delicious. I used a mixture of fuji apples, slivered almonds and raisins to fill these but you really could use anything you liked. The perfect afternoon or anytime treat. I think this will be my go-to pastry from now on. Thanks Jules!
Subscribe to:
Posts (Atom)