Showing posts with label Breads. Show all posts

Tuesday, July 17, 2012

TWD BWJ - Semolina Bread


© food-baby.blogspot.com All rights reserved

I really love making bread. I love the way the dough feels, the aroma when it bakes and of course nothing beats eating it warm from the oven. Making this bread was also a reminder that I need to read recipes properly because I didn't realise until I started that each step took 2 hours. Oops!

This bread was new to me because it contains semolina which I've never used before. The result was a slightly dense but incredibly flavourful loaf. I didn't love it straight from the oven and thought it was a little too salty. But it was wonderful toasted the next day and I think it would make fabulous garlic bread.

I have no idea if I slashed the top the way I was supposed to. Was it just me or were the directions a little confusing?

We ate most of the loaf toasted with some slow-cooked baked beans (recipe to come!) and it was the perfect accompaniment to soak up all the sauce.

Our hosts this week are Renee of The Way to My Family's Heart and Anna of Keep it Luce. They will post the recipe today so make sure you check it out!


Tuesday, June 5, 2012

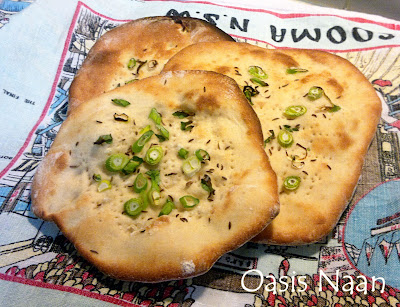
TWD BWJ - Oasis Naan and Creamy Prawn Curry

Oasis Naan © Susan Lockhart King http://food-baby.blogspot.com.au

After the calorie-laden treats of the past few weeks of BWJ I was delighted to have a simple savoury recipe this week, and even more delighted that it was naan! We love Indian food around here and cook it quite often but we have never really made our own naan. 

This was a very simple bread, just 4 ingredients. I baked them on a pizza stone so they were lovely and crispy on the bottom. They just never got the flat middle and puffed edges that I think was intended, maybe my oven doesn't get hot enough for them to puff up? The parts that did puff up sank as soon as they were taken out.

I even happened to have an unopened packet of caraway seeds in the pantry (no idea what that was bought for!) so could make them exactly as per the recipe for a change. Though I did make one with just sesame seeds on top so my boys didn't have to pick off 'the green'.

I served our naan with a creamy prawn curry which we had also never made before. Truly this was one of the most delicious things I've ever eaten! And so simple. We are already imagining this sauce on chicken and fish and making it for guests. Absolutely delicious. 

Our hosts this week were Maggie of Always Add More Butter and Phyl of Cabbages & King Cakes. They will have the recipe up for the Oasis Naan. The curry recipe is below.

Creamy Prawn Curry © Susan Lockhart King http://food-baby.blogspot.com.au

Creamy Prawn Curry
Adapted from A Little Taste of India, Murdoch Books 2003, p104-105

400g prawns (peeled, raw, frozen)
2 tbs oil
2 spring onions, finely sliced
1/2 ts ground turmeric
1/2 ts ground cinnamon
1/2 ts ground cumin
1/8 ts ground cloves
7 cardamon pods
1 ts chilli paste
3cm piece fresh ginger, grated
3 cloves garlic, crushed
1 x 400ml tin coconut milk

Heat the oil in a large heavy based fry pan. Fry the spring onions for 1 minute then add the turmeric, cinnamon, cloves, cumin, cardamon, garlic and ginger. Fry for 2 minutes. Add the chilli, coconut milk and some salt to taste and bring to the boil. 

Reduce the heat to low and add the prawns. Simmer for 5 minutes or until the prawns are cooked through and the sauce has thickened. Garnish with extra sliced spring onions and serve with rice and/or naan. Serves 4.


Sunday, May 27, 2012

Sunday Baking - Homemade Soft Pretzels


Soft pretzels aren't at all common in Australia. Here when someone says pretzels you immediately think of the the hard and crunchy kind you can buy in bags like chips. 

Hubby had soft pretzels recently at a work morning tea and was so keen for me to make some he found a recipe, printed it out and then wouldn't shut up about them!  So late Sunday afternoon we decided to bake them together.

They were surprisingly easy to make. A simple dough made with butter is rested then shaped, boiled and baked. We definitely don't have the shaping technique down but that will improve with practice. We will be making these again!

Homemade Soft Pretzels
Recipe converted from the Food Network

1 1/2 cups water, heated to 44 degrees Celsius (I realise you don't need to activate instant dry yeast as you do with active dry yeast but we used warm water just to keep the same process as the original recipe)
1 tbs sugar
1 ts salt
2 ts instant dry yeast
4 1/2 cups plain flour
60g butter, melted
10 cups water
2/3 cup bicarb soda
1 large egg beaten with 1 tbs water
vegetable oil for greasing pan

Into the bowl of a stand mixer place the flour, butter, warm water, sugar, salt and yeast. Using the dough hook attachment mix on low speed until well combined. Increase speed to medium and mix until the dough is smooth and elastic and pulling cleanly away from the sides of the bowl. Remove the dough from the bowl so you can grease the bowl with vegetable oil then return the dough. Cover with plastic wrap and leave to rest in a warm place for approx 1hr or until doubled in size.

Preheat oven to 230 degrees Celsius. Line 2 baking trays with baking paper and brush them lightly with oil. Set aside.

Bring the 10 cups of water and the bicarb soda to a boil in a large saucepan.

Meanwhile, turn the dough out onto a greased surface and cut into 8 equal pieces. Roll out each piece of dough into a 60cm long rope. Male a U-shape with the dough, then cross them over each other and press the ends onto the bottom of the U in order to form the shape of a pretzel (?). Place onto the greased and lined baking tray and repeat.

Place the pretzels one by one into the boiling water mixture, for 30 seconds only. Remove with a large flat spatula and return to the baking tray. Brush each one with the egg wash mixture then sprinkle with coarse salt.

Bake until dark golden brown, approx 12-14 minutes. Transfer to a cooling rack for at least 5 minutes before serving. 

Makes 8

Tuesday, May 15, 2012

TWD BWJ - Pecan Sticky Buns


You can probably tell from the photo that my sticky buns aren't quite as 'sticky' as they should be. That's because I could feel my arteries clogging just reading this week's recipes and decided to cut the butter somewhat.

I made the brioche but didn't laminate it and I used just a tablespoon of butter in the topping for each tray of buns. The results were absolutely delicious so I can only imagine how amazing the original version would have been!

I've never made brioche before and was really pleased with how it turned out. I'm already planning on making more and turning it into french toast one weekend. Yum!

Overall these were wonderful. I don't regret cutting the butter out because now I don't feel so guilty sneaking one for afternoon tea :)

Our hosts this week are Lynn of Eat Drink Man Woman Dogs Cat and Nicole of Cookies on Friday. They'll have the recipes up and you can decide whether I made the right decision to go low(er) fat with these!

Tuesday, March 20, 2012

TWD BWJ - Irish Soda Bread

For some reason I had it in my head that soda bread was made with beer and I was going to hate it. I actually groaned when I read that it was this week's choice. Well I was wrong about the beer and I really loved this recipe!

For starters, talk about easy. Just 4 ingredients mixed, shaped, plopped on a tray and baked. That's it.


So it seems that Irish soda bread is very similar to an Aussie damper with that wonderful crunchy crust and dense, slightly chewy interior. The perfect bread to eat warm with a smear of butter and lots of golden syrup. Heavenly!

My boys weren't so keen on this one, being used to lighter less chewy bread. Hubby never even saw it, as it was baked, eaten and the leftovers wrapped up in the freezer in a matter of hours. I have yet to test the "as hard as the Blarney Stone" prediction.

If you would like to make this yummy bread check out Carla at Chocolate Moosey and Cathleen at My Culinary Mission for the recipe.

Tuesday, February 7, 2012

TWD Baking with Julia - White Loaves

This is the first week of the new Tuesdays with Dorie - Baking with Julia, how exciting! We will be baking fortnightly and should have one simple and one more complicated recipe to post each month. With over 300 bloggers baking along this is going to be fun!

So, first up we have White Loaves, chosen by Laurie and Jules.

I have been making bread a lot recently but cheating a bit because I use my breadmaker. I heart my breadmaker! While it makes great bread, of course, it also makes pizza dough and I can turn a basic dough mix into almost anything. Just last week I made cinnamon rolls (no pics sorry) and in the lead up to Easter there will definitely be some fresh hot cross buns too!

It has been a while though since I made a loaf of bread completely from scratch. I had forgotten how easy it is and Oscar loved seeing the dough rising and being punched down and turned into real bread.

This is a very simple recipe and it made 2 absolutely delicious loaves of bread. I stuck strictly to recipe and made 2 plain loaves perfect for sandwiches. We go through a LOT of sandwiches in this house. It froze well too and also made great toast.

All in all a great place to start the new TWD. I hope everyone else had success too! The list of bakers should be up soon on the TWD page.

You will find the recipe on pp81-82 of Baking with Julia by Dorie Greenspan, or Laurie and Jules will have it in their posts due today.

Tuesday, February 8, 2011

Tuesdays with Dorie: Maple and Fruit Bread Pudding

I know I've said it before but I'll say it again ... I LOVE bread pudding! It is just about the most comforting food you could ever eat and after the week we've had, a little comfort eating is definitely required.

Oscar came home from daycare last Monday with a fever and by the next day was just downright miserable and refusing to eat or drink. By Thursday he was diagnosed with tonsilitis. By Friday he was covered in a rash which is either rubella or roseola. Being sick at any time sucks but when you're not even 2 and can't tell anyone what hurts or what you need to feel better must be just horrible. While he is on the mend now we still have a week of quarantine at home missing out on all the fun stuff like swimming, daycare, music and playgroup that we normally go to.

The remedy? Bread pudding for breakfast!

While I love bread pudding I don't love bourbon and wanted to make it child-friendly in any case. I pretty much completely changed Dorie's recipe but I was inspired by it. A big thanks to Sharon of Simply Southern for choosing it this week.

For my Maple and Fruitbread Pudding I used the following ingredients but followed Dorie's method of preparation and baking.

250g fruit bread (mine was homemade and packed with dried fruit and mixed spice)
4 eggs
3 cups reduced fat milk
1/3 cup brown sugar
1/4 cup maple syrup
1 ts cinnamon
1 ts vanilla extract

The taste test ...

The youngest and sickest taste tester gave this a big "yum yum!" I have to agree. Absolutely delicious. A little sweet for everyday but perfect for a special breakfast or dessert.

For the real deal aka Bourbon Bread Pudding make sure you visit Sharon of Simply Southern.

Tuesday, August 17, 2010

Tuesdays with Dorie: Oatmeal Breakfast Bread

This week's Oatmeal Breakfast Bread was another hidden gem. Well not hidden exactly, but I had certainly never noticed it until it was picked by Natalie of Oven Love!

It also falls into the ugly but delicious category because try as I might I could not get a decent photo.

Let me just say that I loved this bread. Made without any butter it is incredibly moist from the apple puree and buttermilk and the house smelt amazing while it was baking. Because it was so moist it was a little hard to tell when it was done but in the end it was perfect. I used raisins and dried apple in mine and it was fabulous.

I found the streusel topping a little hard to manage, as in most of it fell off every time a slice was cut. Next time I might skip the topping altogether so that I can toast a piece straight from the freezer.

Thank you to Natalie for hosting this week. Wonderful choice! Make sure you check out her blog Oven Love for the recipe.

Thursday, June 17, 2010

Daring Cooks June - Pâtés and Bread

Wow it feels like ages since I've done a Daring Cooks challenge. Actually that's not totally accurate. It's ages since I completed one on time and got around to posting it!

Our hostesses this month, Evelyne of Cheap Ethnic Eatz, and Valerie of a The Chocolate Bunny, chose delicious pate with freshly baked bread as their June Daring Cook’s challenge! They’ve provided us with 4 different pâté recipes to choose from and are allowing us to go wild with our homemade bread choice.

I didn't follow the pâté recipes provided but I hope what I've done fits within the spirit of the challenge. I made a simple salmon mousse and the sandwich bread.

Salmon Mousse

1 x 415g tin premium red salmon, drained, skin and bones removed
250g cream cheese
approx 200g smoked salmon
juice of 1 lemon
1 1/2 ts gelatine powder

Spray 4 small dariole moulds (I used plastic) with olive oil spray then line with plastic wrap. Then use the smoked salmon slices to completely line each mould, coming right to the top and ensuring there are no gaps.

Place the lemon juice in a small saucepan over low heat. Once warm sprinkle over the gelatine powder and turn off the heat. Stir until the gelatine is completely dissolved then set aside.

Place the tinned salmon and cream cheese in a food processor and process until very smooth, at least 2 minutes. With the motor running, drizzle in the lemon juice mixture and process for another minute or so until completely incorporated and smooth.

Pour the mousse mixture into each mould, tapping the mould on the bench to remove any air bubbles. Cover the tops with plastic wrap and refrigerate for at least 2 hours.

To serve, gently ease each mousse out of the mould and remove the plastic wrap. Garnish with sprigs of fresh dill. Allow to stand at room temperature for 30 minutes before serving with fresh baguette or toast slices.

This mousse is intensely salmon flavoured but the lemon cuts through the richness. A perfect dinner party entrée.

Sandwich Loaf/Baguettes

3 tsp (15 ml) active dry yeast
2 2/3 cups (600 ml) whole milk (3.25 per cent fat), warmed to a temperature of 97ºF (36ºC)
2 1/2 tsp (12.5 ml) salt
2 tsp (10 ml) butter, melted
5 1/3 cups (750g) unbleached white bread flour, + 1/2 cup (75g), for working the dough
2 tbsp (30 ml) butter, for the loaf pan

To make loaves:

In a large mixing bowl, combine the yeast and warm milk, and whisk to dissolve. Whisk in the salt and the melted butter. Gradually sprinkle in the flour, stirring with a wooden spoon.

When the dough becomes too thick to stir, knead it with your hands, for about 5 minutes, until you obtain a smooth, homogeneous dough that is soft and a little sticky. Cover with plastic wrap and let rest 30 minutes.

Knead the dough 20 strokes (still in the bowl), cover again, and let rest for 1.5 hours.

Transfer the dough to a lightly floured work surface, and divide in two. Form each half into a sausage. Transfer the dough to a greased baking sheet. Cover lightly and let rise in a draft-free area for 60 minutes, or until doubled in volume.

Fill a large baking pan with hot water (simmering is fine) and place in the oven. Preheat oven to 450ºF (240ºC). Using a very sharp knife cut 3 slits into the top of each loaf. Spritz the loaves with warm water and sprinkle the tops with sesame seeds (optional).

Put the loaves in then oven and bake for 10 minutes. Do not open the oven door during this time.

After 10 minutes, lower the oven temperature to 400ºF (200ºC) and continue baking for about 25 minutes, or until the loaves are nicely golden. Unmould and let cool on a rack.

Next time I would love to try the proper french bread recipe. It's been on my to-do list for ages but I just ran out of time. I was also worried how my starter would fare overnight considering how cold it has been lately.

TIP: I have always struggled with getting my dough to prove/rise well, especially in winter. But for this challenge I used a tip from Chocolatchic to proof the dough in the car! This worked spectacularly well and I think I will do it every time from now on.

Thanks for a great challenge!

Tuesday, June 15, 2010

My Tuesday with Dorie: Raisin Swirl Bread

First of all, woo-hoo! I had figured it would be my turn to pick sometime this year but getting Laurie's email for June was a huge surprise. I spent a harried 24 hours or so flicking back and forth between recipes, trying to select something that I would not only love to bake but that said something about me.

My very first TWD post was for the Chocolate Puddings back on 15 July 2008. I wasn't even an official member at that stage but was playing along at home until I could order my copy of Baking. My blog was only a few days old and it was less than a month since my mum passed away. Baking and blogging seemed like a wonderful distraction at a really difficult time. Since then I have gotten married, had a baby and reached the 200 post mark.

All of this brings me to my reason for choosing the Raisin Swirl Bread this week. Baking bread is such a comforting, homey thing to do. There's nothing quite like the smell or taste of your own fresh bread and it is something I hope my kids remember from their childhood as I do.

I loved this bread and I hope anyone who was scared of yeast (or raisins!) had a go and was happy with the results!

Raisin Swirl Bread
pp 59-60 of Baking: From My Home to Yours

For the bread:
1 packet active dry yeast
1/4 cup sugar, plus a pinch
1 1/4 cups just-warm-to-the-touch whole milk
1/2 stick (4 tablespoons or 60g) unsalted butter, at room temperature
3/4 teaspoon salt
1 large egg
1/4 teaspoon pure vanilla extract (optional)
Grated zest of 1/2 orange (optional)
Pinch of freshly grated nutmeg (optional)
3 3/4 to 4 cups all-purpose (plain) flour

For the swirl:
1 tablespoon sugar
2 teaspoons ground cinnamon
2 teaspoons unsweetened cocoa powder (optional)
1 cup moist, plump raisins (dark or golden)
3 tablespoons (45 grams) unsalted butter, softened to a spreadable consistency

To make the bread:
Put the yeast in a small bowl, toss in the pinch of sugar and stir in 1/4 cup of the warm milk. Let rest for 3 minutes, then stir - the yeast may not have dissolved completely and it may not have bubbled, but it should be soft.

Working with a stand mixer, preferably fitted with a paddle attachment, combine the remaining 1 cup of milk, the butter and the remaining 1/4 cup sugar and mix for a minute or two. Add the salt, egg and vanilla, if you are using it, as well as the zest and nutmeg, if you're using them, and mix for a minute. In all likelihood, the mixture will look unpleasantly curdly (it will look even worse when you add the yeast). Add the yeast mixture and beat on low-medium speed for 1 minute more.

Turn the mixer off and add 2 3/4 cups of the flour. Mix on low speed just until you work the flour into the liquids - you'll have a sticky mix. If you've got a dough hook, switch to it now. Add another 1 cup of flour, increase the mixer speed to medium and beat the dough for a couple of minutes. If the dough does not come together and almost clean the sides of the bowl, add up to 1/4 cup more flour, 1 tablespoon at a time. Keep the mixer speed at medium and knead the dough for about 3 minutes, or until it is smooth and has a lovely buttery sheen. The dough will be very soft, much too soft to knead by hand.

Butter a large bowl, turn the dough into a bowl and cover the bowl tightly with plastic wrap. Put the bowl in a warm place and let the dough rise until it is doubled in size, about 1 1/2 hours.

Scrape the dough onto a large piece of plastic wrap, wrap it and put it in the freezer for 30 minutes to firm enough to be rolled easily. (At this point, you can instead refrigerate the dough overnight if that is more convenient).


To make the swirl and shape the loaf:
Butter a 9 x 5 inch loaf pan.

Whisk together the sugar, cinnamon and cocoa, if you're using it. Check that the raisins are nice and moist; if they're not, steam them for a minute, then dry them well.

Put the dough on a large work surface lightly dusted with flour, lightly dust the top of the dough and roll the dough into a rectangle about 12 x 18 inches.

Gently smear 2 tablespoons of the butter over the surface of the dough - this is most easily done with your fingers. Sprinkle over the sugar mixture and scatter over the raisins. Starting from a short side of the dough, roll the dough up jelly-roll fashion, making sure to roll the dough snugly. Fit the dough into the buttered pan, seam side down, and tuck the ends under the loaf.

Cover the pan loosely with wax paper and set in a warm place; let the dough rise until it comes just a little above the edges of the pan, about 45 minutes.

Getting ready to bake:
When the dough has almost fully risen, centre a rack in the oven and preheat the oven to 375 degrees F (190 degrees Celsius). Line a baking sheet with parchment or a silicone mat.

Melt the remaining tablespoon of butter, and brush the top of the loaf with the butter. Put the pan on the baking sheet and bake the bread for about 20 minutes. Cover loosely with a foil tent and bake for another 25 minutes or so, until the bread is golden and sounds hollow when the bottom of the pan is tapped. Transfer the pan to a rack and cool for 5 minutes, then unmold. Invert the bread and cool to room temperature right side up on the rack.

I have to confess to slicing my bread while it was still warm and I ended up with raisins scattered everywhere. But it was totally worth it ... it is sensational straight from the oven!

Oh and it also makes spectacular cinnamon toast the next day!

Thank you in advance to everyone who baked along with me this week and huge thanks to Laurie for creating such a wonderful group and Dorie for her fabulous book! :-)

Tuesday, May 18, 2010

Tuesdays with Dorie: Apple-Apricot Bread Pudding


This week Elizabeth of Cake or Death? chose Dorie's Apple-Apple Bread Pudding and it was the perfect pick given the freezing cold weather we've been having (well freezing for Brisbane anyway). Is there anything more comforting on a cold night than bread pudding?

We've had a lot of rich food recently so I tried to cut the calories a bit with this one, without sacrificing taste of course.

Rather than caramalise the apples I simply stewed them with water and cinnamon. The gala apples are so sweet at the moment they really don't need any added sugar.

We can't get apple butter here so I used a 100% apricot spread instead.

I also used low fat milk and reduced the amount of cream.

As for the bread, I found something called Scone Toast at the supermarket which seemed ideal. I always leave the crusts on.

The result? A creamy, delicious bread pudding that we all loved! Definitely didn't miss the extra butter, sugar or cream. With a scoop of vanilla ice-cream on top this is the quintessential winter dessert.

Thanks for a great pick Elizabeth! You can find the recipe on her blog under today's date.

Sunday, February 14, 2010

Daring Cooks February - Mezze

Daring Cooks time again! It feels like ages since I participated in the Daring Cooks challenges but in reality I only skipped January. This month brought the opportunity to make something that's been on my to-cook list for about year - pita bread!

I've really been getting into making bread but this one has always had me worried. How do you get your pita bread to puff up like they should? What are they like if they don't? I needn't have worried though because these worked perfectly. If you've ever wanted to try making pita then this is the recipe for you.

Now the actual challenge was to make a mezze table, a Middle Eastern version of Spanish Tapas, but basically a whole lot of small dishes that are served before a main meal or as finger food. I shamefully did the bare minimum and just made the pita and hummus.

The 2010 February Daring COOKs challenge was hosted by Michele of Veggie Num Nums. Michele chose to challenge everyone to make mezze based on various recipes from Claudia Roden, Jeffrey Alford and Naomi Dugid.

Pita Bread – Recipe adapted from Flatbreads & Flavors by Jeffrey Alford and Naomi Duguid

Prep time: 20 minutes to make, 90 minutes to rise and about 45 minutes to cook 2 teaspoons regular dry yeast (.43 ounces/12.1 grams)
2.5 cups lukewarm water (21 ounces/591 grams)
5-6 cups all-purpose flour (may use a combination of 50% whole wheat and 50% all-purpose, or a combination of alternative flours for gluten free pita) (17.5 -21 ounces/497-596 grams)
1 tablespoon table salt (.50 ounces/15 grams)
2 tablespoons olive oil (.95 ounces/29 ml)

Directions:

1. In a large bread bowl, sprinkle the yeast over the warm water. Stir to dissolve. Stir in 3 cups flour, a cup at a time, and then stir 100 times, about 1 minute, in the same direction to activate the gluten. Let this sponge rest for at least 10 minutes, or as long as 2 hours.

2. Sprinkle the salt over the sponge and stir in the olive oil. Mix well. Add more flour, a cup at a time, until the dough is too stiff to stir. Turn it out onto a lightly floured surface and knead for 8 to 10 minutes, until smooth and elastic. Rinse out the bowl, dry, and lightly oil. Return the dough to the bowl and cover with plastic wrap. Let rise until at least doubled in size, approximately 1 1/2 hours.

3. Place a pizza stone, or two small baking sheets, on the bottom rack of your oven, leaving a 1-inch gap all around between the stone or sheets and the oven walls to allow heat to circulate. Preheat the oven to 450F (230C).

4. Gently punch down the dough. Divide the dough in half, and then set half aside, covered, while you work with the rest. Divide the other half into 8 equal pieces and flatten each piece with lightly floured hands. Roll out each piece to a circle 8 to 9 inches in diameter and less than 1/4 inch thick. Keep the rolled-out breads covered until ready to bake, but do not stack.

5. Place 2 breads, or more if your oven is large enough, on the stone or baking sheets, and bake for 2 to 3 minutes, or until each bread has gone into a full balloon. If for some reason your bread doesn't puff up, don't worry it should still taste delicious. Wrap the baked breads together in a large kitchen towel to keep them warm and soft while you bake the remaining rolled-out breads. Then repeat with the rest of the dough.

Look at that puff!

Just a note about the breads, I found it took much, much longer for them to cook despite using a very hot oven and a pizza stone. My pita took about 15 minutes to cook and puff up. And even then they didn't brown much. Still delicious though.

Hummus – Recipe adapted from The New Book of Middle Eastern Food by Claudia Roden

Prep Time: Hummus can be made in about 15 minutes once the beans are cooked. If you’re using dried beans you need to soak them overnight and then cook them the next day which takes about 90 minutes.

1.5 cups dried chickpeas, soaked in cold water overnight (or substitute well drained canned chickpeas and omit the cooking) (10 ounces/301 grams)
2-2.5 lemons, juiced (3 ounces/89ml)
2-3 garlic cloves, peeled and crushed
a big pinch of salt
4 tablespoons tahini (sesame paste) OR use peanut butter or any other nut butter—feel free to experiment) (1.5 ounces/45 grams)
additional flavorings (optional) I would use about 1/3 cup or a few ounces to start, and add more to taste

Directions:

1. Drain and boil the soaked chickpeas in fresh water for about 1 ½ hours, or until tender. Drain, but reserve the cooking liquid.

2. Puree the beans in a food processor (or you can use a potato masher) adding the cooking water as needed until you have a smooth paste.

3. Add the rest of the ingredients and mix well. Adjust the seasonings to taste.

This hummus recipe is identical to the one I make for myself quite regularly and it was fabulous with the pita. Now that I know how easy the pita is I will be whipping them up for myself more often!

Thanks to Michelle for a great challenge!

Monday, January 25, 2010

Ten in 10 Update 3 and Garlic Bread

It's usually about this point into a diet that I start to lose motivation and this time is no different. There's nothing I can really put my finger on, I'm just a bit over it all.

I chose not to count calories this week so paid extra attention to how much I ate and exercised 6 days out of 7. I also made sure we ate less red meat and more veges with dinner. The end result? I gained 200g. Could it be 200g of muscle? I hope so! My fitness is definitely improving and I feel I have more muscle tone.

I'm thinking maybe I won't weigh myself at all for the next 2 weeks but rather will focus on how I feel and how my clothes fit.

And now onto something that makes me smile just thinking about it ...

Cheesy Garlic Bread

I made this absolutely delicious garlic bread to accompany some leftover spaghetti. Now I know that sounds like a very carb heavy meal (and it was!) but the pasta was jam-packed with veges. I have to admit I'm not great at sitting down to a plateful of unadorned vegetables. So I tend to 'sneaky chef' myself and fill everything I cook for dinner with hidden veges.

If you have a favourite vegetable recipe please let me know! I'm definitely looking for inspiration :)

I have been continuing to bake from the fabulous Healthy Bread in 5 Minutes a Day cookbook. I made this garlic bread using 1/4 of the master recipe found on p53. But you could use your own favourite bread dough and do the same thing.

Cover a baking tray with a good dusting of cornmeal. Using as light a touch as possible, flatten the dough into a large circle, about 1/2 inch thick. Place on the tray. Sprinkle with 2 cloves of finely minced garlic, a handful of mozzarella cheese and any fresh or dried herbs you like. Dot with butter (about 1 tablespoon total) and then roll up the dough into a sausage shape. Fold under the ends to seal. Using a sharp knife, slash the top of the loaf.

Once again, I won't post the full recipe because I think you should get the book!

My baking hiatus is now almost over. Come February I will be back in the swing of things. It will be interesting to see how that impacts on my Ten in 10 program!

Monday, January 4, 2010

Healthy Bread in 5 - Soft Whole Wheat Sandwich Loaf

We eat a lot of toast in this family. My dad has even been known to have toast with jam for dessert! But to make good toast you definitely need good bread and this recipe fits the bill perfectly.

This was the second recipe I made out of Healthy Bread in 5 Minutes a Day. I was looking for a more standard loaf (I made a boule the first time). Something that would hold up for both sandwiches and toast.

This loaf is a honey and egg-enriched, wholewheat bread with a lovely sour/sweet flavour. As it contains eggs it doesn't keep in the fridge as long as the other recipes, just 5 days as opposed to 14. But really when it tastes this good I defy you to have it last even that long!

One batch of this recipe was enough for 2 full loaves (made in a 9 x 4 pan). It sliced up beautifully and we are still enjoying it toasted, straight from freezer.

I won't post the recipe here as I think you should get the book! You'll find it on p78 of Healthy Bread in 5 Minutes a Day.

Wednesday, November 25, 2009

Healthy Bread in 5 Minutes a Day

So everyone has heard about the fabulous Artisan Bread in 5 Minutes a Day that has been doing the rounds in the blogosphere. But have you heard about Healthy Bread in 5 Minutes a Day? From the same authors, Zoe Francois and Mark Luinenberg, the focus of this new book is on breads with whole grains, fruits, vegetables and even gluten free options. Yay!

Amazon delivered my copy in amazingly good time last week and I have already made my first batch. I decided to go with the master recipe for a plain whole wheat boule to begin with. It was very simple to mix up and I love that the authors have included metric conversions. Makes my life much easier!

Dough mixed

After a 2 hour rest on the bench

Shaped and ready to bake - definitely need to practice slicing the top

Baked and smelling fabulous!

Well cooked, nice crumb but very slightly sticky/gummy in the middle - will try a little less water in the mix next time

Continuing with our plan to use our new bbq every week we decided to do pizzas. Let me tell you, pizza on the grill is out-of-this-world good! One batch of the master recipe was enough for the boule plus 3 large pizzas. No further resting is required for the bases, so after shaping each one just throw on your toppings and get it straight on the grill.

My favourite - ham and pineapple. Yum!

Bread making is definitely an art and I have a lot to learn but I'm really encouraged by the results so far. Making your own bread is not only healthier but kinder on your wallet as well. I would estimate each loaf/pizza base cost less than $1 to make. Beat that, supermarket!

Michelle of Big Black Dog has started a baking group for HBin5. There is still time to join as their first bread isn't posted until January. Click below for all the details ...

I'm on the fence about joining as I have my hands pretty full with TWD, Daring Bakers and Daring Cooks. But I do plan on posting everything I bake so stay tuned!

Tuesday, July 14, 2009

Tuesdays with Dorie: Brioche Plum Tart

Having mastered the Kugelhoph previously I was delighted that Denise of Chez Us picked Brioche Plum Tart this week. Brioche? Phaw, too easy!

That said I'm still always unsure whether I've stuffed up the dough as it is extremely soft and gooey for most of its resting and slapping down stage. But after an overnight rest in the fridge it was really easy to play with.

I used tinned plums with plum jam, brown sugar and pecans and added a sprinkle (maybe a tablespoon) of ground almonds to soak up any excess juice from the plums.

The taste test ...


Rich and buttery brioche with sweet, slightly tart plums ... definitely a winning combination! The crust did get a little darker than I would have liked, and I already tented it after just 10 minutes instead 20 as per the recipe. However even the dark bits were delicious. This got the thumbs up from all my taste testers and my mind is swimming with other possible toppings.

And seeing this blog is called food.baby here is another pic of Oscar, this time in his new Bumbo seat which he loves! It gets him right in the thick of the action at the table. Definitely a little foodie in the making :)

Tuesday, April 21, 2009

Tuesdays with Dorie: 4 Star Chocolate Bread Pudding


This week's pick made me very happy as I love bread pudding! I hadn't tried a chocolate version before so was curious to taste the results.

As it was around Easter I decided to replace the challah/brioche with leftover hot cross buns. I made a smaller version than the recipe using 4 buns each sliced into 9 rough cubes which fit perfectly into the dish. I also figured this would add enough dried fruit and spice so I left out the raisins.

The taste test ...

I think I must be a bread & butter pudding purist, because while I liked this I didn't love it. We actually had a little piece leftover that ended up in the rubbish. That NEVER happens in this house! I think the chocolate flavour overwhelmed it. Maybe it was using hot cross buns rather than plain brioche. But then chocolate hot cross buns are fabulous. I just don't know!

Thanks to Lauren of Upper East Side Chronicle for this week's pick. You can find the recipe on her blog!

Tuesday, November 11, 2008

Tuesdays with Dorie: Kugelhoph

Another first for me this week but this one was an absolute winner! Considering I have never made brioche and breadmaking is generally a bit hit and miss I was delighted with how this turned out.

I used a fluted tube pan which was conveniently exactly the size needed so I didn't need to fiddle with baking times etc. While it rose beautifully (I leave the bowl in the oven with the light on) I was a bit concerned by how soft the dough was. The instruction to "pull the sides of the dough away and let it slap down in the bowl" didn't happen because as soon as I touched it I was left with sticky stringy cobwebby bits of dough stuck all over my fingers. After it's final rise in the pan before baking I was still concerned by the consistency because it wobbled like a bowl of jelly, unlike any dough I've ever seen before!

Still, you can't argue with results and this was divine.

The taste test ...

Warm, incredibly buttery and very delicate. I love fruit breads so I left the raisins in and also added the zest of an orange to punch up the fruit flavours. This also helped to give a lovely golden colour. To be honest it really didn't need the soaking in butter at the end but I really wasn't complaining as I licked my fingers clean after my third piece!

I will definitely be making this again. And again and again and again. Yum!

Thanks to Yolanda of All Purpose Girl for this week's pick.

Next week: Arborio Black & White Rice Pudding.
Related Posts Plugin for WordPress, Blogger...