Showing posts with label Healthy. Show all posts

Tuesday, June 20, 2017

Super Sprinkle!

Super Sprinkle - boost your nutrition with nuts and seeds - www.mywholefoodfamily.com

I used to love breakfast.

Back in the days when I ate gluten and dairy (and had a myriad of health problems I might add), breakfast was my favourite meal of the day!

Sugary cereal, yoghurt, fruit bread, toast with jam, pancakes, waffles you name it.

These days I'm not really hungry as soon as I wake up and often won't have breakfast until after I've dropped the kids off at school. And as a side note, there's a lot of research about the benefits of fasting so getting a solid 14-15 hours between dinner and breakfast is probably doing me lots of good!

Most days I have eggs scrambled up with some veggies leftover from dinner the night before BUT I'm really starting to crave other things and getting a bit bored of eggs.

For the past few days my breakfast has been a grated appled topped with a few tablespoons of this super sprinkle mix on top. Light, fresh and surprisingly filling!

It's really just a mixture of nuts and seeds but I've started calling it Super Sprinkle to get my kids on board with it. Once I gave it a name they have loved having it on their porridge or yoghurt and in smoothies. Haha!

It's a great way to boost their nutrients and good fats and of course it tastes delicious too.

Just throw everything into the food processor and blitz. We like it a little chunky but you could process it until it is more finely ground and add it to your biscuits and muffins as well to give them an extra boost.

Super Sprinkle

1/2 cup raw almonds
1/2 cup sunflower seeds
1/2 cup pumpkin seeds
1/2 cup coconut flakes
1/4 cup linseeds
1/4 cup chia seeds
1 tbs cinnamon
pinch sea salt

Place all ingredients in your food processor or Thermomix and blitz to desired consistency (TMX about 8-10 seconds / SP 9).

What's your favourite breakfast? x


Friday, April 14, 2017

Citrus Gummies

gut loving citrus gummies - essential oils - www.mywholefoodfamily.com

While we love chocolate in this house we don't go crazy with it at Easter.

My boys each receive a Lindt dark chocolate Gold Bunny from the Easter Bunny (one of the lowest sugar options around and palm-oil free), and I usually make a chocolate dessert for our Easter lunch but that's usually pretty much it!

You can make nearly anything Easter-y with a little imagination, so I decided to dig out some silicone moulds and make some Easter themed gummies for the boys to snack on over the long weekend.

Aren't they cute??

I've shared before just how good for you homemade jellies are. This is a tweaked version using some of my favourite essential oils to boost the citrus flavour.

The boys went nuts for them (as they always do) without any idea they were having something so nutritious and good for their tummies!

If you don't have any silicone moulds, you can just pour the mixture into a glass dish and slice it into squares once it has set.

When it comes to removing them from the moulds or container, just press around the edges of the gummies lightly with your fingertips, pulling it away from the edges. They should then just pop out.

Citrus Gummies

1 cup orange juice
1 cup coconut water
2-4 tbs organic raw honey (I used 2)
3 tbs grass-fed gelatin (I use Great Lakes in the orange container)
6 drops doTERRA Lemon Essential Oil
2 drops doTERRA Wild Orange or Grapefruit Essential oil

Place all the liquid ingredients into a small pot. Sprinkle the gelatin over the top and leave to bloom for a minute or so.

Turn the heat onto low and using a whisk, stir together until the honey and gelatin have dissolved.

Tip into a jug then pour into moulds.

Place in the fridge to set (only takes about 15 minutes).

Remove from the moulds and store in the fridge in an air-tight container.

You can read more about the essential oils I personally use and recommend here, and be sure to get in touch if you would like to try some for yourself!

Have you experimented with gelatin yet?

Do you have a favourite healthy jelly recipe?

Let me know below! x

Monday, December 19, 2016

Healthy Christmas Rum Balls

Healthy Christmas Rum Balls - free form gluten, dairy and refined sugar - from www.mywholefoodfamily.com

Now I know I'm venturing into dangerous territory here.

It seems like everyone's mum or nanna makes rum balls at Christmas - and everyone thinks their version is the best!

Some have crumbled cake, some use crushed biscuits or weetbix, all have chocolate and of course, rum.

My previous favourite back in my BW days (Before Wholefoods) was this version I made with Madeira cake and condensed milk. So good but so bad!

I've tried a few different variations and this one is a definite winner.

It has the fewest ingredients and tastes out of this world!

They are rich, intensely chocolatey and have a lovely warmth from the rum. Just perfect.

So I started these a few days ahead of time by soaking the sultanas in the rum and leaving them to steep. As soon as the rum was gone and the sultanas were plump and juicy they were ready to use.

If you don't have time for that (or just don't want to), you can place the sultanas and rum in a small saucepan, bring to the boil and then simmer until all the liquid is absorbed.

Despite it being school holidays I have somehow managed to keep these hidden from the kids in the freezer. They are definitely adults only and if I'm honest, just to good to share!

Healthy Christmas Rum Balls - free form gluten, dairy and refined sugar - from www.mywholefoodfamily.com

Healthy Cacao Rum Balls

1/2 cup organic sultanas*
2-3 tbs rum
250g organic raw almonds (or almond meal)
2 heaped tbs raw cacao + 1/2 cup extra
2 tbs coconut oil
pinch salt

*See the post above for details on how to prepare the sultanas and rum - by either steeping or boiling. When you are ready, follow the instructions below to make the rum balls.

Place the almonds into your food processor and blend to a fine meal (Thermomix 10 secs / SP 9).

Add all remaining ingredients (except the extra cacao) and blitz until the mix is sticky and clumping together.

Place the extra 1/2 cup raw cacao into a bowl.

Roll spoonfuls of mixture into balls and then drop into the cacao. Toss until covered and place into a storage container.

Makes approximately 16 balls.

Store in the fridge or freezer.

Do you have a favourite treat that it just wouldn't be Christmas without? Tell me below!

Monday, November 28, 2016

Review: Reshape Your Body with Real Food Challenge

Review of the Reshape Your Body with Real Food Challenge - from www.mywholefoodfamily.com

You know, as much as I tout the benefits of menu planning, the actual process of doing it bores me to tears.

It is one of my least favourite jobs!

So the past few weeks were an amazing breath of fresh air as I completed the 21 day Reshape Your Body with Real Food Challenge with naturopath Jessica Donovan from Energetic Mama.

I've written before that I've been feeling fat, frumpy and tired this past Winter.  All of this has been due to some health issues I've been having and while I definitely wanted to lose weight, what I really wanted was more energy and to just feel a little better.

I've been on Jess's mailing list for years and wasn't actually going to do this challenge until the 11th hour when she sent an email detailing how her program can help women with thyroid problems, oestrogen dominance and adrenal fatigue.

Umm, that's the exact trifecta I'm dealing with. I signed up on the spot and couldn't wait to get stuck in!

There was a daily email for the 3 weeks covering the menu, shopping, meal prep, mindset, exercise and some naturopathic advice on the specific conditions so many of us are struggling with.

So 3 weeks later, was it worth it?

In a word, YES.

Within the first few days I could see where some bad habits had been sneaking in.

I could see just how often I was reaching for something sweet, that I wasn't having a substantial enough lunch and then snacking before dinner, and that I'd become too reliant on carb-heavy foods like potatoes and brown rice.


Pros:

1. It is run by a naturopath so you know the nutritional information is sound. Plus Jess is always available to answer any questions in the private Facebook group during the challenge which was great.

2. Jess specialises in treating mums and this program is designed for women with hormonal, adrenal and thyroid issues. Like I said, this is exactly what I need.

3. It got us out of a food rut. Despite eating well, lately we've been busier and tending to make the same things over and over again. The whole family appreciated some different things on the menu and they have been easily adaptable for our gluten and dairy free way of eating.

4. I loved not having to decide what was for breakfast, lunch and dinner each day. The menu and shopping list were provided and all I had to do was check the menu and cook. No thought involved!

5. The food was delicious, very fresh, great variety and easy to prepare. Some of the dinners have become new family favourites and I've made them several times since the challenge.

Cons:

1. The cost of the food. This was something I didn't even consider. We already a eat whole foods/no junk diet but we eat simply, and we buy and cook in bulk. Our food bill essentially doubled for the period of the challenge which was hard for us to absorb. But if you buy processed food and a lot of takeway chances are you would end up saving money.

2. The exercise program was way beyond me. If you already exercise no doubt you would be fine. But coming from a background of chronic fatigue syndrome and no regular exercise for years this was completely, and totally beyond my capabilities.

3. No ongoing access to the exercise videos. While all the menus, shopping lists and exercise planners are downloadable, the exercise videos are not, which is a shame because I would have liked to be able to work up to doing them and track my progress.


My results:
  • 1.4 kg weight loss in 21 days
  • No more bloating
  • 3.5cm off my waist measurement so my jeans are comfy again, and
  • I gained a new repertoire of fresh and delicious meals

They say it takes 21 days to form a new habit, and I have to say I have been sticking with this way of eating quite easily.

I'm now not only planning dinners, but breakfasts and lunches as well and finding I don't really need to snack at all. I'm also more tuned into my body and only eating when I'm hungry, rather than when I'm tired or bored. This is huge!

I think this has been the perfect way to get back into healthier eating, especially with Christmas coming.

I'm not sure when Jess will run the challenge again but you can go here to get on the waiting list for next year.

Thanks Jess! It was a great investment and I'm so happy I signed up.

* This is not a sponsored post. I paid for the challenge myself and was not compensated for this post. All opinions are my own. You should seek medical advice before embarking on a diet and exercise program.

Tuesday, November 15, 2016

3 top tips for going gluten free (and my favourite gluten free flour recipe)

How to go gluten free - 3 top tips from www.mywholefoodfamily.com

Let me say up front that I love bread. Like really LOVE it.

To me the aroma of freshly baked bread is one of the best smells in the world, so the thought of not being able to indulge in a piece, warm from the oven and smeared with butter was ... upsetting.

But after years of ill-health and lots of niggly issues that just wouldn't go away, it was time to bite the bullet and cut out gluten.

Now if you listen to mainstream media you will probably hear that going gluten-free is a fad, that there's no benefit in doing so and that it may even be harmful. I think that's rubbish personally, and naturopath Jules Galloway sums it up perfectly here.

So while I don't have coeliac disease, since going gluten free I have noticed:

- less brain fog
- more energy
- no more constant runny nose
- fewer headaches
- less bloating

Doesn't sound like a harmful fad to me!

I made the decision to go gluten-free back in July and haven't looked back.

As I was already eating a wholefoods type of diet I was expecting it to be relatively painless but I definitely got hit with withdrawal symptoms. It was fascinating to see just how much my body craved carbs and how often I would normally reach for 'a little something', a biscuit or piece of toast, something to keep me going until the next meal.

So based on my experience with going gluten free, here are my top 3 tips:

(And I just have to preface this by saying if you suspect you have coeliac disease, please seek medical advice before cutting out gluten. You need gluten in your system for the testing to be accurate so please see your doctor! For everybody else who suspects gluten may not be the best thing for you, read on).

1. Approach this as an experiment.

Going gluten free is entirely your choice, and for now, you are choosing not to eat gluten. Take each day as it comes and really listen to your body.

Keeping a journal is a great idea. Keep track of what you are eating and how you feel afterwards. For me, eating traditional wheat-based pancakes for breakfast practically sends me into a coma and makes me feel bloated and lethargic for the rest of the day. But I can eat gluten free pancakes and feel great. Seems obvious when you think about it!

2. Focus on foods that are naturally gluten-free.

We are really lucky these days to have access to gluten free products in the supermarket. You can buy gluten-free bread, pasta, crackers, cakes ... you name it. But gluten free bread is definitely not the same as wheat bread. It won't taste the same, look the same and may not work in the same way. I am yet to find a gluten-free bread that is good for sandwiches although most make great toast.  Most brands are also full of additives and preservatives which is not what I want.

So instead of focusing on all the foods you can't eat (because let's face it, gluten is hiding almost everywhere), think about everything you CAN eat. Meat, fish, poultry, fruits, vegetables, nuts, seeds, dairy products ... all of these are naturally gluten free, nourishing and delicious.

3. Plan an alternative so you don't feel deprived

If the rest of your family is having pizza, one of 2 things will happen. You will either feel angry and deprived, or you'll give in and have some. So plan ahead. Make sure you have a gluten free base on hand ready to go, or a recipe to make your own. Make a batch of muffins or bliss balls and stash them in the freezer so you have a sweet treat to have while your coworkers are gobbling down birthday cake. Feeling deprived will make you miserable, even if you're feeling better in other ways.

Now I love baking and am pretty experienced, but even I have had some gluten-free disasters. I'm talking muffins like bricks, and pizza base so tough we couldn't even break it!

The Orgran brand plain and self-raising flours at the supermarket are great, but I've also come up with my own recipe that I keep on hand. And if that's too much, a simple 50:50 blend of buckwheat and rice flours also works well for most recipes like biscuits and muffins.

My favourite gluten-free flour mix

200g sorghum flour
200g buckwheat flour
200g white rice flour
100g brown rice flour
300g potato starch
1 tbs psyllium powder

Place all ingredients into a very large bowl and use a whisk to mix well together.

Store in an airtight container.

If I was to add a top tip #4 it would be to choose your start date carefully - don't make things harder on yourself by quitting gluten a week before your birthday or Christmas or some other normally gluten-free celebration.

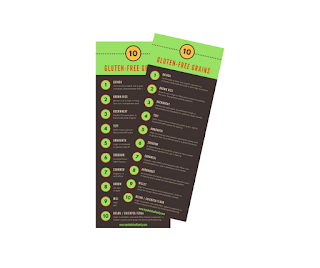
To help you on your gluten-free journey I've done up a handy printable showing 10 of my favourite gluten-free grains, their health benefits and how to use them. Just click on the image below to grab your copy now!

Get your free 10 Gluten-free Grains PDF

Have you gone gluten free? Did you notice any great improvements? How has it changed the way you cook and eat?

I would love to hear your thoughts.

Susan

Friday, July 15, 2016

Wholefood Banana Custard Slice (Gluten and Dairy Free)


Baking desserts has always been one of my favourite things - not only because I get to eat what I make, but also because bringing out a special dessert to the table always lights people up. I love it when people love my food!

Not too many years ago I was baking regularly and going through a staggering amount of sugar. Rather than beat myself up about that I choose to see that just by making it myself I was avoiding all the artificial additives you find in processed versions of desserts.

After quitting sugar and when food intolerances became an issue for the boys and me, I was worried  I wouldn't be able to bake anymore, or at least not anything that other people would enjoy. While I've had quite a few flops I am now at a point where I can quite easily convert a recipe to be free of wheat or gluten, dairy and refined sugar without any drama.

And the results can be spectacular!

You know how you always have a soft spot for the sweets from your childhood? For me it's custard - think vanilla slice, custard tart or just plain custard with sliced bananas. So with that in mind I decided to create my own version - something that would be free of gluten, dairy and refined sugar, something that would be sweet and luscious and feel a bit special.

I had the opportunity to bake it when we had family over for morning tea during the school holidays and I had some time to play in the kitchen. I find a slice is always a crowd-pleaser and it's certainly easy to do a big tray of something and slice it up to feed everyone.


We all LOVED this slice. Perfect for morning or afternoon tea, but special enough for dessert.


Banana custard slice - gluten, dairy and refined sugar free - www.mywholefoodfamily.com

Wholefood Banana Custard Slice (Gluten and Dairy Free)

Base:

1 cup buckwheat flour
1 cup desiccated coconut
1/2 cup almond meal
2 tbs coconut sugar
150g coconut oil

Custard:

400ml coconut cream
300ml rice milk
4 egg yolks
2 tbs arrowroot flour
125g rice malt syrup
1 vanilla bean, split and scraped (save the bean for something else)
2 tbs gelatine (I use Great Lakes - the red one)

Topping:

3 bananas, thinly sliced
1/2 lemon, juiced
fresh nutmeg

Preheat the oven to 180 degrees Celsius. Grease and line a 20 x 30 cm slice tray with baking paper and set aside.

To make the base, mix all ingredients together (TMX - 6 secs / SP 4), then tip into the prepared tin and press in firmly with your hands or the back of a large spoon.

Bake for 15-20 minutes - when done it will be  evenly golden brown and still a little soft, it will firm up as it cools.

Remove from the oven and place the tin on a wire rack to cool completely.

While the base is cooking, start to prepare the custard.

If you're using the Thermomix, place all custard ingredients into the bowl and cook for 9 minutes / 90 degrees / SP 4.

No thermomix? Place the coconut cream, milk and vanilla into a medium pan over medium heat until it starts to steam. Meanwhile, use a whisk to beat together the egg yolks, arrowroot and syrup until smooth. When the milk is steaming pour it over the egg mixture and whisk together. Place a few tablespoons of the mixture into a small bowl, sprinkle over the gelatine and stir to dissolve. Pour all the custard mixture back into the pan, add the gelatine mixture and cook over low heat until it starts to thicken, stirring constantly with a large spoon or spatula. This could take 20 minutes so be patient!

Leave the custard to cool for 10 minutes before pouring over the cooked base, then place in the fridge to chill until set (at least 4-6 hours or overnight).

Just before serving, slice the bananas into thin rounds and place in a large bowl. Sprinkle over the lemon juice and toss gently to combine, making sure all the banana gets the juice. The lemon stops the banana going brown but also adds a lovely flavour.

Using the baking paper on each side as a handle, carefully lift the slice out of the tin and place onto a serving board. Gently slide the paper off and discard.

Layer on the banana pieces and dust the top generously with nutmeg.

Cut into 12-16 pieces and enjoy!

What was your favourite childhood sweet treat?

Thursday, February 18, 2016

Curried Veggie Slice

Curried vegetable slice www.mywholefoodfamily.com

A few weeks ago we realised our fridge was suddenly not cold anymore so I baked up a storm, trying to use up everything that I could before it went bad. This was one of the results and it was absolutely delicious!

It's basically my take on a classic zucchini slice. Unfortunately not one of my children will eat zucchini slice, something I've found incredibly frustrating as it's such an easy meal and can be served hot for dinner or cold in lunchboxes.

I did have a small win with this recipe though, as after leaving out the bacon, swapping some of the veggies and adding some curry powder I called it a Curried Veggie Slice and my 6 year old loved it! Go figure.

I ate some for lunch straight away and froze the rest in single serves. It's been brilliant for my lunch on study days when I need something quick and filling.

Have you had any luck changing the name of something to get your kids to like it?

Curried Veggie Slice

1 onion, finely chopped
1 clove garlic, crushed
450g grated vegetables (I used sweet potato, carrot and zucchini*)
6 eggs
50g extra virgin olive oil
100g wholemeal spelt flour (or rice flour to be gluten free)
1 ts baking powder
1 tbs veggie stock paste
1 ts curry powder
1 tbs nutritional yeast flakes (or a handful of grated cheese if not dairy free)

Grease and line a 20 x 30cm slice pan with baking paper and set aside.

Preheat oven to 180 degrees C / 160 degrees fan-forced.

In a small bowl beat the eggs, oil, stock paste, curry powder and nutritional yeast until well combined. Place all other ingredients into a large bowl. Pour the egg mixture over the top  and mix well.

Pour the mixture into the prepared pan and bake for approximately 30 minutes or until golden brown and just set.

Leave to cool for at least 15 minutes before serving or refrigerate until needed. Great for lunchboxes.

*make sure you squeeze out the excess liquid from the zucchini before adding it otherwise your mixture will be very wet and the slice won't bake properly.

Sunday, February 14, 2016

Chocolate Bliss Balls (Nut free, Coconut free)

Chocolate Bliss Ball nut free coconut free www.mywholefoodfamily.com

Well love it or loathe it, today is Valentine's Day!

We don't really celebrate it as such but do tend to have something a bit more special for dinner and I will often bake something chocolate-y for us all to enjoy. This year, being determined to keep some treats in the freezer at all times for school lunches and afternoon tea, I decided to just make a batch of chocolate bliss balls.

Yep another bliss ball recipe. I love them! They really are perfect little morsels of deliciousness.

Our school doesn't have any nut restrictions so I don't really need to make things nut free but I think it's good to mix things up a bit so we're not eating the same things all the time. I tend to avoid dates as they are so high in fructose but as a treat now and then (and especially on Valentine's Day) I'm not going to worry about it, especially as they are also a great source of fibre and oh yeah, they're delicious!

The only reason these are coconut free is that we were almost completely out of coconut! Totally unheard of in this house as there is usually coconut in all forms - coconut milk, coconut cream, coconut oil, coconut water, shredded coconut and desiccated coconut #coconutaddict.

So whether you are celebrating Valentine's Day or not, I hope you had a wonderful day!

My (Nut free, Coconut free) Chocolate Bliss Balls

3/4 cup sunflower seeds
3/4 cup pumpkin seeds
2 tbs chia seeds
2 tbs raw cacao
1 ts vanilla extract
1/4 ts sea salt
1/2 cup dried dates
2 tbs coconut oil

Place all ingredients into a food processor and blend until the mixture is sticky and clumping together (TMX 10 secs / SP 8).  Using wet hands, roll the mixture into balls and store in the fridge or freezer.

Make approximately 16

Thursday, February 11, 2016

My Frozen Peanut Butter Cream Pie (Dairy Free)


I absolutely love peanut butter. I know lots of people do but unlike most people it's not something I grew up eating. In fact I don't ever remember having it as a kid. I do remember craving it when I was pregnant though and ate stacks of spelt toast with peanut butter and a sprinkle of sea salt all 3 times!

We only buy the good stuff these days, that is freshly ground 100% peanut butter with no oils or salt or anything else added. It's brilliant on crunchy green apple or even just straight from the tub on a spoon.

I was in the mood for something sweet and cool and peanut-buttery and came up with this gorgeous pie for dessert one weekend way back when I should have been packing for our move. I made it again last month and it was equally delicious. A crunchy chocolate base topped with smooth and creamy filling that was almost like ice cream. Yum!

I splurged on medjool dates for this which you can find in the fresh food section of Coles and Woolies near the herbs. You could definitely use regular dried dates instead they may just take a little extra blitzing for the filling to become really smooth.

This sets hard in the freezer so be sure to take it out at least 20 minutes before serving.

Enjoy!

My Frozen Peanut Butter Cream Pie (Dairy Free)

Base:
200g raw almonds
75g medjool dates
20g coconut oil
20g raw cacao
pinch salt

Place all ingredients into the food processor and blitz until the mixture forms sticky crumbs (TMX 30 secs / SP 5). Press the mixture into the base of an 8 inch spring form pan lined with baking paper and place into the freezer while your prepare the filling.

Filling:
200g natural peanut butter
60g medjool dates
270ml coconut cream
30ml milk of choice
20g maple syrup or raw honey

Wipe out the processor (no need to wash it) and add all ingredients. Process until smooth, around 30 seconds to 1 minute depending on your machine (TMX 30 secs / SP 7). Pour over the prepared base and place back into the freezer to set for 4-6 hours or overnight.

Remove from the freezer at least 20 minutes before serving.

Serves 8

Monday, January 11, 2016

Pumpkin Boiled Fruit Cake


We're going old school with this one - and it doesn't get much more retro than a boiled fruit cake!

I know not everyone is a fan of fruit cake but we love them. They are very much a treat in this house though as being full of dried fruit they are also packed with sugar. I still had half a bag of mixed dried fruit leftover from making Christmas cakes and a visitor coming for morning tea so it seemed like to the perfect opportunity to make this again.

It is adapted from an old family recipe that I can remember my mum making in the 80s (yep I'm that old!). It is has no sweetener apart from the dried fruit (tick), wholemeal flour (tick) and mashed pumpkin (big tick for hidden veggies).

The pumpkin gives it a lovely warm colour and helps keep it moist, although unlike other fruitcakes this one is best eaten on the day or the day after baking but no longer. Even my pumpkin-hating husband and super fussy Mr 5 loved this and the entire cake was demolished between 6 of us.

I didn't do it this time around but I have been extra sneaky in the past and added a grated zucchini into the fruit mixture and it virtually disappears once boiled. Love those hidden veggies :)


Boiled Pumpkin Fruit Cake

450g organic mixed dried fruit (I used sultanas, raisins and currants)
125g butter
1 cup water
2 ts mixed spice (cinnamon, nutmeg and allspice)
2 cups wholemeal spelt flour
2 ts baking powder
1 cup cold mashed pumpkin
2 large eggs

Place the fruit, butter, water and spice into a large pot and bring to the boil over medium high heat. Let bubble for 5-10 minutes or until most of the liquid is gone and the fruit is plump and sticky. Allow to cool completely.

Preheat the oven to 170 degrees C / 150 degrees fan-forced. Grease and line a deep 8 inch cake pan and set aside.

Add the beaten egg and pumpkin and mix well.

Fold through the flour and baking powder (I never bother sifting but you can whisk them together in a bowl before adding if you like).

Pour the mixture into the prepared tin and bake for approximately 1 1/2 hours. Watch the top and cover with foil if it is getting too dark.

Cool in the tin and serve sliced with butter and a cup of tea.


Monday, September 14, 2015

Healthy chocolate crackle slice

Healthy chocolate crackle slice © www.foodbabylife.com

Snacks, snacks snacks! That's what we seem be needing a lot of lately. I guess moving really does work up an appetite!

And today is moving day! As you read this the truck will already be here loading our things and getting us ready to start our new family life in our new home.

For anyone who grew up in Australia you will be very familiar with the chocolate crackle, which featured at every birthday party and school fete as a kid.

These are a far healthier version from the Naughty Naturopath Mum who calls them anti-LCM bars. I have to admit my kids have never eaten an LCM and would have no idea what they are (yay!) so I just called it a chocolate rice bubble slice for them.

We don't usually buy rice bubbles either but half a bag came home with them from their sleepover down the coast in the holidays and frugal me didn't want to throw them, but also didn't want them to just eat it for breakfast because they would be starving again in 5 minutes.

These were SOOOO delicious. Chocolatey, caramelly, crispy and chewy and just plain good. Still a treat but one you can definitely feel good about.

Healthy Chocolate Crackle Slice or Anti-LCM Bars
From the Naughty Naturopath Mum

4 cups rice bubbles (puffed rice from the health food shop is better!)
2 cups desiccated coconut (check that it is preservative free)
1 cup rice malt syrup
1/2 cup coconut oil
1/4 cup chia seeds
1/4 cup raw cacao
pinch salt

Grease and line a slice pan with baking paper.

Place all dry ingredients into a large bowl and mix together.

In a small pan over medium heat, place the rice malt syrup and coconut oil and warm gently until it is smooth and only just starting to bubble. Pour immediately over the dry ingredients and mix until well combined.

Tip the mixture into the prepared pan and press down well, smoothing the top as you go.

Store in the fridge and slice into bars when ready to serve (you can't store this out of the fridge as the coconut oil will start to melt as it warms up).

Makes lots.

Enjoy!


Thursday, August 20, 2015

Healthy Orange Jellies

Healthy orange jellies © www.foodbabylife.com

When you think of healthy foods I'm pretty sure jelly isn't the first thing that springs to mind! But did you know you can make a jelly that is not only delicious but healing too?

I've been reading about and experimenting with all sorts of gut healing foods lately and one ingredient that continually appears is gelatin. Not all gelatin is created equal though and it is important to source a high quality product. I use Great Lakes Gelatin (red label) which I bought online from iHerb at less than half the price you can buy it in Australia.

Gelatin is packed full of protein, collagen and minerals all of which help to support healthy gut and immune function. A great source of gelatin is bone broth which I have been making all winter as a base for soups and casseroles and even just drinking warm with a pinch of salt. You can read about the benefits of bone broth here and here.

Two of my three boys love bone broth and the savoury meals I make with it but Mr 4 won't go near it in any form. This jelly however has become a favourite treat and I know he's getting all the health benefits he needs.

The ginger, turmeric and Manuka honey are all brilliant for coughs and colds and combined with hydrating coconut water and the vitamin-C from the orange juice this makes one seriously healthy jelly!

Healthy Orange Jellies
Adapted from Well Nourished

1 cup coconut water
1 1/2 cups freshly squeezed orange juice (I got enough from 3 large oranges)
2 cm piece of fresh ginger
1/4 ts dried turmeric
1-2 tbs Manuka honey
3 tbs good quality gelatin powder

Oil and line a small slice/brownie pan and set aside.

Squeeze your oranges and measure out 1 cup of juice into a heatproof jug (mine was pyrex).

Place the coconut water, ginger and turmeric in a medium pan over low-medium heat. Bring to the simmer and allow to steep for 5 minutes.

Pour the coconut water mixture through a sieve into the orange juice. Stir to combine then return to the pan by pouring through the sieve again to remove any orange pulp (my juice was cold from the fridge so my mixture was just luke-warm. Allow to cool slightly before adding the Manuka honey if your mixture feels hot to touch).

Add the honey and stir to combine.

Sprinkle the gelatin over the warm liquid, one tablespoon at a time, whisking well after each addition. Continue whisking until the gelatin is completely absorbed. If you have lumps of gelatin return the pan to the heat but don't let it get more than luke-warm.

Pour the mixture through the sieve into the prepared pan and place in the fridge to set for a few hours.

I give the kids a couple of pieces a day and it lasts for about 1 week in the fridge. 

Thursday, July 23, 2015

Healthy Peanut Butter Slice

 healthy peanut butter squares - www.mywholefoodfamily.com

One of my all time favourite things is peanut butter and chocolate. For many years I've made Nigella's Peanut Butter Squares every Christmas and I always get requests for it. But seeing we're nowhere near Christmas and I'm baking a little healthier these days I thought it was time I tweaked the recipe and came up with my own peanut butter slice.

I had all of these ingredients in the pantry and it took probably 10 minutes to whip up which I love. It is gluten-free, dairy-free and refined sugar free but certainly not flavour free and be warned, it is VERY rich so a little goes a long way!

healthy peanut butter squares - www.mywholefoodfamily.com
Healthy Peanut Butter Slice

Crust:
1 cup almond meal
1/2 cup dried pitted dates
2 tbs raw cacao
2 tbs coconut oil (solid)
pinch salt

Filling:
200g natural peanut butter
1 tbs coconut oil
2 tbs rice malt syrup
pinch salt

Topping:
1/3 cup raw cacao
1/4 cup coconut oil
3 tbs rice malt syrup

Grease and line an 8 inch square brownie pan and set aside.

Place all crust ingredients in your food processor and blitz until sticky and well combined. Press into the base of the prepared tin and place in the fridge.

Wipe out the bowl then add all filling ingredients and blitz until smooth. Taste and add another pinch of salt if desired. Pour mixture over the top of the chilled base and smooth with a spatula. Place back in the fridge.

Place the topping ingredients in a small saucepan over low-medium heat and stir until smooth and well combined (TMX 3 mins/50 degrees/SP 2). Pour over the peanut butter filling and smooth with a spatula.

Place in the freezer until set. Delicious frozen but for best results remove from the freezer about 10 minutes for slicing into squares and serving.

Makes 16 pieces (or more if cut smaller squares!)

Wednesday, July 8, 2015

'Apple' Crumble Slice


This may be the most amazingly sneaky recipe I've ever made. I mean I've done lots of hidden veggies recipes before but this really takes the cake. I called it an apple crumble slice and my kids went nuts for it. But let me tell you a secret ... there isn't any apple in it.

So do you want to take a guess as to exactly what is cooking in this pan?


It's zucchini!!!

Seriously.

I found this recipe for Zucchini Pie Bars on Crazy for Crust and I was immediately intrigued but quite dubious. How on earth would zucchinis taste like apples? Especially as I wouldn't be smothering it in ice cream and caramel sauce like the original recipe. But I'm always up for a challenge so I gave it a go.


The slice consists of a pastry base which you bake until golden brown. Then the filling is diced zucchini sauteed in butter, cinnamon and sugar until just soft and then drained. Next there is a buttery crumble topping.

There was absolutely no discernible taste of zucchini. For all intents and purposes it was an apple slice, although perhaps a little less sweet than normal. The crust and crumble were crisp and buttery and the filling was soft and lightly spiced with cinnamon and lemon. My boys absolutely devoured it, asking for seconds and thirds.

So do I feel a little guilty about the deception? Not even a little bit. It is totally delicious and my extremely fussy 4 year old actually ate a serve of vegetables. Win!

'Apple' Crumble Slice
Adapted from Crazy for Crust

For the Crust:
125g softened butter
1 1/2 cups white spelt flour
1/4 cup coconut sugar
1/4 ts salt

For the Filling:
3 large zucchini, peeled and diced
2 tbs butter
2 tbs coconut sugar
1 ts cinnamon
zest 1/2 lemon

For the Topping:
125 softened butter
1/2 cup coconut sugar
1 cup white spelt flour
1/2 ts cinnamon
1/2 cup rolled oats
1/4 ts salt

Line a 20x30cm slice pan with baking paper. Preheat oven to 170 degrees Celsius.

To prepare the crust, place all ingredients into a food processor and pulse until the mixture is crumbly. It may look dry but if it sticks together when you squeeze a handful it is ready. Press the mixture into the prepared tin and bake for 13 minutes.

To make the filling, melt the butter and sugar together in a frying pan over low-medium heat. Add the zucchini, cinnamon and lemon zest and cook, stirring often, for approximately 5 minutes or until the zucchini is just starting to soften. Remove from the heat and drain until ready to use.

While the zucchini is cooking prepare the topping. Place all ingredients into the food processor and pulse until crumbly.

Remove the hot crust from the oven and scatter the cooked zucchini carefully over the top before sprinkling the topping evenly over the top. Bake for around 25 minutes or until golden brown.

Cool completely in the pan before slicing into bars and serving. Can be stored in the fridge for 3 days in an airtight container or up to 1 month in the freezer.

Thursday, June 18, 2015

Fudgy (almost) Grain-free Chocolate Brownies

Fudgy Grain-free Chocolate Brownies © www.foodbabylife.com

I have been on the search for the perfect 'healthy' brownie for more than a year now. I've tried literally dozens of recipes, and a few of them have actually been pretty good like this Healthier Chocolate Brownie.

But I still hadn't found one I was completely happy with in terms of both taste and ingredients. Until now. This brownie recipe comes from Eat Drink Paleo where Irena describes them as the brownies that blew her away. And now that I've made them I completely agree!

Now my husband would say that the best part of a brownie is the crispy edges but I actually prefer the fudgy middle and that's what these brownies deliver unlike so many others.

My kids loved these and they disappeared so quickly I barely had a chance to take a photo. They had no idea there was sweet potato in them, and you certainly can't taste it, but that must be what makes the texture so fudgy and delicious.

The only change I made was to use rice malt syrup instead of honey. This makes them fructose free but no longer paleo as rice is obviously a grain, hence the (almost) grain-free of the title!

These would make a fabulous dessert served with berries and coconut cream or dairy-free ice-cream but we had them simply dusted with extra cacao powder.

The original recipe said to bake for 25-30 minutes but this made my first batch too dry so second time around I baked for just 20 minutes and they were perfect.

Fudgy (almost) Grain-free Chocolate Brownies 
Slightly adapted from Eat Drink Paleo

1 medium sweet potato (approx 2-3 cups grated)
2 whole eggs
1/2 cup coconut oil, melted
1/3 cup rice malt syrup
2 ts vanilla extract
1/2 cup raw cacao powder
1 ts baking powder
1 ts bicarbonate of soda
2 1/2 tbs coconut flour

Preheat oven to 180 degrees C / 160 degrees fan-forced. Grease and line an 8 inch square baking pan.

In a large mixing bowl, place the sweet potato, eggs, vanilla, syrup and coconut oil and mix together until well combined. Next stir through the cacao, baking powder and bicarb soda, and then add the coconut flour mixing until only just combined.

Pour the mixture into the prepared tray and bake for 20-25 minutes. Remove from the oven and allow to cool for 10 minutes before carefully removing from the tin. Serve dusted with extra cacao powder and some berries.

Wednesday, May 13, 2015

Sunshine Soup (aka Carrot, Pumpkin and Sweet Potato Soup)

Sunshine Soup (Carrot, Pumpkin and Sweet Potato Soup) © www.foodbabylife.com

We've been hit with numerous bouts of colds recently and seemingly permanent runny noses so I've been looking for lots of nutrient rich foods to boost the kids immune systems - fresh juices made on carrots, celery, beetroot, spinach, orange and ginger in the morning and warming drinks with lemon and raw honey in the afternoon when the coughs and sniffles come back.

And now that it seems like Winter is finally on the way (we've dropped into single digits overnight in the last few days) it's soup time!!!

I don't tend to follow recipes for soup, I usually just throw in whatever veggies we have on hand, add some herbs and stock and call it a day. This soup, which my boys called Sunshine Soup because of its gorgeous sunny colour, was the perfect tonic for my big boy who was home sick from school yesterday. As usual I thought I made plenty but it disappeared in record time and I will be making another batch today!

I did this in the Thermomix but you can easily adapt it and I have included alternative directions below.

We all loved this soup. My 18 month old ate more than 1 1/2 cups and wanted more but there wasn't any left!


Sunshine Soup (Carrot, Pumpkin and Sweet Potato)

2 large carrots, roughly chopped
1 large sweet potato, roughly chopped
1 big wedge of pumpkin, roughly chopped
3 cloves garlic
2cm piece ginger
2cm piece fresh turmeric OR 1ts dried turmeric
2 1/2 cups water or stock
1 ts vegetable stock paste (only if using water)
1 heaped tbs solid coconut oil
sea salt and pepper to taste

TMX - place the ginger, garlic and fresh turmeric (if using) into the bowl and chop 3 secs / SP 7. Add the coconut oil and dried turmeric (if using) and saute 2 mins / Varoma / SP 1. Add the carrot, sweet potato and chop 15 secs / SP 7. Scrape down the sides of the bowl, add the stock or water and cook 20 mins / 100 degrees / SP 1. Blend 45 secs / sp8, gradually increasing from SP 1 to SP 8. Add sea salt and pepper to taste.

If not using a Thermomix, place all ingredients except the water/stock and oil into a food processor and process until finely chopped. Pour into a medium saucepan, add the oil and water or stock. Bring to the boil then simmer for 20 minutes or until veggies are tender. Using a stick blender, process the soup until smooth.

Serves 4.

Friday, March 20, 2015

Sweet Potato Brownies


Sweet Potato Brownies © www.foodbabylife.com


The idea of hiding veggies isn't new but I must admit I am becoming more and more intrigued by just what you can get away with hiding! I have a very fussy 4 year old and we have struggled with expanding his range of foods. We've been through feeding therapy with a speech pathologist and occupational therapist which helped a little but his palate is still extremely limited and he is not at all open to trying new things. So while we still put veggies on his plate at dinner time the only time they actually pass his lips is if they are hidden in something else.

Chocolate is the ideal medium for hiding veggies not only because kids love it but it's taste and colour are great at disguising them. These chocolate and zucchini muffins have been a continued success but our new favourites are these Sweet Potato Brownies. There are 2 small sweet potatoes hidden here which along with the coconut oil, eggs, almond meal and raw cacao make them not only a really substantial snack but also a really nutrient dense one.

My boys all loved these. In the words of my 5 year old 'Mum please make these again and DON"T CHANGE A THING.' Hilarious!

These are richly chocolatey like all good brownies and even have a little crunch around the edges but the interior is very soft. I sliced these when they were still a bit warm and it was a bit messy as you can see. We kept the rest in the fridge and it was equally delicious cold but it sliced much more cleanly.

Sweet Potato Brownies
Adapted from this and this

1 medium sweet potato (3 cups grated)
2 ts vanilla extract
2 eggs, at room temperature
1/2 cup liquid coconut oil or olive oil
1/2 cup raw cacao
1/2 cup rice malt syrup
1/2 cup almond meal with 1 tbs coconut flour mixed in
1 ts baking powder
1 ts bicarbonate soda

Preheat oven to 180 degrees C. Grease and line an 8 inch square brownie pan and set aside.

Finely grate the sweet potato (and place in the food processor along with the vanilla, eggs and oil. Mix well. Add the dry ingredients and pulse until just combined.

Pour the mixture into the prepared pan and bake for approx 35 minutes or until  just set and firm to the touch in the middle. Allow to cool completely in the pan before slicing.

Store in the fridge. Makes 16 serves.

Thursday, March 12, 2015

My favourite chocolate granola

Chocolate Granola - low carb, high protein - fructose free and grain free variations - from www.mywholefoodfamily.com

With a big boy in grade 1 this year and another in kindy, I've realised just how important breakfast is to their mood and energy levels. I can pick the day they didn't eat properly by their behaviour at the end of the day! The more filling and protein packed their breakfast, the better the day goes (for everyone!).

My kindy boy Charlie loves a smoothie for breakfast most days and while the fruit and the flavour varies it always includes oats, chia seeds, coconut oil, something green and a big spoonful of NutraOrganics Thriving Protein (affiliate link).

Oscar on the other hand loves quinoa porridge or scrambled eggs most of the time but having a standby like some ready prepared granola is another great alternative for him.

I've posted some granola / toasted muesli recipes before but I just had to post this one because it is hands-down my favourite one yet! Sweet, nutty, chocolate-y and equally good for dessert as for breakfast. My husband has a sprinkle of this on his yoghurt at work most days. It is a great alternative to porridge and about a million times more nutritious and filling than any cereal out of a box.

As with all recipes like this you are limited only by your imagination. If you don't like something or just don't have any feel free to substitute for something else.

The bowl above was my dinner - a generous 1/2 cup of granola with homemade almond and coconut milk and a scattering of frozen raspberries. 

If you've never tried buckwheat before you should definitely give it a go! It's crunchy, nuttiness goes perfectly here. If you use honey or maple syrup instead of the rice malt syrup it will also be 100% grain free. The 1/2 cup of sweetener is a little on the high side for us but could be increased or cut back depending on your taste.

Chocolate Granola © www.foodbabylife.com

My Favourite Chocolate Granola
Recipe by me
Makes lots!

3 cups raw mixed nuts (I used ABC nuts - almonds, brazils and cashews)
3 cups coconut flakes
1/2 cup linseeds
1/2 cup raw buckwheat
1/4 cup chia seeds
1/4 cup sesame seeds
1/4 cup raw cacao
1/2 cup coconut oil
1/2 cup rice malt syrup (or honey or maple syrup)
2 ts cinnamon
1/2 ts Himalayan salt

Preheat oven to 140 degrees C. Line a large baking tray with foil and set aside.

Roughly chop the nuts by hand or in a food processor. Place the nuts in a very large bowl and add all remaining ingredients. Mix until well combined.

Bake for approximately 1 hour, checking and stirring every 15 minutes, or until the granola is as dark and crunchy as you prefer. Make sure you keep a close eye on it!

Allow to cool completely before storing in an airtight container for a few weeks to a month.

Thursday, March 5, 2015

Quinoa Salad with Sausage and Roast Pumpkin

Quinoa salad with sausage and roast pumpkin © www.mywholefoodfamily.com

I have been a little slow getting on board with quinoa. Actually that's not entirely true as I used to make Noah a quinoa and strawberry porridge which he adored!

But given how nutritious it is I have made a concerted effort to buy and cook some this week and have had great results.

Firstly for dinner I made the quinoa salad pictured above and it was insanely delicious. Seriously! I could eat a big bowlful of this every day of the week. I drew my inspiration from this Quirky Cooking recipe but just used the ingredients I had.

So no recipe as such for this but here is what I used:
4 cups cooked quinoa
4 sausages, cooked and sliced
1 punnet cherry tomatoes, halved
a handful of basil from the garden
1 wedge of pumpkin, diced and roasted with a little sesame oil
a dressing made from extra virgin olive oil, lemon juice, dijon mustard, salt and pepper

I am planning on making a batch of this (or a variation depending on what we have in the fridge) most weeks to have as my weekday lunches. The possibilities are endless with different combinations of meat, veg and herbs.

With some leftover cooked quinoa I made a very simple porridge which we al had this morning for breakfast. I prepared it in the thermomix but just a pot on the stove would work just as well. To 2 cups of cooked quinoa I added enough nut milk to cover, 2 tbs rice malt syrup and 1/2 ts cinnamon and let it simmer for 5 mins or so until the milk was about half absorbed. 2 of my 3 boys had this with me for breakfast today and loved it so this is a keeper as well.

There is still a little quinoa leftover and I am planning on using it in some bliss balls (recipe to come).

Expect to see lots more quinoa here as I am now officially on the bandwagon! :)

Monday, February 2, 2015

Grain-free Choc Cranberry Cookies

Grain-free Choc Cranberry Cookies © www.foodbabylife.com

These are a very simple adaptation of the Grain-free Oatmeal Raisin Cookies which our family is so in love with. Seriously, I have lost count of how many batches I have made with the intention of freezing them for after-school snacks, only to find that they disappear almost before they have cooled down!

Cranberry and chocolate is always a winning combination but the coconut in these also shines through. They are moist, chewy and chocolatey with a nice little zing from the cranberries. They are only slightly sweet, which my kids are used to, but if you're not you may want to up the sweetness, perhaps with a few drops of liquid stevia which will add sweetness without affecting the consistency of the dough.

We've been having a heat wave here for the past few weeks but some overnight rain has brought a cool change so I have been baking up a storm and even made a batch of curried pumpkin soup for lunch (recipe to come).

Grain-free Choc Cranberry Cookies © www.foodbabylife.com

Grain-Free Choc Cranberry Cookies

Follow the recipe for Grain-free Oatmeal Raising Cookies but replace the spice with 1 tablespoon of cocoa powder and use dried cranberries instead of raisins. Shape and bake as usual. Enjoy!


Related Posts Plugin for WordPress, Blogger...