Showing posts with label Easy. Show all posts

Monday, August 26, 2013

Chicken and Drop Dumplings (SRC)

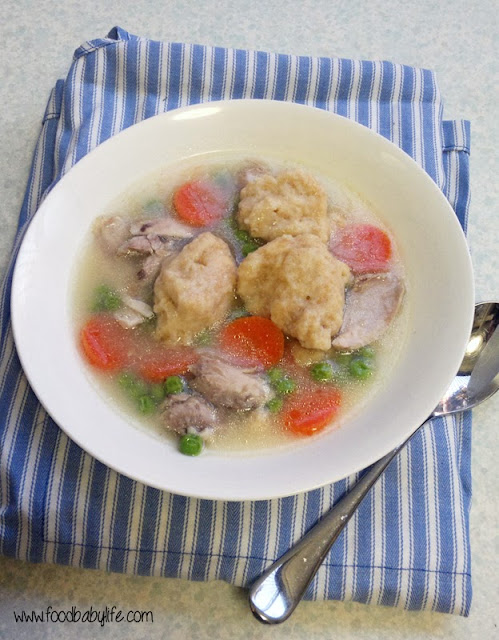
Chicken and Drop Dumplings © www.foodbabylife.com


Yay Secret Recipe Club time again! If you're new here, each month SRC members are assigned a blog at random where they get to choose a recipe to make, keep it a secret and then all post on the same day. This month I was excited to be given Angel's Homestead by April who happens to be the fearless leader of SRC!

I really enjoyed taking the time to read through April's blog which is full of simple, easy to make and delicious recipes. I love her philosophy of frugal and sustainable living and this is really reflected in the food she makes for her family.

I don't have time for complicated meals at the moment. Life with 2 little kids is busy and in a couple of months, will be getting a lot busier with the arrival of #3! We're due at the end of October so only about 9 weeks to go.

Anyway, on to this month's recipe! Chicken and Dumplings...

I've made dumplings quite a few times, usually with a slow cooked beef casserole. They are such a great alternative to rice or pasta and so easy to whip up. My husband in particular is a big fan and really enjoyed these ones.

We've been having unseasonably warm weather for August so I was lucky that the day I had set aside to make this for dinner was cold and windy and just perfect for a warming and hearty dish like this.

April has several chicken and dumplings recipes on her blog so I decided to choose the simplest one and make a couple of changes of my own.

First I never use stock cubes because I am yet to find a good one without MSG and other yucky ingredients. So to boost the chicken flavour I browned the meat first and added some vegies to the broth while the chicken cooked. I also added some carrots and peas to the final dish for colour and because I can't help myself! I also used wholemeal flour because that's what I bake with most often.

Chicken and Drop Dumplings
Adapted from Angel's Homestead

4 chicken marylands (leg & thigh quarters)
1 litre chicken stock
2 cups water
1 medium onion, quartered
2 cloves garlic, peeled but whole
1 carrot, roughly chopped
1 stick celery, roughly chopped
3 carrots, extra (sliced thinly)
1 cup frozen peas

For the dumplings:
2 cups wholemeal self-raising flour (or plain flour with 1 tbs baking powder sifted through)
1/2 tsp salt
50g butter
1 cup of milk

To make the broth, heat up a large pot over medium high heat and sear the chicken pieces, skin side down, until golden brown. Remove the pieces and any excess oil. Throw in the onion, garlic, carrot and celery and fry for a few minutes. Return the chicken to the pot and pour in the stock and water (the chicken should be completely covered). Reduce heat to medium, put the lid on and allow to simmer for around 40 minutes or until the chicken is cooked through and the meat is pulling away from the bones.

Remove the chicken pieces then strain the broth through a fine metal strainer, discarding the vegies.

Shred the chicken meat and return to the pot along with the sliced carrots, frozen peas and strained broth and place over medium-low heat. Check for seasoning and add salt if needed.

To make the dumplings, mix together the flour and salt in a large bowl and set aside. Place the milk and butter in a small saucepan over medium-low heat until the butter is melted. Once melted, pour the milk and butter over the flour and mix until just combined. Drop the dumplings into the pot, a tablespoon at a time until all the mixture is used. Cover and let simmer for about 15 minutes.

We all really enjoyed this, such a hearty and savoury meal for a cold day. Normally when I make chicken stock or soup I make it ahead of time so I can remove some of the fat. I didn't do that this time so there was quite a bit as you can see in the photo but I love that. It was a delicious dinner and one we'll be making again for sure.

Secret Recipe Club

Wednesday, June 26, 2013

Roasted Pumpkin and Apple Soup

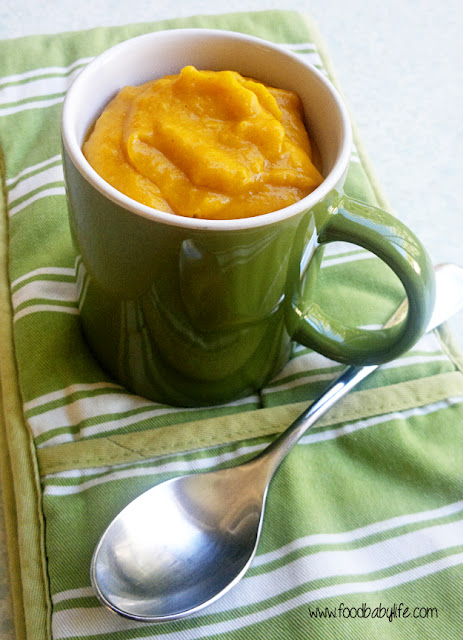
Roasted Pumpkin and Apple Soup © www.foodbabylife.com

Winter has well and truly arrived this week. While we're still getting glorious sunny days, the nights and early mornings are absolutely freezing. We have so far avoided having heaters on but a few more days like this and that will change!

In our house cold weather is soup weather. I love the fact that both my boys love soup, especially my 4 year old. If you haven't tried soup with your kids yet it's really worth a go, just be prepared for some mess!

We've had pumpkin soup a few times recently and I've always stuck to my tried and true recipe which includes garlic, ginger and coriander. This time I thought I would make something a little lighter and sweeter, so decided to not only include some apple but also to roast all the ingredients first, something that really brings out the natural sweetness.

The taste test ...

Pumpkin and apple really are a match made in heaven! My kids absolutely devoured this for lunch. Both had seconds. You'll notice from the photo how thick this soup is. Not only does it make quite a hearty meal it also makes it easier for little kids to handle.This was a winner and will be added to our regular rotation.

Roasted Pumpkin and Apple Soup

1/4 large pumpkin (I like jap or kent for soup, my piece was 1.6kg)
2 small green apples
1 potato
1 large onion
1/4 ts cinnamon
1/4 ts cumin
3-4 cups stock (chicken or vege work well)
1 tbs olive oil
Salt and pepper to taste

Preheat oven to 190 degrees C / 170 degrees fan-forced.

Chop up the pumpkin into thick slices, removing the seeds but leaving the skin on. Wash and core the apples, leaving them whole with the skin intact. Wash the potato and chop into quarters, leaving the skin on. Top and tail the onion and remove the skin.

Place all veggies into a large baking dish. Sprinkle over the spices, drizzle on the oil and toss to combine.

Place in the oven and roast for 45 -60 minutes or until all the vegetables are soft, golden and cooked through. Keep an eye on the apples and onion as they will be done before the potatoes and take them out if they are getting too brown.

Remove from the oven and allow to cool slightly before scooping out the flesh of the apples and veggies into a food processor or blender. Leave any hard or overcooked edges and all the skin behind.

Blitz until well combined. Add the stock and blitz for 2 minutes or until completely smooth (if you want a thinner soup just add more stock now). Season with salt and pepper to taste. Pour the soup into a large saucepan and simmer gently until warmed through. Serve with hot buttered bread rolls.

Serves 4.


Monday, June 24, 2013

Snow White Popcorn Treats (Secret Recipe Club)

Snow White Popcorn Treats © www.foodbabylife.com

SRC time again! This month I was assigned Life and Kitchen by Lindsay. I love that Lindsay posts so many veggie and meatless meals but after doing something savoury for the past few months of SRC I had already decided to do something sweet this month, and was delighted that she had so many to choose from!

The instant I saw these Snow White Popcorn Treats I was sold. It actually is winter here, but this is as close as my boys will get to snow!

We make popcorn a few times a week using our air popper. I like mine with a little melted butter and sea salt but the kids are totally happy having it plain. But let me tell you they were very excited about their special sticky popcorn!

The recipe called for 1 large or 2 small bags of popcorn but I have no idea what size that would actually be. I just did the usual 1/4 cup we always do and hoped for the best. It was pretty much spot on.

So how did it taste? Totally amazing as you would expect! I did find it VERY sweet though and added extra salt to mine (love that sweet and salty contrast). This would be perfect bagged up and given as gifts at Christmas and I will be doing just that this year.

Thanks for a great recipe Lindsay!

Snow White Popcorn Treats
From Life and Kitchen

1/4 cup popping corn
20 white marshmallows
2 tbs butter
1/4 cup white chocolate
sea salt

Pop the corn and spread it out on a lightly greased baking tray, making sure to remove any unpopped kernals.

In a medium pan over lowish heat gently melt the butter and the marshmallows, stirring constantly. Once they are completely melted and liquidy, add in the white chocolate and stir until smooth.

Quickly pour the mixture over the popcorn using a silicone spatula to toss it all together, coating as much of the popcorn as you can.

Sprinkle generously with sea salt and leave to set for about 10 minutes before devouring.


Secret Recipe Club

Tuesday, April 2, 2013

BWJ - Rustic Potato Loaves


Rustic Potato Loaf © www.foodbabylife.com

 aka the bread that almost wasn't.

I had it in my head that this was a typical long-rest bread. Add to that I was going to have to actually cook potatoes first AND I don't even have a mixer at the moment, I was sure this was not going to happen!

But then I realised how quick it would be, and hubby cooked the potatoes for me, and I realised I could mix the dough in the breadmaker. Voila.

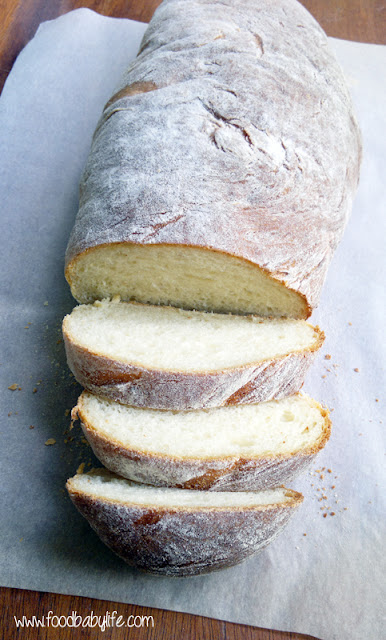
Rustic Potato Loaf Sliced © www.foodbabylife.com

I made half the recipe and got a really decent sized loaf. You will notice from the picture that I forgot to cook the bread seam side up so it doesn't have the same look as the book. Still, it was delicious and made the house smell like an intoxicating mix of fresh bread and hot chips. Doesn't get much better than that!

Make sure you visit our host Dawn of Simply Sweet for the recipe.


Tuesday, March 26, 2013

Secret Recipe Club - Chicken Cheesesteaks

Chicken Cheesesteaks © www.foodbabylife.com

Secret Recipe Club time! This month I was given So Tasty So Yummy by Katie, and let me tell you I was really spoilt for choice when it came to picking a recipe. She has some amazing things on there!

Her Sea Salt Peanut Butter Oatmeal Chocolate Chip Cookies are on my must-bake list for another time, as is Katie's mum's Chocolate Cheesecake (swoon).

But for this month I really wanted an easy dinner to add into our rotation and her Chicken Cheesesteaks fit the bill perfectly.

I've always been intrigued by 'cheesesteaks' and used to imagine it was some sort of cheese that was crumbed and fried (how awesome would that be!). A little research showed it was actually thinly sliced steak covered with melted cheese. Katie has a chicken version on her blog which is much more us as we always have chicken in the freezer.

I made a few minor changes to the recipe, using chicken thighs instead of breast, red capsicum instead of green, red onion and mozzarella instead of provolone.

And the verdict? We LOVED this. So quick and easy and sooo tasty. Perfect for a quick dinner or weekend lunch. I topped ours with homemade dijonnaise (a mixture of mayonnaise and dijon mustard) and it was absolutely delicious! Definitely a keeper.

Chicken Cheesesteaks
Recipe from So Tasty So Yummy

1 tbs olive oil
2 large chicken thigh fillets
1/2 red onion, finely sliced
1/2 red capsicum, finely sliced
Worcestershire sauce, a few dashes to taste
1 cup shredded mozzarella cheese
4 long white bread rolls
Salt and pepper to taste

Split the rolls and place under the grill for 1-2 minutes to toast.

Thinly slice the chicken (you can freeze the pieces for about 15 minutes first to make this easier). Saute the onion and capsicum in the oil for a few minutes until starting to soften, then add the sliced chicken and cook until the chicken is starting to brown. Add the salt, pepper and worcestershire sauce and cook for another minute or so until the chicken is cooked through.

Place the chicken mixture into each roll, top with mozzarella and grill until the cheese is melted and bubbly.


Secret Recipe Club

Wednesday, December 19, 2012

Tim Tam Balls

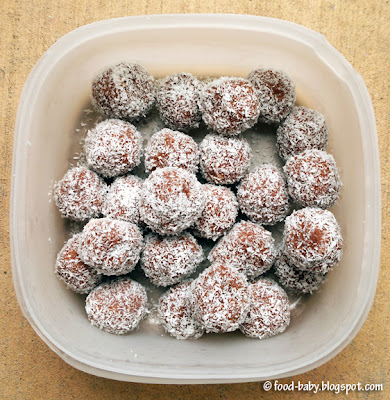
Tim Tam Balls © food-baby.blogspot.com All rights reserved

It seems I have been missing out because I hadn't even heard of these little beauties until last week!

Apparently they are the most popular recipe on the Stay At Home Mum blog and I can see why. I mean everyone loves tim tams and having them in ball form makes them even more appealing. But be warned, you won't be able to stop at one!

These are just one of the tasty little homemade morsels our family and friends will be receiving this year. I will also be making my famous Rum Balls, mini Christmas Cakes and Peanut Butter squares as well as a few other things which I will post soon.

This is half the original recipe which you will find here on Stay At Home Mum.

Tim Tam Balls

1 packet of Tim Tams, any flavour
125g cream cheese (1/2 a block) at room temperature
1 cup dessicated coconut OR hundreds & thousands

Place the tim tams into the food processor and blitz until they turn into crumbs. Add the cream cheese and pulse until the mixture forms a clump around the blade. Roll teaspoonfuls of mixture into balls and then roll in the coconut or hundreds & thousands (I did 1 batch of each). Makes approx 20. Chill until ready to serve.

Sunday, October 7, 2012

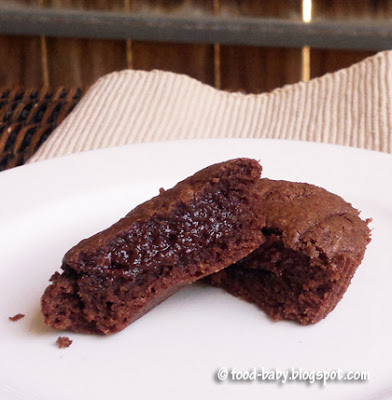
Easy Nutella Brownie Bites

Nutella Brownie Bites © food-baby.blogspot.com All rights reserved
My husband (aka the chocolate fiend) loves nutella and will quite often be seen eating it out of the jar by the thick, fudgy spoonful. Having just bought a few jars on special I was determined to actually make something with it this time. And then I stumbled across these incredibly decadent but oh so easy brownie bites.

They were originally called 3 ingredient brownies with just nutella, flour and eggs, but I can't help tweaking so I added some salt and also vanilla extract to round out the flavour.

The verdict? 10/10. These would be up there with some of the best brownies I've made and for a lot less effort. I managed to freeze a few and after a quick zap in the microwave they were back to brownie perfection. They would be sensational smooshed up through vanilla ice cream as well. Yum!

Nutella Brownie Bites
Makes 12. Adapted from various sources including Laura's Sweet Spot

1 cup Nutella
1/2 heaped cup plain flour
2 eggs
1 ts vanilla extract
Pinch of salt

Preheat oven to 180 degrees celsius (160 degrees fan-forced). Line a muffin tray with paper liners and set aside.

In a large bowl mix together the nutella, eggs and vanilla until smooth. Sprinkle over the flour and salt and mix until just combined. Spoon evenly into the prepared tray and bake for 12 minutes.

Allow to cool to room temperature before removing from the tray and the paper cases. Just try to stop at one!
Oscar has definitely inherited his father's sweet tooth and couldn't wait for a taste.

Thursday, September 6, 2012

Peanut Butter Ice Cream

Peanut Butter Ice Cream © food-baby.blogspot.com All rights reserved

I blogged a few days ago about the amazing Aztec "Hot" Chocolate Ice Cream I made for our Father's Day dinner. Well I also made a more kid-friendly ice cream. Both my boys love peanut butter so when I saw this recipe it was perfect. It's also such an easy recipe with no cooking involved at all that older kids would be able to make it themselves!

If you love peanut butter you will LOVE this ice cream. I served it with hundreds and thousands but I think having it in a sundae with hot chocolate fudge sauce and a scattering of roasted salted peanuts would be divine. Yum!

Peanut Butter Ice Cream
From The Perfect Scoop by David Lebovitz p50

180g smooth peanut butter
180g sugar
330ml full cream milk
330ml pure cream
Pinch of salt
1/2 ts vanilla extract

Puree all ingredients in a food processor until smooth. Chill thoroughly in the fridge then churn in your ice cream machine according to the manufacturer's instructions.

Makes approx 1 litre.

Sunday, August 26, 2012

No-Bake Lemon Slice


No-Bake Lemon Slice © food-baby.blogspot.com All rights reserved

I love a good slice and it's such a shame that they're a bit hard to find. Everyone seems to have jumped on the cupcake, whoopie pie and macaron bandwagon. Not that there's anything wrong with those but they don't have that nostalgia of childhood and simpler times like a slice does. The thought just occurred to me though that maybe my kids will yearn for cupcakes, whoopies and macarons when they're older!

This is now my second no-bake recipe for the month which I think just shows what a busy month it has been. Between the flu, chest infections and my bad back there hasn't been a whole lot of spare time for baking.

So when I needed something to take for a morning tea the next day I immediately thought of this easy lemon slice which I saw on Around Here. Basic pantry ingredients and no need for the oven. Perfect!

Lemon Slice
(Very) Slightly Adapted from Around Here

1/2 cup (162g) condensed skim milk
100g butter
200g Granita biscuits
1 cup dessicated coconut
Grated rind of 1 lemon
2 cups icing sugar
40g melted butter
2 tbs lemon juice

Lightly grease a slice tray (approx 15 x 25cm), line with non-stick paper and set aside.

Place the condensed milk and butter in a saucepan over medium-low heat until the butter is melted.

Crush the biscuits to fine crumbs and add to a large bowl along with the coconut and lemon rind. Pour in the condensed milk and butter and mix until well combined. Press firmly into the prepared tray and refrigerate until firm.

Once the slice is firm, sift the icing sugar into a bowl and add the butter and lemon juice. Mix until smooth and spread onto the chilled slice. Refrigerate again until set. Slice into squares and serve.

This was a real hit with kids and adults alike at our morning tea. Sweet and lemony and very easy to eat!

This post is linked to Crazy Sweet Tuesdays:

Thursday, August 9, 2012

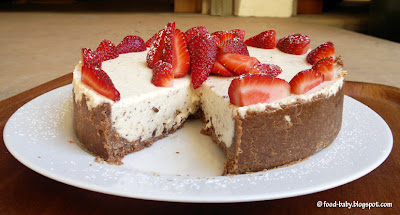
No-Bake Chocolate Chip Cheesecake

No-Bake Chocolate Chip Cheesecake © food-baby.blogspot.com All rights reserved

I've made a lot of cheesecakes over the years like these here, here and here. But I can't even remember the last time I made a no-bake one! So in honour of my dad coming to dinner I decided to make this no-bake Chocolate Chip Cheesecake.


No-Bake Chocolate Chip Cheesecake © food-baby.blogspot.com All rights reserved

The taste test ...

Wow, seriously good! The filling is smooth and light and the natural yoghurt gives it a lovely tangy creaminess. I actually chopped the chocolate rather than grated it so I had a few bigger chunks of chocolate that sank to the bottom. Not that there's anything wrong with that! Served with fresh strawberries this was the perfect make-ahead dessert and a great alternative when you don't have time for a baked cheesecake. Two thumbs up!!!

No-Bake Chocolate Chip Cheesecake
Recipe by me

250g chocolate chip biscuits
100g melted butter
250g cream cheese, at room temperature
1 x 400g tin condensed milk
300ml natural yoghurt
1 ts vanilla extract
100g dark chocolate, grated
3 ts gelatine
1/4 cup hot water

Line the base of an 8 inch springform pan with baking paper and set aside. Using a food processor, crush the biscuits into a fine crumb. Add the melted butter and blitz until well combined. Pour the crumbs into the prepare tin and smooth over the base and about halfway up the sides. Place in the fridge to set.

Sprinkle the gelatine over the hot water and set aside for a few minutes then stir to make sure it is completely disolved.

Wipe out the food processor bowl then add the cream cheese and whiz until smooth. Add the condensed milk, yoghurt and vanilla and mix well. Add the cooled gelatine mixture and whiz for 1 minute until thoroughly combined. Tip in the grated chocolate and blitz to mix through.

Pour over the prepared base then refrigerate until set, a few hours at least or overnight. Serve with sliced strawberries and a dusting of icing sugar. Serves 8-10.

Saturday, August 4, 2012

Peanut Butter Cookies

In the midst of a flu-ridden and miserable week the urge for peanut butter cookies struck. These went from bowl to belly in 20 minutes flat...

Peanut Butter Cookies
Makes 24

1 cup natural peanut butter
1 cup brown sugar
1/2 cup rolled oats
1/2 cup wholemeal flour
1/2 ts salt
1 ts vanilla extract
1 egg

Preheat oven to 180 degrees celsius (160 degrees fan-forced). Line 2 trays with baking paper and set aside.

Combine dry ingredients in a large bowl then add the egg, vanilla and peanut butter. Mix well. Roll tablespoons of mixture into balls and place on the prepared trays. Flatten each ball slightly then bake for 10-12 minutes, rotating the trays halfway through.

Remove trays from the oven and allow to cool for at least 5 minutes before turning the cookies out onto a wire rack to cool completely. Devour.

Thursday, July 12, 2012

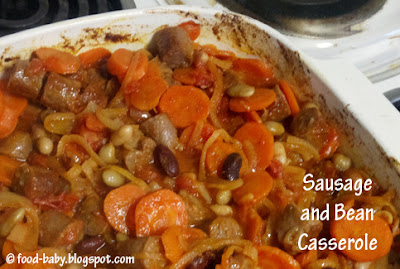
Sausage and Bean Casserole

© food-baby.blogspot.com All rights reserved

This was a really delicious dinner so I hope you can look past the horrible photo! We are having a run of very cold weather at the moment and as a result we're all looking for comfort food. This casserole is an easy weeknight meal and with sausages, beans and rice it fit the bill perfectly.

I feel a little ridiculous putting my copyright info on a such a bad photo but I recently discovered that not one but two lowlifes had stolen virtually every post and photo from my blog. It's taken a little while but both blogs and the other sites where they had used my stolen content seem to have all been taken down. I actually feel quite violated by the whole experience.  Anyone else had this problem? How do you protect your work online?

Anyway. You can see that comfort food is most definitely required.

Make this!

Sausage and Bean Casserole

6 sausages of your choice
1 large onion, thinly sliced
2 large carrots, thinly sliced
2 cloves of garlic, crushed
1 tin diced tomatoes
1 tin five bean mix (or any beans)
1 heaped ts hot english mustard
1 tbs brown sugar
1/2 dozen shakes of worcestershire sauce
1/2 cup water
salt and pepper to taste

Preheat oven to 180 / 160 degrees celsius fan forced. In a large fry pan fry off the sausages until mostly cooked. Remove and place into a 3 litre casserole dish and once cool enough to handle, slice into 2cm rounds.

In the same frypan add the onion, garlic and carrot and cook, stirring frequently until the vegetables are beginning to soften. Add the tomatoes, beans, water, mustard, brown sugar and worcestershire sauce. Stir until well combined. Bring to the boil, season to taste and then add to the sausages. Mix well to combine then cover and place in the oven for approx 45 minutes, or until the vegetables are cooked through and the sauce has thickened.

Serve with rice or crusty bread for a hearty winter meal.

Sunday, July 8, 2012

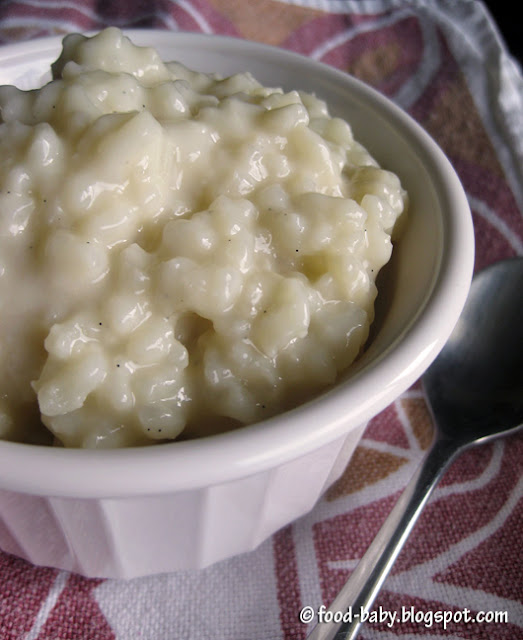
Creamy Rice Pudding


© food-baby.blogspot.com All rights reserved

While I've never really jumped on the '4 ingredients' bandwagon, this recipe does have just 4 ingredients and it takes just 40 minutes of simmering on the stove to get a creamy and luscious rice pudding. It doesn't really get much better than that!

Arborio Rice Pudding

1/2 cup arborio rice
4 cups full cream milk
1/4 cup sugar
1 heaped ts vanilla paste

Place all ingredients in a medium sized heavy-based saucepan.  Bring to the boil then reduce heat to low and simmer gently for approx 40 minutes stirring occasionally to prevent it sticking. Start checking for doneness at 30 minutes, the rice should be soft and plump and the pudding melt-in-the-mouth smooth.


Monday, June 25, 2012

Meatless Monday - Vege Bean Patties

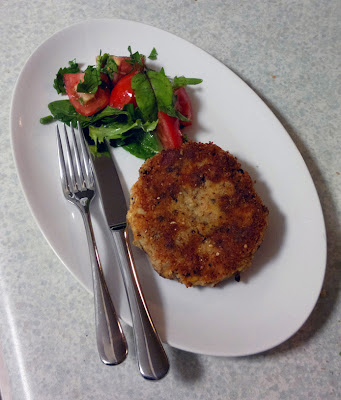
© Susan Lockhart King http://food-baby.blogspot.com All rights reserved

Recently I've been trawling some old magazines and cookbooks looking for cheap eats. My mother in law lent me a set of Women's Weekly Menu Planners from the late eighties and that's where I found this little gem aka Vegetable Bean Patties. Think a veggie burger, but old school.

It was exactly the type of thing I was after. Cheap, easy, no fancy ingredients and something I could make with very little notice given we already had all the ingredients in the pantry. I also did most of the work in food processor so it took next to no time to make. You could of course do the grating and chopping by hand.

And the verdict? Yum!

I made a very simple salad of baby leaves, parsley and tomato dressed with lemon juice and olive oil and it was all absolutely delicious. We will definitely be having this again!


Vegetable Bean Patties
Slightly adapted from The Australian Women's Weekly Menu Planner No 6, ACP 1988 p24

2 cups mashed potato
1 can red kidney beans, drained and rinsed
2 carrots (about 250g) grated
1 egg
1/2 red onion, finely diced
1 ts curry powder
1 1/2 cups dry breadcrumbs
olive oil for shallow frying

Place the mashed potato in a large bowl.

Using a food processor, add the onion and pulse a few times or until broken up. Add the kidney beans and pulse again until coarsely chopped and combined. Switch to the grating attachment and grate the carrots. Add it all to the potato. Add the lightly beaten egg and curry powder and mix with you hands until well combined.

Divide mixture into 8 equal portions, roll into patties and roll each patty in breadcrumbs.

Heat the oil in a large frypan over medium-high heat. Add the patties (in batches if you need to) and cook until golden brown on both sides and heated through. Remove and drain on paper towel. Serve with a salad.

Wednesday, June 20, 2012

Best Ever Custard

© food-baby.blogspot.com All rights reserved

There are probably a dozen different varieties of custard at the supermarket - full fat, low fat, skinny, extra thick, pouring, chocolate flavoured, brandy flavoured, snack size ... you name it. But do any of them even come close to homemade? Nope!

The beauty of a good custard is you can just eat it straight out the pot or serve it very simply with some passion fruit or sliced bananas and you have a little bowl of heaven.

I was inspired to make some yesterday afternoon after watching Gary make a gorgeous apple strudel with cream and custard on Masterchef. This is his recipe with only a few minor changes. It is seriously the best custard I have made. Ever. It will most definitely be served with our Christmas pudding this year, and probably quite a few times before then as well!

Custard
Recipe very slightly adapted from MasterChef

300ml pure cream
200ml low fat milk
5 egg yolks
1/4 cup caster sugar
25g corn flour
1 ts vanilla extract

Place the cream and milk in a saucepan over a medium heat and heat until just before boiling.

Whisk the egg yolks, sugar and vanilla in a large bowl until thick and pale before whisking in the corn flour. 

Pour half of the hot cream into the egg mixture whisking continuously. Pour this mix back into the saucepan with the remaining milk/cream and return to a medium low heat. Stir continuously with a wooden spoon or heatproof spatula until the mixture is thick and coats the back of the spoon. 

Strain the custard through a fine sieve to remove any stray bits of egg. Serve immediately or to serve later, place this bowl over another bowl of iced water and stir until cooled to room temperature.


Sunday, June 10, 2012

Sunday Baking - Chocolate and Coconut Slice

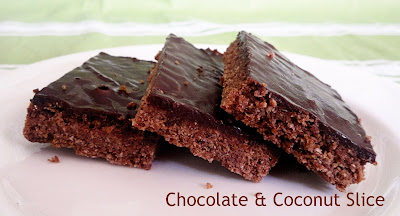
Chocolate and Coconut Slice © Susan Lockhart King http://food-baby.blogspot.com.au

Another childhood favourite this week! This slice brings back memories of school fairs, fancy morning teas and Grandma's house. With a crunchy chocolate base covered with smooth chocolate icing, it will disappear pretty quickly. This is such an easy and yummy treat to make. In fact, you will probably have all the ingredients in the pantry right now. So get baking!

Chocolate and Coconut Slice
Recipe slightly adapted from Taste.com.au

3 weetbix or similar
85g dessicated coconut
100g raw sugar
150g self-raising flour
150g melted butter
2 tbs cocoa
1 ts vanilla extract
1 cup icing sugar
1 tbs cocoa extra
20g soft butter
1-2 tbs hot water

Preheat the oven to 180 /160 fan-forced degrees celsius. Lightly grease a slice pan (20 x 30cm approx) and line with baking paper. 

Crush the weetbix into a large mixing bowl. Add the coconut, sugar, flour and cocoa and stir well. Pour the melted butter over the dry ingredients. Add the vanilla and mix well to combine. Tip the mixture into the pan and smooth out to make level, then press down with the back of a spoon (if you don't press it down at this stage it may be too crumbly when cooked). Bake for 15 minutes. Remove from the oven and ice while hot. 

To make the icing, sift the icing sugar and cocoa into a bowl. Add the softened butter and start to mix through. Add 1 tablespoon of hot water and stir well to combine. If it is too thick add a little extra water. Pour over the hot slice and smooth into the corners. Allow to cool completely before slicing in the pan. 

Makes 24 pieces.

Sunday, June 3, 2012

Sunday Baking - Cornflake Biscuits


Does anyone else remember these fondly from their childhood? They were always a favourite of mine and now with young kids, they are perfect for lunchbox treats or a rainy day baking project.

You can experiment with different add-ins. I generally use sultanas but any dried fruit would work, as would chocolate chips or nuts. Just go crazy!

Cornflake Biscuits

125g softened butter
1/3 cup raw sugar
1 1/4 cups self-raising flour
1 tbs milk
1 ts vanilla extract
1/2 cup sultanas or chocolate chips
2 cups cornflakes, lightly crushed

Preheat oven to 180 degrees celsius (160 degrees fan-forced). Line 2 baking trays with baking paper and set aside.

Using an electric mixer, beat the butter, sugar and vanilla together until creamy. Sift in the flour, add the milk and mix until the mixture forms a dough. Add the sultanas/choc chips and 1 cup of the cornflakes and fold together until well combined.

Place remaining 1 cup of cornflakes into a bowl. Roll tablespoons of mixture into the cornflakes then place onto baking trays, allowing some room for spreading. Press each biscuit down with the back of a fork. 

Bake for 12-15 minutes or until golden brown. Allow to cool on the trays for 5 minutes before carefully placing them on a wire rack to cool. Makes approx 22.

Sunday, April 29, 2012

Sunday Baking - Lunchbox Biscuits

Is it just me or does this picture look like it came straight out of a 1970s Woman's Weekly magazine?? Not quite sure how I managed that but conveniently this is a pretty retro recipe so perhaps it was meant to be.

These are simply called Lunchbox Cookies and everyone seems to have their own variation. I found this one online at Best Recipes and made a few changes. These are wonderful warm from the oven but hubby has been taking a few from the freezer every day to have with his morning coffee at work and really enjoyed them.

Lunchbox Cookies
Very slightly adapted from Best Recipes

1 cup self raising flour
1/2 cup milk powder
1 cup rolled oats
1/2 cup coconut
1 cup dried dates, chopped
1/4 cup sugar
150g melted butter
1 egg, beaten
1 ts cinnamon

Preheat oven to 180 degrees celsius. Combine the dry ingredients in a large mixing bowl. Add the melted butter and beaten egg and mix well to combine. Roll tablespoons of mixture into balls and place on a lined baking tray, allowing some room for spreading. Flatten each biscuit with a fork.  Bake for around 15 minutes or until golden brown. Remove from oven and let rest on tray for 5 minutes before turning out onto a wire rack to cool completely. Makes approx 18.


Monday, April 16, 2012

Meatless Monday - Easy Pumpkin Soup

We've had some lovely cool nights and mornings and to me that signals the beginning of soup weather. However my husband hates both pumpkin AND soup so it's no surprise the boys and I had this for lunch instead of dinner!

This is just about the easiest soup you could possibly make. Just chop, throw it all in a pot for a while then blend and eat. Yum!


Easy Pumpkin Soup
Serves 4

1/2 onion
2 cloves garlic
20g butter (or coconut oil for dairy free)
800g pumpkin (peeled weight), roughly chopped into 3cm pieces
approx 1 litre water or vegetable stock
salt, pepper and freshly grated nutmeg to taste
cream (or coconut cream) to serve

Place a large saucepan over a medium heat and the butter. Roughly chop the onion and garlic and add to the pan when the butter has melted and is starting to foam. Cook for a few minutes until the onion has softened. Add the chopped pumpkin and toss to combine. Add enough water or vegetable stock to cover the pumpkin, place the lid on the pan and bring to the boil.

Once boiling remove the lid and reduce the heat down to a simmer. Cook uncovered for 15-20 minutes until the pumpkin is soft and cooked through. Add salt, pepper and nutmeg to taste. Add a splash of cream.

You can blend the soup using either a stick blender in the saucepan (off the heat) or by pouring the soup into a food processor.

Serve with another swirl of cream, a grating of fresh nutmeg and lots of crusty, buttered bread. Delicious!

Sunday, April 1, 2012

Sunday Baking - Milo Muffins

In a few years I'll be baking treats for my kids' lunchboxes, but for now I am baking for the big kid in my life aka the hubby! We are trying to cut back our spending and making sure he takes lunch with him every day is a big part of that.

We have been planning our dinners pretty carefully for a while so that there are always leftover meals for his lunch, and now I am baking every Sunday so there is something sweet to have with his coffee as well. I'm such a good wife! Ha!

I stumbled across these Milo Muffins on the Essential Kids website but they are actually from one of my favourite bloggers, Melissa at Frills in the Hills.

Milo Muffins
Recipe very slightly adapted from Essential Kids
Makes 12 small or 6 jumbo muffins

1 1/2 cups self raising flour
2/3 cup milo
1 egg
2/3 cup milk
2/3 cup brown sugar
1/2 tsp baking powder
60g butter, melted
Chocolate sprinkles to decorate

Preheat oven to 190 degrees celsius. Place all ingredients in a large bowl and mix until smooth. Pour into muffin papers until 3/4 full. Cover each with chocolate sprinkles and bake for approx 20 minutes.

Cool in tin for 5 minutes then turn out onto a wire rack to cool completely. Suitable to freeze.

I made 6 jumbo muffins which meant 1 for me and 5 for hubby's lunches. He did forget to take one one day and I got a text with sad face that morning!
Related Posts Plugin for WordPress, Blogger...