Monday, June 22, 2015

Saffron and Cardamom Sweet Buns (SRC)

St Lucia Saffron and Cardamom Buns © www.foodbabylife.com

It's Secret Recipe Club time! We are now officially halfway through the year, can you believe it??

This month for SRC I was assigned the fabulous Lavender and Lovage by Karen. Karen is truly living the dream, dividing her time between the UK and the South West of France where she runs her own cookery school! I've long had a love-affair with France, learning the language in high school and enjoying a 3 month homestay with a family in Brittany when I was 17. So as you can imagine I had a great time on Karen's blog this month, reveling in some truly delicious food and stunning photography.

Being the middle of Winter here I was drawn to some hearty and traditional dishes like her Provence Beef Casserole and Chicken, Sausage and Vegetable Hotpot, and I have bookmarked her Victorian Epiphany Tart with 9 different types of jams and preserves to make at Christmas time. I was also really tempted by her Cauliflower Pizza Crust as it is the nicest looking version that I've seen.

In the end though I simply couldn't go past her Saffron and Cardamom sweet buns, which are baked in Sweden (and Scandinavia) to celebrate St Lucy's day and the Winter Solstice on the 13th December. Now before you wonder why I would choose to make this recipe when it is nowhere near December, it actually makes perfect sense: here in Australia our Winter Solstice is in June and this year it coincidentally falls today on reveal day (at 2.39am to be exact!).

Clearly it was meant to be!

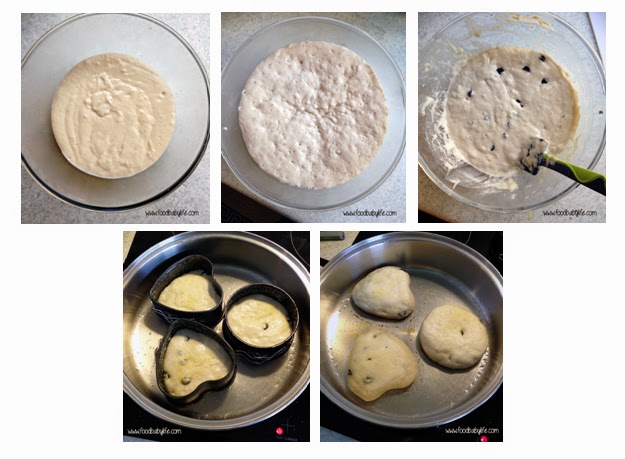
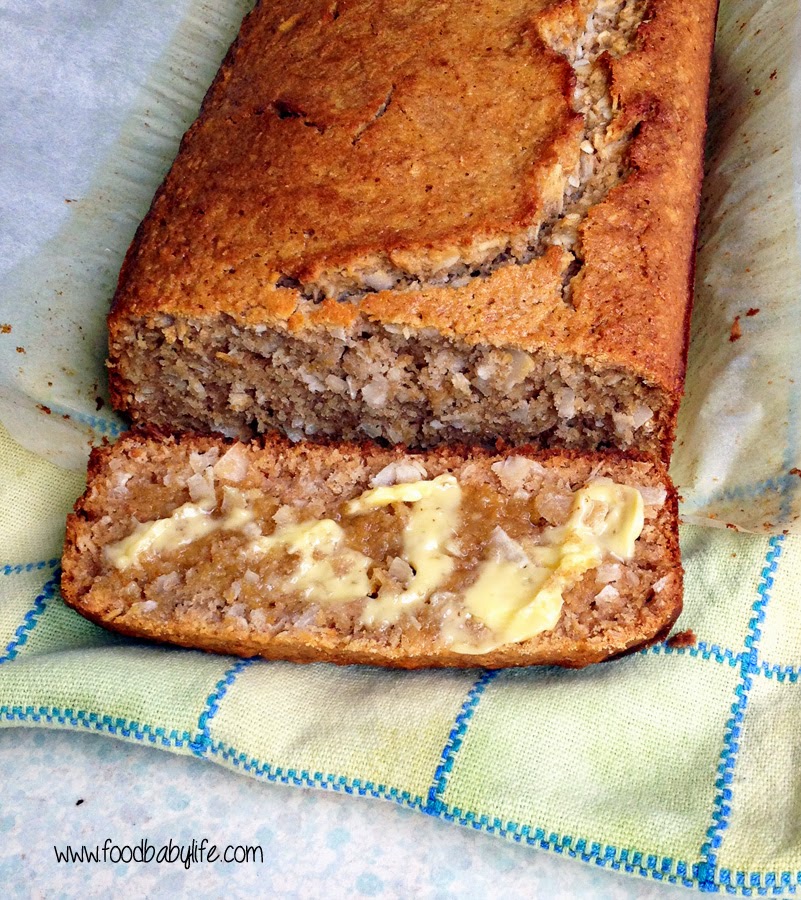
I baked these just yesterday and it was a perfect Winter weekend baking project as they take a few hours to make. If you've made any sort of bread you would have no problems making these. And just look at that gorgeous sunny colour! The saffron was a real splurge - my tiny 1 gram container cost $11!! but I didn't use all of it and now need to think of something suitably special to make with what's left.

shaping Saffron and Cardamom Buns © www.foodbabylife.com

And the verdict? We LOVED these! So delicious, not too sweet and with that beautiful fragrance from the saffron and cardamom. My 6yo declared that I was 'a chef and should work in a bakery.' High praise indeed. In all seriousness these were sensational and I will definitely be baking them again, although perhaps saving them for the festive season as they are a bit of a luxury.

St Lucia Saffron and Cardamom Buns © www.foodbabylife.com

Lussakatter - St Lucia Saffron and Cardamom Sweet Buns
Recipe from Lavender and Lovage

300mls milk (I used rice milk)
1 ts saffron threads
500g strong white bread flour
7g sachet dried yeast
1/2 teaspoon salt
100g golden caster sugar
10 cardamom pods (seeds removed and crushed in a mortar and pestle)
75g butter, melted
1 large free-range egg
1 small free-range egg (extra, for the glaze)
24 raisins

Grease 2 large baking sheets and set aside. Place the saffron threads and the milk in a small pot and warm gently over low heat. Remove from the heat and cool to tepid.

In a large bowl, combine the flour, yeast, sugar, salt and cardamom seeds. Make a well in the middle and add the saffron milk, beaten egg and melted butter.

Stir together before turning it out onto a floured surface and kneading for 10 to 15 minutes, until the dough is smooth and elastic.

Grease the bowl you already used before returning the dough, covering it with a clean tea towel and leaving it to prove in a warm place for about an hour, or until doubled in size.

Knock the dough back and turn out onto a floured surface and divide into 12 equal pieces. Take each piece in turn and roll it out into a long sausage shape before twisting it tightly into an ‘S’ shape.

Place the shaped dough onto the prepared trays, cover with a tea towel and leave them to prove in a warm place for approximately 45 minutes. Preheat the oven to 200 degrees C / 400 degrees F during this time.

Once risen, brush the tops with the extra beaten egg and then push a raisin into the middle of the scroll on each end – 2 raisins per bun (see photos).

Bake for 15 to 20 minutes until dark golden brown and sound hollow when tapped from underneath.

Cool on a wire rack before serving. Best eaten the same day.

Makes 12 buns.

Thank you Karen for a truly special recipe and a wonderful month!
 

Thursday, June 18, 2015

Fudgy (almost) Grain-free Chocolate Brownies

Fudgy Grain-free Chocolate Brownies © www.foodbabylife.com

I have been on the search for the perfect 'healthy' brownie for more than a year now. I've tried literally dozens of recipes, and a few of them have actually been pretty good like this Healthier Chocolate Brownie.

But I still hadn't found one I was completely happy with in terms of both taste and ingredients. Until now. This brownie recipe comes from Eat Drink Paleo where Irena describes them as the brownies that blew her away. And now that I've made them I completely agree!

Now my husband would say that the best part of a brownie is the crispy edges but I actually prefer the fudgy middle and that's what these brownies deliver unlike so many others.

My kids loved these and they disappeared so quickly I barely had a chance to take a photo. They had no idea there was sweet potato in them, and you certainly can't taste it, but that must be what makes the texture so fudgy and delicious.

The only change I made was to use rice malt syrup instead of honey. This makes them fructose free but no longer paleo as rice is obviously a grain, hence the (almost) grain-free of the title!

These would make a fabulous dessert served with berries and coconut cream or dairy-free ice-cream but we had them simply dusted with extra cacao powder.

The original recipe said to bake for 25-30 minutes but this made my first batch too dry so second time around I baked for just 20 minutes and they were perfect.

Fudgy (almost) Grain-free Chocolate Brownies 
Slightly adapted from Eat Drink Paleo

1 medium sweet potato (approx 2-3 cups grated)
2 whole eggs
1/2 cup coconut oil, melted
1/3 cup rice malt syrup
2 ts vanilla extract
1/2 cup raw cacao powder
1 ts baking powder
1 ts bicarbonate of soda
2 1/2 tbs coconut flour

Preheat oven to 180 degrees C / 160 degrees fan-forced. Grease and line an 8 inch square baking pan.

In a large mixing bowl, place the sweet potato, eggs, vanilla, syrup and coconut oil and mix together until well combined. Next stir through the cacao, baking powder and bicarb soda, and then add the coconut flour mixing until only just combined.

Pour the mixture into the prepared tray and bake for 20-25 minutes. Remove from the oven and allow to cool for 10 minutes before carefully removing from the tin. Serve dusted with extra cacao powder and some berries.

Monday, June 15, 2015

Vegie-loaded Spaghetti Bologanise


I can't believe that in 7 years blogging I've never even considered posting my spaghetti bolognaise recipe before. I mean everyone and their mum has the best recipe out there, can you really improve on perfection? I changed my mind though as there has been a theme in my baking and cooking lately of surprise ingredients and hidden veggies and thought it might be interesting to others.

I just recently spilled the beans to my cauliflower-hating husband that he's been happily chowing down on cauliflower rice without even noticing! I did feel a little guilty about that but honestly if he enjoyed it then most kids will. But that's a recipe for another day.

The basic secret to my bolognaise sauce is pureeing a whole heap of veggies until they are very fine and cooking it very slowly for maximum flavour. By fully incorporating the vegetables into the sauce there are no weird textures or bits for the kids to pick. out. It is all just tomato saucy goodness!

To be honest this is easiest in the Thermomix as it chops, cooks and then purees all in the same pot however a food processor and stick blender will do the job as well.

I always make a big batch. The recipe below makes 2 full dinners plus leftovers for our family of 5 easily. We always use half on the night is made and freeze the rest for later. One will be spaghetti bologanise and then the next will be lasagne.

The rest of the family loves spaghetti but I will often have my bolognaise sauce on a pile of roasted pumpkin and greens. Makes my tummy happier and I get even more veggies in one meal which is a good thing.

If you have fussy kids (or husbands!) give this one a go :)

My Veggie-loaded Spaghetti Bolognaise

1 onion
3 cloves garlic
2 carrots
2 stalks celery
2 zucchinis
2 red capsicums
1-2 cups greens (kale, spinach, broccoli stems etc)
1kg beef mince (or a beef/pork/veal blend)
1 x 750ml jar tomato passata
2 tbs olive oil
a big handful of fresh herbs (basil/oregano/parsley) roughly chopped or 1tbs dried Italian herb mix
1 heaped tbs homemade veggie stock paste
salt and pepper to taste

-------------------------------

TMX - place the onion, garlic, carrots, celery and capsicum into the bowl and chop for 10 seconds / SP 5-8, using the spatula to stir if needed. Add the oil, herbs, stock paste and passata and cook for 20 minutes / 100 degrees / SP 2. Scrap down the sides and puree for 1 minute / SP 5-9. Check for seasoning. While the sauce is cooking, brown the mince in a large pan. When the sauce is done either add it to the pan and simmer together for at least 30 minutes, or place the mince and sauce plus an extra jar of passata into the slow cooker and cook on low for 4-5 hours.

-------------------------------

Using a food processor or by hand, grate the carrots, celery, zucchini and capsicums and then set aside.

Place a large pot over medium heat and add 1 tbs oil. Brown the mince and then remove it from the pan, draining the fat if you wish (I don't bother).

Add the remaining 1 tbs oil along with the chopped onion and garlic and saute until translucent.

Add the grated veggies, passata, stock and herbs and simmer for around 30 minutes, until the vegetables are cooked and it smells amazing.

Using a stick blender or food processor, blitz the sauce until it is completely smooth.

Return to the pot, add the browned mince, give it a good stir together and simmer for as long as you can (I usually do this step in the crockpot and allow it to cook on low for 4-6 hours) but even an hour would be good. Check for seasoning.

Serve with pasta or veggie noodles.

Makes LOTS.

Monday, June 8, 2015

Winter Spice Biscuits

Winter Spice Biscuits © www.foodbabylife.com

After making these biscuits twice in as many days I have decided they must be worth sharing! I'm not sure if its just the cold weather but my boys have all been ravenous this past week and I've been searching for something tasty and healthy to fill them up.

Apart from warming soups and stews, my other favourite things to have in Winter are spices. With ginger, cinnamon, cloves and molasses these smell quite Christmassy to me but really why wait until Christmas to enjoy something so delicious!

My kids absolutely devoured these biscuits. They have a texture quite like brandy snaps - being thin, crisp and lacy around the edges and a little chewier in the middle. They are also gluten and dairy free (and virtually grain-free as well apart from the small amount of rice syrup) and very low in fructose.

Winter Spice Biscuits
Recipe by me

150g almond meal
25g chia seeds
20g molasses
50g rice malt syrup
50g coconut oil
1 ts vanilla extract
1 ts cinnamon
1 ts ginger
1/4 ts ground cloves
pinch salt

Preheat oven to 150 degrees Celsius. Line 2 trays with baking paper and set aside.

Combine all ingredients in a large bowl until well mixed.

Roll mixture into balls and place onto prepared trays, allowing room to spread.

Bake for approximately 15 minutes or until golden brown (they will be very soft but will firm as they cool). Remove from the oven and allow to cool on the trays for 10 minutes before transferring onto a wire rack to cool completely.

Makes approx 18.

Wednesday, June 3, 2015

Simple Tomato Soup

Simple tomato soup from www.mywholefoodfamily.com

Well Winter has well and truly arrived! I have shivered my way through today and actually haven't felt warm since I got out of bed this morning! My favourite thing about Winter (apart from the clothes - jeans, boots, scarves, jackets - I'm in heaven) is the food. Nothing warms up the house like having a soup simmering on the stove and some bread baking in the oven.

Tonight we had this really simple tomato soup with some focaccia. The simple things really are the best.

I've made this soup a few times and I always wish we had more. Next time I will make a double batch so I can enjoy it for a few days. Mr fussy 4yo had a tiny little taste and declared he didn't like it, but the fact he even tasted it is huge progress. The rest of us loved it, even my 19mth old who loves his focaccia stirred into the soup to get mushy!

Simple Tomato Soup

1/2 brown onion, roughly chopped
3 big cloves of garlic, roughly chopped
2tbs extra virgin olive oil
1kg very ripe tomatoes, halved and core removed
1 tbs tomato paste
1tbs rice malt syrup
1 tbs veggie stock paste
pepper

Heat up the oil in a medium pot over medium heat, add the onion and garlic and saute for a few minutes or until they start to soften. Add the remainder of the ingredients and cook over medium-low heat for 15-20 minutes until the tomatoes completely collapse and the onion is soft. Use a stick blender to blitz until smooth. Check for seasoning and add salt and pepper to taste (I only ever need to add pepper as my homemade stock paste is salty enough).

Serves 4.

Thursday, May 28, 2015

Wholemeal Vanilla Loaf Cake

Wholemeal Vanilla Loaf Cake © www.foodbabylife.com

Sometimes you just need cake. And with cake it really doesn't need to be fancy to be good. This may be a bit plain in the looks department but it is moist, buttery and scented with vanilla and really, who could ask for more?

We ate ours warm from the oven with lots of my Roasted Strawberry Chia Seed Jam. Absolutely delicious!!!

Wholemeal Vanilla Loaf Cake
Adapted from Lisa Corduff

100g rice malt syrup
130g butter, at room temperature
2 eggs
2 tsp vanilla extract
2 tsp baking powder
1/2 tsp bicarbonate soda
250g wholemeal flour
150g milk (I used homemade almond and coconut milk)

Preheat your oven to 180 degrees C / 160 degrees fan-forced. Grease and line a loaf tin with baking paper and set aside.

Place the butter and syrup into the thermomix bowl and beat for 1 min / SP 4.

Add eggs one at a time while mixing at SP 4 until well combined.

Add all other ingredients and mix for 30 secs / SP 4, scraping down the bowl as needed.

Pour the mixture into the prepared pan and bake for approximately 30 minutes, or until a skewer inserted comes out clean.

Remove from the oven and cool in the tin for 5 minutes before turning out to cool completely.

If you don't have a thermomix just use a food processor, stand mixer or electric beaters and follow the same instructions. It may just take a little longer for each step!

Monday, May 25, 2015

Fantastic Cuban Sandwiches (SRC)

Fantastic Cuban Sandwiches © www.foodbabylife.com

It's Secret Recipe Club time again and that means all my fellow Group Ds are revealing their chosen recipes today! This month I was really excited to be assigned Making Miracles by Rebekah. If you haven't checked out Rebekah's blog yet you really should because this woman is AMAZING! Rebekah has been a surrogate 3 times since 2006 (and currently on pregnancy #4) and started her blog to keep a record of her surrogacy experiences. Since then it has definitely evolved to include her own family and lots and lots of food!

I love the names of her recipes too, it makes them really hard to resist - how about some Amazingly Easy and Delicious Ham and Potato Soup, Emergency Chicken or the Best Steak Marinade in Existence?

I nearly went with the Bacon-Wrapped Potato Wedges but in the end though the Fantastic Cuban Sandwiches won me over not only because they sounded absolutely delicious, but because I remembered seeing the movie Chef  last year (did anyone else see it? we loved it!) which was all about Cuban street food including the famous el sandwich Cubano!

This is a super easy meal which takes only minutes to prepare and then the slow-cooker does all the work for you. I use my slow-cooker a few times every week so this was perfect for us. Every time I cook meat like this I wonder why I don't do it more often because it's just SO good! Tender, juicy and packed with flavour.

Fantastic Cuban Sandwiches © www.foodbabylife.com
The house smelt amazing all day while the pork was cooking and when it came the taste did not disappoint! I don't eat dairy and I did feel like I was missing out a bit without all that luscious melty cheese but it still tasted fantastic. We all loved these and even better, because I did such a big roast we had lots of leftover pork for lunch the next day and froze the rest for another dinner a week later.

Fantastic Cuban Sandwiches © www.foodbabylife.com

Fantastic Cuban Sandwiches
Recipe from Making Miracles

For the roast:
1 x 2kg pork shoulder (this makes lots of leftovers)
6 cloves garlic, finely minced
1/4 teaspoon black pepper
2 ts oregano or marjoram
2 tbs olive oil
2 tbs white vinegar
3 ts salt

For the sandwiches:
Long bread rolls
Sliced Swiss cheese
Sliced ham
Sliced pickles
Honey mustard
Mayonnaise 

To prepare the roast, combine all marinade ingredients together and rub over the pork before covering well and leaving it in the fridge overnight. The next morning place in your crock pot on low for 8-12 hours (mine had about 10 1/2 hours and was perfect).

To assemble the sandwiches, slice the rolls in half and spread a thin layer of the mustard and mayonnaise on the insides. Layer the cheese, ham, pickles and roast pork on one half. Top with another slice of cheese and then the other half of the roll.

Press sandwiches in a panini press until bread is crispy and cheese is melted, about 3-4 minutes on medium-high heat.

Thanks for a great recipe Rebekah. I loved spending some time on your blog! :)

secret-recipe-club.blogspot.com


Thursday, May 21, 2015

Chocolate Chickpea Biscuits

Chocolate Chickpea Cookies - free from gluten, dairy and fructose - from www.mywholefoodfamily.c

I know they don't look like much but these Chocolate Chickpea Biscuits are one of the best things I've baked in ages. Seriously! I've made a Magic Bean Chocolate Cake before which we all loved and these biscuits are just as good with their fudgy chocolate middles surrounded by raggedy, crinkly, crispy edges that make it incredibly hard to stop at 1 (or 2).

My kids are always ravenous at the end of the day and afternoon tea often turns into one big grazing session (and yes they still eat a big dinner!). We had an after school function to go to the day I made these so I packed them up and hoped it would be enough to keep them going until we got home. Well, they each ate 3 biscuits and were set. They absolutely loved them but 3 was enough and I didn't get a single 'I'm hungry' the whole afternoon! The chickpeas and oats in these are packed with protein and fibre and they are really satisfying. Next time I will be doubling the recipe and stashing some in the freezer. 

Even straight from the oven there was absolutely no discernible taste or smell of the chickpeas so if you've been on the fence about the whole beans-in-cakes thing give these a go!

Chocolate Chickpea Biscuits - Gluten, Dairy and Fructose Free
Recipe adapted from The Road to Loving My Thermomixer

45g quinoa flakes
80g rice malt syrup*
zest of 1 orange (optional but delicious!) 
400g tin chickpeas
40g raw cacao powder
1 ts vanilla extract
1 ts gluten-free baking powder
100g coconut oil

Preheat oven to 180 degrees C / 160 degrees fan-forced. Line 2 trays with baking paper and set aside.

Place quinoa flakes into a food processor and blitz for 20 seconds (TMX 20 secs / SP 7). Add all remaining ingredients and process for 30 seconds (TMX 30 secs / SP 5).

Dollop small spoonfuls of mixture onto the prepared trays, allowing some room to spread, and flatten slightly (I often forget to do this).

Bake for 15 minutes. Remove from the oven and allow to cool for 5 minutes before placing the biscuits on a wire rack to cool completely (or not, they are absolutely delicious warm from the oven!).

* Using RMS is what makes these fructose free but they are definitely not as sweet as the original - if you're not worried about fructose you could use raw honey instead or half-and-half. 

Makes approx 20

Monday, May 18, 2015

Sweet Potato, Bacon and Egg Bake (Dairy Free)

Sweet Potato Bacon and Egg Bake © www.foodbabylife.com

We go through lots of eggs in this house, at least 2-3 dozen or more if I'm doing lots of baking. We love them boiled, scrambled and fried. Turned into omelettes, quiches, custard and french toast.

A quick flick through an old Woman's Weekly cookbook called Cheap & Cheerful and I came across a Kumara, Bacon and Egg Bake. We had everything on hand it was such an easy and delicious dinner! Itwas somewhere between a quiche and a frittata and would work really well if you happened to have some leftover steamed veggies in the fridge already. I used sweet potato and regular potatoes but really you could use anything you have.

We had this for dinner but I think it would be a perfect brunch dish, especially as it could be prepared ahead of time and then popped in the oven at the last minute.

Sweet Potato, Bacon and Egg Bake
Adapted from Cheap & Cheerful (Australian Woman's Weekly, ACP Books, p50-51)

1 large sweet potato (about 500g)
2 large potaotes (about 500g)
5 bacon rashers (about 350g)
8 eggs
1/4 cup milk (I used rice milk)
1 ts ground cumin
2 tbs nutritional yeast

Chop the sweet potatoes and potatoes into a 2-3cm dice and steam until just tender and then set aside to cool.

Preheat the oven to 180 degrees / 160 degrees fan-forced. Grease a baking dish ( mine was 20 x 26 cm) with olive oil.

Roughly chop the bacon and fry it in a pan over medium heat until just starting to crisp up. Sprinkle over the cumin and toss to combine. Spread the potatoes over the base of the baking dish and scatter the bacon over the top.

Whisk together the eggs, milk and nutritional yeast in a medium bowl and then pour over the potatoes and bacon. Bake for 30 minutes. Serve warm or hot with a green salad.


Wednesday, May 13, 2015

Sunshine Soup (aka Carrot, Pumpkin and Sweet Potato Soup)

Sunshine Soup (Carrot, Pumpkin and Sweet Potato Soup) © www.foodbabylife.com

We've been hit with numerous bouts of colds recently and seemingly permanent runny noses so I've been looking for lots of nutrient rich foods to boost the kids immune systems - fresh juices made on carrots, celery, beetroot, spinach, orange and ginger in the morning and warming drinks with lemon and raw honey in the afternoon when the coughs and sniffles come back.

And now that it seems like Winter is finally on the way (we've dropped into single digits overnight in the last few days) it's soup time!!!

I don't tend to follow recipes for soup, I usually just throw in whatever veggies we have on hand, add some herbs and stock and call it a day. This soup, which my boys called Sunshine Soup because of its gorgeous sunny colour, was the perfect tonic for my big boy who was home sick from school yesterday. As usual I thought I made plenty but it disappeared in record time and I will be making another batch today!

I did this in the Thermomix but you can easily adapt it and I have included alternative directions below.

We all loved this soup. My 18 month old ate more than 1 1/2 cups and wanted more but there wasn't any left!


Sunshine Soup (Carrot, Pumpkin and Sweet Potato)

2 large carrots, roughly chopped
1 large sweet potato, roughly chopped
1 big wedge of pumpkin, roughly chopped
3 cloves garlic
2cm piece ginger
2cm piece fresh turmeric OR 1ts dried turmeric
2 1/2 cups water or stock
1 ts vegetable stock paste (only if using water)
1 heaped tbs solid coconut oil
sea salt and pepper to taste

TMX - place the ginger, garlic and fresh turmeric (if using) into the bowl and chop 3 secs / SP 7. Add the coconut oil and dried turmeric (if using) and saute 2 mins / Varoma / SP 1. Add the carrot, sweet potato and chop 15 secs / SP 7. Scrape down the sides of the bowl, add the stock or water and cook 20 mins / 100 degrees / SP 1. Blend 45 secs / sp8, gradually increasing from SP 1 to SP 8. Add sea salt and pepper to taste.

If not using a Thermomix, place all ingredients except the water/stock and oil into a food processor and process until finely chopped. Pour into a medium saucepan, add the oil and water or stock. Bring to the boil then simmer for 20 minutes or until veggies are tender. Using a stick blender, process the soup until smooth.

Serves 4.

Thursday, May 7, 2015

Pumpkin Banana Bread

Pumpkin Banana Bread © www.foodbabylife.com

I'm beginning to think I have a bit of an obsession with banana bread. I was too scared to check just how many variations I've posted over the years but I know I've never made a Pumpkin Banana Bread before!

We bought a whole pumpkin last weekend for just $2 and we enjoyed it roasted last night, mashed for lunch today and now baked into a cake. There will also be pumpkin soup made in a few days when it cools down again after a few days of unseasonably hot weather.

Mr Fussy 4yo loves cinnamon and was willing to taste some pumpkin roasted with cinnamon last night (it got a screwed up face) but even he couldn't resist this Pumpkin Banana Bread still warm from the oven and spread with lots of butter. It was the perfect afternoon tea for the kidlets and I can vouch for the fact that it is just as good if not better toasted the next day.

The original recipe had 1/2 cup honey AND 1/2 cup sugar which I replaced with just 1/2 cup rice malt syrup and an extra banana and it definitely sweet enough for us. You may want to increase it a little.

This was incredibly moist, lightly spiced and absolutely delicious. We will be making it again!

Gotta love hidden veggies!

Pumpkin Banana Bread sliced © www.foodbabylife.com

Pumpkin Banana Bread
adapted from allrecipes

3 ripe bananas, mashed
2 large eggs
1/3 cup olive oil
1 1/3 cups pumpkin puree
1/2 cup rice malt syrup
2 1/2 cups plain flour
1 ts baking powder
1 ts baking soda
1/2 ts salt
2 ts cinnamon
1/4 ts nutmeg
1/4 ts cloves

Preheat oven to 175 degrees C / 350 degrees F. Grease and line a 9 x 5 inch loaf pan.

In a large bowl, stir together the mashed banana, eggs, oil, pumpkin and syrup. In another bowl combine the dry ingredients and then stir these into the banana mixture until just combined (don't over-mix).

Pour batter into the prepared pan and bake for 45 minutes (mine took 50 - it was huge!) or until the top springs back when touched and a skewer comes out clean.

Cool in the pan for 10 minutes before turning out onto a wire rack to cool completely. Serve warm or cold. Suitable to freeze.

TMX - place bananas, eggs, oil, pumpkin and syrup into the mixing bowl and blend for 10 seconds / speed 6. Add remainder of ingredients and blend 6 seconds / speed 6. Scrape down the sides of the bowl and proceed with baking instructions above.

Monday, April 27, 2015

Blueberry English Muffins (SRC)

Blueberry English Muffins basket © www.foodbabylife.com

Hooray it's Secret Recipe Club time! For those who don't know SRC is a group of dedicated cooks and bakers who are assigned a blog in secret each month from which to choose a recipe and blog about on the same day.

This month I was delighted to be assigned Karen's Kitchen Stories and I had a wonderful time this month on Karen's blog. Karen is a little bit obsessed with bread and has baked some amazing things which had my mouth watering like Braided Lemon Bread with Blackberries, Pain au Chocolat and Strawberry Danish. Yum! She claims to not be an expert at either baking or photography but her recipe index and stunning photos beg to differ!

I also love baking bread (although I am nowhere near as accomplished as Karen) so I decided to choose a bread for SRC and settled on her Cherry English Muffins. Mine ended up being blueberry muffins though as I couldn't find any dried cherries.

Making English muffins has been on my to-do list for years but I've never quite gotten around to it. Part of the reason is that English muffin/crumpet rings just aren't available here in Australia. I know because I've looked in every kitchenware shop I've come across and searched online to no avail. Actually that's not quite true as I found a set of 4 on Ebay that would ship from the US for more than $30! Um, no.

I decided that I wasn't going to let that defeat me and came up with an alternative - I used the rings from my mini spring-form pans instead! I could only fit 3 rings in the pan at a time and the 3 batches each took about 20 minutes to cook so this is definitely not a quick bake, but it does make a great weekend project and we got to enjoy some delicious muffins for afternoon tea. I got 9 largish muffins from this mixture and between the 5 of us they lasted all of, oh, 15 minutes. Seriously!


There's definitely no comparison between these and the shop-bought ones - they were sensational! They may have taken ages to make but it was totally worth it. I'm really pleased I persevered and finally made them. Thanks to Karen for the inspiration!

Blueberry English Muffins © www.foodbabylife.com

Blueberry English Muffins
Very slightly adapted from Karen's Kitchen Stories

2 tsp rice malt syrup (or honey)
1 tbs olive oil
1 1/2 cups lukewarm milk (I used homemade almond and coconut milk)
340 g (12 oz) bread flour
3/4 tsp salt
2 tsp instant dried yeast
1/2 cup dried blueberries
1/4 tsp bicarb soda (baking soda)
3 tbs warm water
Corn meal or semolina flour for dusting

Mix the syrup, oil, milk, flour, salt and yeast in a large bowl with a large spoon. Mix together for a few minutes, scraping down the sides of the bowl as needed. Immediately cover the bowl with plastic wrap and refrigerate for 1 to 4 days.

Remove the bowl from the fridge about 2 hours before you will be making the muffins.

When you are ready to make the muffins, mix the baking soda with the water. Sprinkle the cherries over the dough and then gently fold the water, soda and cherries into the dough. Leave to rest for 10 minutes.

Heat a heavy based frying pan or griddle over medium heat (150 C / 300 F for an electric griddle).

Spray the griddle, muffin rings and a 1/3 cup measure with spray oil and then dust the inside of the rings with cornmeal. Pour 1/3 cup of dough into each ring (no more than 2/3 full). Sprinkle cornmeal over each muffin once you've filled all of the rings.

Cook for at least 12 minutes, until the bottoms are golden brown and then flip the muffins in their rings and cook for another 12 minutes or until you are sure they are cooked through and springy to the touch.

Cool the muffins in their rings for 2 minutes, then remove the rings and cool them on their edges for at least 30 minutes to prevent shrinking.

Thanks Karen! I really enjoyed my month visiting Karen's Kitchen Stories

secret-recipe-club.blogspot.com


Friday, April 24, 2015

Marinated Chicken Burger with Fountain Good Choice Sauces

I gave up sugar in September 2012 after reading Sweet Poison by David Gillespie and then stumbling across Sarah Wilson's I Quit Sugar program. While I don't remember the exact date I do remember jumping up and clearing out the pantry and being horrified at the amount of sugar that was hiding in our everyday products. I thought we were eating quite healthily but the bags of stuff I threw away said otherwise!

One group of products that didn't survive the great cull of 2012 were condiments. I knew that some sauces were quite sweet but I was astounded that our tomato sauce was over 25% sugar, the BBQ sauce around 40% and the sweet chilli contained a whopping 60%! I know you don't use much at a time but if I was going to be eating something so packed with sugar I would have rather had a chocolate bar or bowl of ice cream!

While I make most things from scratch these days, especially since buying our Thermomix, I have never really made any sauces.  I just didn't think I would be able to make a version that the kids would really like and I didn't think we would get through a whole batch before it went off.

So I was delighted to receive a pack of Fountain Good Choice Sauces to review thanks to Product Talk by Nuffnang. All the sauces are free of both sugar and gluten and the pack included a squeezy bottle each of tomato and barbeque sauces, and glass bottles of sweet chilli, hot chilli and soy sauces. Instead of sugar the sauces are all sweetened with Natvia which is an alternative sweetener using stevia.

Fountain Good Choice Sauces Review

We had a BBQ at Oscar's birthday party last weekend and I knew this would be perhaps the greatest test for the Good Choice Tomato and BBQ sauces. Would the kids be able to taste the difference? Would the adults notice the labels on the bottles? Well, I can say that both sauces got the thumbs up from all our big and little taste testers, every sausage got eaten and there was not a single complaint!!

As for the other sauces I decided the best test for them would be a burger. I mean, it's not a real burger unless there's sauce dripping from your chin! I came up with this simple marinated chicken burger and it was SO good: lick-your-fingers-to-savour-every-last-bit good. I was surprised how spicy the sweet chilli sauce was (in a good way) but the hot one was too hot for me. In fact you can tell just how much we like the sweet chilli sauce as by the time I got around to taking the photo of the bottles it was half empty!

Marinated Chicken Burger with Fountain Good Choice Sauces © www.foodbabylife.com

Marinated Chicken Burger

For the marinade:
6 chicken thigh fillets
2 tbs Fountain Good Choice Soy Sauce
1 tbs Fountain Good Choice Tomato Sauce
1 tbs Fountain Good Choice Sweet Chilli Sauce
1 crushed clove of garlic

Place all ingredients into a large ziplock bag. Seal the bag, removing as much air as possible. Massage the sauces into the chicken pieces until well covered and then leave to marinate in the fridge for at least a 2 hours. The chicken pieces can be fried, grilled or barbecued until cooked through. I baked mine at 200 degrees C for approximately 20 minutes (make sure you check they are cooked through). Cover the chicken pieces with foil and leave to rest for 10 minutes while you prepare the burgers.

For the burger:
6 hamburger buns
1 avocado
2 tomatoes
lettuce
2 grated carrots
Fountain Good Choice Sweet Chilli or Hot Chilli Sauce

Assemble your burgers with your favourite salad ingredients, place a piece of chicken on top and drizzle over some sweet or hot chilli sauce to taste.

So. Would I buy these for myself? Yes but I'd still use them in moderation. There's not too much research into stevia yet and I've gotten my kids out of the habit of smothering everything in sauce so for us these sauces would still be a 'sometimes' food.  That being said I do love that this range is available and for anyone who wants to switch to something healthier but is worried the kids would reject it, try these!  The full range is available at Woolworths both in store and online.

*This is NOT a sponsored post. I received product for review and all thoughts and opinions are my own.

Tuesday, April 21, 2015

Oscar turns 6!

My big boy turned 6 yesterday. I can hardly believe it! There has been much excitement over the past month or so as we planned his party, wrote invitations and decided on a birthday cake. His party was held at a local park on Saturday afternoon and despite the threatening weather it turned into a wonderful day. The party went off without a hitch and we had 14 kids plus siblings and parents. We had John from Crazy Party come to run some crazy games for the kids which was lots of fun followed by some food and of course birthday cake. It really was one of the easiest parties we've had. I was a little concerned about how the lack of junk food would go with the kids but no one seemed to notice (or at least they didn't say anything to me!).

Rainbow fruit skewers © www.foodbabylife.com
Rainbow fruit skewers

Nut free Bliss Balls © www.foodbabylife.com
Apricot Balls and Nut-free Chocolate Bliss Balls

The food was really simple - some rainbow fruit skewers with watermelon, pineapple, kiwi fruit, green and red grapes and blueberries, a huge bowl of popcorn, some plain salted chips, apricot balls and nut free chocolate bliss balls, sausages, bread and sauce. We had bottles of water for the kids for after their activities and some mineral water for the adults.

Smarties Cake © www.foodbabylife.com
Smarties Cake!
The one exception to our no-junk party was the cake. I made a double layer fudgy chocolate cake covered with vanilla buttercream icing and smarties. It went down a treat and got lots of ooohs and aaaahs at the table. I thought it would be big enough to feed everyone but my first few slices were too big so we got down to some thin slivers of cake at the end and every crumb got eaten. I guess that's a sign of a good cake!

We also didn't have a traditional party bag because I'm really not a fan of the cheap plastic stuff and all the lollies that usually go with it. Instead we had a lucky dip and as each child was leaving they got to choose something. I found lots of great stuff like giant playing cards, stamp sets, packs of textas and crayons, figurines and sticker packs all for $2. The kids loved being able to choose and unwrap something to take home and I didn't hear any complaints. 

Then yesterday was Oscar's actual birthday and we had family around for an afternoon tea of birthday cake and dinner of lasagna, salad, garlic bread and dairy-free chocolate ice cream (all chosen by the birthday boy).

Oscar was very keen on having a number 6 cake but he was happy to leave the decorations to me. I decided that given how much he loves school, writing and reading that he would like a school themed cake and I was right! I made a simple butter cake with vanilla butter cream icing and decorated with some fondant shapes. Cake decorating is really not my strong point and while they do look amateurish I was pretty happy with how they turned out. I made a book, open notepad, ruler, (wonky) pencil and a little apple. We even found some candles that looked like crayons! Oscar loved his cake and everyone had seconds.

School theme number 6 cake © www.foodbabylife.com

All in all it was a brilliant birthday for him, he was surrounded by friends and family, ate some great food and received lots of great presents. Can't ask for more than that!

Friday, April 17, 2015

2 ingredient Apricot Balls

2 Ingredient Apricot Balls © www.foodbabylife.com

We are coming to the end of 2 weeks school holidays here and it has been action packed! Between sleepovers, trips to the park and the movies and play dates with friends there hasn't been too much down time. And to top it all off we have Oscar's 6th birthday party tomorrow! I will write a separate post about the party and all the happenings on his actual birthday but for now I thought I would share one of the recipes I am making for the party.

We are expecting 14 kids plus parents and sibilings (maybe 40 people all up) but are keeping the food very simple. I remember loving apricot slice as a kid but I do remember it being very sweet and I recently checked the packet and yep, LOADS of sugar!

Luckily The Organised Housewife came to the rescue with these simple apricot balls which have just 2 ingredients and take all of a minute to whip up. I found they had to be squeezed into balls rather than rolled but they held together beautifully and were certainly firm enough even without being refrigerated.

My kids loved these and I loved how simple they were. Perhaps the easiest party food ever!

2 Ingredient Apricot Balls
Recipe from The Organised Housewife

200g dried apricots
200g desiccated coconut

Place apricots and coconut into the food processor and blitz until well combined and sticky, about 90 seconds. In the thermomix process on speed 10 40-50 seconds.

Squeeze into balls and store in the fridge.

Makes approx 18 (depending how big or small you make them!)

Monday, April 6, 2015

Chocolate Custard Tart and our Easter wrap-up

Chocolate Custard Tart - dairy free, gluten free, fructose free - no refined sugar - from www.mywholefoodfamily.com


Every Easter for the past few years my goal for our family has been to cut back on commercial chocolate, indulge in a healthier way and make some great family memories instead of gorging on sugar.

In our house the Easter Bunny always brings winter pyjamas, a CD and 1 chocolate (this year it was a Lindt dark chocolate bunny). We do an Easter egg hunt using small plastic eggs that each have one of those little fluffy chickens inside and then once they've found them all they get a prize (this year they each got a pre-printed canvas set with paint and brushes which kept them busy for a few hours). In spite of our efforts to cut back on junk both the big boys still had stomach aches at the end of the day so we had a bit of a chat about how junk food can taste good but still make your body feel yucky.

We had a delicious lunch of roast lamb and vegetables and I made this fabulous chocolate custard tart for dessert. I found it on Alexx Stuart's blog and if you haven't heard of her then head on over and check out her amazing real food recipes and low-tox living ideas.

This tart is creamy, chocolatey and indulgent but won't leave you with a stomach ache! It's also easily grain and dairy free and totally decadent. I had all the ingredients in the pantry already except the chocolate so it was really easy to whip up and also very easy to eat!

I've just included the Thermomix instructions but Alexx's recipe includes non-Thermomix instructions as well so you can check out the link below.

This really was one of the best things I've made in a long time and we will definitely be making again for another special occasion!

Chocolate Custard Tart
Recipe from Alexx Stuart

Base:
1 1/4 cups (120g) tapioca flour
1/3 cup (30g) almond meal
2 heaped tbs (20g) coconut flour
1/2 cup (45g) buckwheat or sorghum flour
160g butter (or solid coconut oil to be dairy free) (VERY COLD)
1 egg
2ts vanilla extract
2 tbs rice malt syrup (or honey/maple syrup to be grain free)
2 tbs raw cacao

Filling:
400ml coconut cream (I used Ayam brand)
100ml water
2 whole eggs
1 egg yolk
2 tbs arrowroot flour
1 tbs gelatin
5 tbs rice malt syrup (or honey/maple syrup to be grain free)
1 ts vanilla extract
120g very dark chocolate (Lindt 85% is good, grated or finely chopped

To make the base:
Place the flours and cacao into the thermomix (3 secs/ sp 5) to aerate and combine. Add the chilled fat and pulse until it has disappeared (TMX 3 secs / sp 6). Whisk together the egg, vanilla and syrup and slowly add 2/3 of this mixture to the dry ingredients. If it clumps you don't need to add anymore, or you may need the whole lot.

Use a spatula to remove the dough (it will be very wet) onto plastic wrap, shape into a disc and place in the fridge for 20 minutes.

Preheat the oven to 180C / 350F fan-forced or 200C/400F non-fan-forced. Grease a 23 cm loose-bottomed tart pan with coconut oil and dust with a little extra sorghum flour. Set aside.

Dust the dough with some extra flour and then roll it out in between 2 sheets of baking paper. Remove the top sheet, flip the dough and lay it over the prepared tart pan. Remove the second sheet of baking paper and press the pastry into the tin. It will be soft, sticky and a little temperamental. If it breaks or there are holes just patch them with a blob of dough. Trim the excess and then blind bake (covered with baking paper and filled with beans or rice) for 10 minutes. Remove the baking rice and bake for a further 15-20 minutes or until it is a deep brown (not black!).

Set aside. Start the filling as soon as you remove the the blind baking rice/beans to get the timing right - hot filling needs to go into a hot pastry shell, cold filling into a cold pastry shell (that tip is courtesy of the great Maggie Beer).

To make the filling:
Place all ingredients except the gelatin and chocolate into the thermomix and cook for 7 mins/90 deg/sp 4. Add the gelatin at the end for 5 secs / sp 6. Then the chocolate for 20 secs / sp 7.

Pour into the baked pastry shell and chill until firm. Decorate with grated chocolate and serve with berries. Serves 10.

Friday, April 3, 2015

Coconut Bread


Coconut Bread © www.foodbabylife.com

Move over banana bread there's a new kid in town!

When this coconut bread popped up in my facebook feed from Smitten Kitchen I had no idea it would lead me back to a blog I used to read religiously (The Wednesday Chef) and from there to renowned Aussie chef Bill Granger who is famous for this recipe.

We've been on a real coconut kick lately and eat it in some form every day be it coconut milk on my muesli, coconut flour in some muffins or coconut oil in a stir fry.  This bread is a celebration of coconut and while I knew my husband wouldn't be particularly keen, the rest of us would love it and I was not disappointed.

I did make a few substitutions (of course) but I think I have stayed pretty true to the original recipe. It makes a huge (10 x 5) loaf which is pretty tasty warm from the oven but is absolutely sensational toasted and spread with lots of butter and a drizzle of syrup.

I was intending on serving a slice of this topped with homemade mango sorbet for my mother in law's birthday but in the end we had a piece of this for afternoon tea and saved the mango sorbet for a few days later when we weren't quite so full from our dinner of takeaway Chinese food.

It is the perfect breakfast or brunch bread and is really substantial without being too heavy. I loved it.

If you like coconut and are getting sick of the same old banana bread, this is the one for you!

I chose to use the recipe from the Australian Women's Weekly just so I wouldn't have to do any of the conversions.


Coconut Bread
Slightly adapted from AWW

1 1/2 cups plain flour
1 cup wholemeal plain flour
2 ts baking powder
2 ts cinnamon
150g shredded coconut (I used coconut flakes which I blitzed in the food processor to make finer)
300ml milk (I used almond and coconut milk)
2 eggs
1 ts vanilla
1/2 cup rice malt syrup
75 g melted butter
pinch salt

Preheat oven to 180 degrees celsius. Grease and line a large loaf tin (mine was 10 x 5 even though the original said 8.5 x 5) and set aside.

Place the dry ingredients into a large bowl and stir together. Make a well in the middle.

Place the liquid ingredients into a large and whisk well.

Pour the wet ingredients into the well and mix until only just combined. Pour into the prepared tin and bake for 1 hour or until a skewer inserted in the middle comes out clean.

Remove from the oven and leave for 5 minutes before turning out of the tin. Serve warm or slice and freeze to be thawed and toasted later.

Serves 10-12.


Friday, March 27, 2015

Lemon Diva Cupcakes


I have a confession to make. I'm a little embarrassed to admit that I became completely hooked on I'm a Celebrity Get Me Out of Here! I think I watched every episode and was cheering for the fabulous Chrissie Swan to win (she came third). I was also cheering when Julie Goodwin arrived as an intruder because she was fabulous on MasterChef and I have her cookbooks. During the show Julie made her Lemon Diva Cupcakes so guess what I couldn't resist making the next day?

There is a reason these have become famous - they are completely delicious! I haven't made cupcakes for ages and it's been even longer since I used a piping bag. My piping skills are atrocious but the taste more than made up for that.

If you like lemon you will love these cupcakes! I made a few changes to the recipe like using rice malt syrup instead of sugar in the cupcakes and dextrose in the icing but other than that it is as per the original.

Perfect for afternoon tea. Make them!!

Lemon Diva Cupcakes
Found online here

Cupcakes:
100g butter, softened
1/2 cup rice malt syrup
1 ts vanilla extract
zest of 3 lemons
1 1/2 cups self-raising flour
1/2 cup milk (I used homemade almond and coconut milk)

Icing:
125 g unsalted butter, softened
2 cups dextrose
1 1/2 tbs lemon juice

Preheat the oven to 160 degrees C fan-forced. Line a 12-hole muffin pan with paper cases. Using a stand mixer or electric beaters, beat together the butter, syrup, lemon zest and vanilla until light and creamy.

Add the eggs one at a time, beating well after each. Alternately fold through the flour and milk in two batches. Spoon the mixture evenly into the paper cases.

Bake for around 20 minutes or until golden brown and the centre springs back when touched. Place on a wire rack to cool completely before decorating.

To make the icing, beat the butter until light and creamy using electric beaters. Add the dextrose a little at a time, beating constantly. Add half the lemon juice and beat well. Add the remaining lemon juice a little at a time. Pipe the icing onto the cooled cupcakes (Julie recommends a 1cm fluted nozzle which I don’t have).

Monday, March 23, 2015

Garlic Smashed Potatoes (SRC)


Secret Recipe Club time! This month I was assigned Confessions of a Cooking Diva by Julie. I had a great time looking through Julie's blog this month and I especially liked all her menu planning posts and the way she bases her meals around different themes. We plan and shop fortnightly (which I know doesn't work for everyone) but tend to base our meals around the kids' activities and having enough leftovers for hubby's lunch. I really should do a menu-planning post of my own one of these days!

Anyway there were lots of yummy recipes to chose from and I have her Slowcooker Chicken Drumsticks, Baked Banana Bread Oatmeal and these Baked Eggs all bookmarked to try soon but in the end I couldn't go past these Garlic Smashed Potatoes. I mean, Julie is from Idaho after all!

We have a roast dinner probably every second Sunday and I am always on the lookout for different and interesting sides. We've had potatoes lots of ways but never smashed despite seeing variations of them all over the place.

These are such a simple yet delicious way to cook potatoes. Crispy and crunchy on the outside, fluffy in the middle and seasoned beautifully with garlic. We had them with roast chicken, roast beetroot and green beans tossed in lemon and olive oil. It was a seriously good dinner. Unfortunately the day I chose to make all this was ridiculously hot and we all sweltered with the oven on for a few hours (sorry to all of you in the Northern Hemisphere who are dealing with endless snow - here it is a seemingly endless summer!).


Garlic Smashed Potatoes
Recipe from Confessions of a Cooking Diva

1-2 potatoes per person
2 tbs olive oil
2-3 ts minced garlic
salt and pepper to taste

Boil the potatoes in lightly salted water until just tender, approximately 10-15 minutes. Remove from the water and cool for 15 minutes. While they are cooling, preheat the oven to 190 C/375 F degrees. Grease a baking dish and set aside.

Place the potatoes in the baking dish and using a fork or potato masher gently squash each potato. Mix together the oil and garlic, drizzle this mixture over the potatoes, sprinkle with salt and pepper and bake for around 20 minutes or until crisp and golden brown.

Serve warm or hot.

Thanks for a great recipe Julie! This has become our new favourite way to have potatoes :)

secret-recipe-club.blogspot.com

Friday, March 20, 2015

Sweet Potato Brownies


Sweet Potato Brownies © www.foodbabylife.com


The idea of hiding veggies isn't new but I must admit I am becoming more and more intrigued by just what you can get away with hiding! I have a very fussy 4 year old and we have struggled with expanding his range of foods. We've been through feeding therapy with a speech pathologist and occupational therapist which helped a little but his palate is still extremely limited and he is not at all open to trying new things. So while we still put veggies on his plate at dinner time the only time they actually pass his lips is if they are hidden in something else.

Chocolate is the ideal medium for hiding veggies not only because kids love it but it's taste and colour are great at disguising them. These chocolate and zucchini muffins have been a continued success but our new favourites are these Sweet Potato Brownies. There are 2 small sweet potatoes hidden here which along with the coconut oil, eggs, almond meal and raw cacao make them not only a really substantial snack but also a really nutrient dense one.

My boys all loved these. In the words of my 5 year old 'Mum please make these again and DON"T CHANGE A THING.' Hilarious!

These are richly chocolatey like all good brownies and even have a little crunch around the edges but the interior is very soft. I sliced these when they were still a bit warm and it was a bit messy as you can see. We kept the rest in the fridge and it was equally delicious cold but it sliced much more cleanly.

Sweet Potato Brownies
Adapted from this and this

1 medium sweet potato (3 cups grated)
2 ts vanilla extract
2 eggs, at room temperature
1/2 cup liquid coconut oil or olive oil
1/2 cup raw cacao
1/2 cup rice malt syrup
1/2 cup almond meal with 1 tbs coconut flour mixed in
1 ts baking powder
1 ts bicarbonate soda

Preheat oven to 180 degrees C. Grease and line an 8 inch square brownie pan and set aside.

Finely grate the sweet potato (and place in the food processor along with the vanilla, eggs and oil. Mix well. Add the dry ingredients and pulse until just combined.

Pour the mixture into the prepared pan and bake for approx 35 minutes or until  just set and firm to the touch in the middle. Allow to cool completely in the pan before slicing.

Store in the fridge. Makes 16 serves.

Thursday, March 12, 2015

My favourite chocolate granola

Chocolate Granola - low carb, high protein - fructose free and grain free variations - from www.mywholefoodfamily.com

With a big boy in grade 1 this year and another in kindy, I've realised just how important breakfast is to their mood and energy levels. I can pick the day they didn't eat properly by their behaviour at the end of the day! The more filling and protein packed their breakfast, the better the day goes (for everyone!).

My kindy boy Charlie loves a smoothie for breakfast most days and while the fruit and the flavour varies it always includes oats, chia seeds, coconut oil, something green and a big spoonful of NutraOrganics Thriving Protein (affiliate link).

Oscar on the other hand loves quinoa porridge or scrambled eggs most of the time but having a standby like some ready prepared granola is another great alternative for him.

I've posted some granola / toasted muesli recipes before but I just had to post this one because it is hands-down my favourite one yet! Sweet, nutty, chocolate-y and equally good for dessert as for breakfast. My husband has a sprinkle of this on his yoghurt at work most days. It is a great alternative to porridge and about a million times more nutritious and filling than any cereal out of a box.

As with all recipes like this you are limited only by your imagination. If you don't like something or just don't have any feel free to substitute for something else.

The bowl above was my dinner - a generous 1/2 cup of granola with homemade almond and coconut milk and a scattering of frozen raspberries. 

If you've never tried buckwheat before you should definitely give it a go! It's crunchy, nuttiness goes perfectly here. If you use honey or maple syrup instead of the rice malt syrup it will also be 100% grain free. The 1/2 cup of sweetener is a little on the high side for us but could be increased or cut back depending on your taste.

Chocolate Granola © www.foodbabylife.com

My Favourite Chocolate Granola
Recipe by me
Makes lots!

3 cups raw mixed nuts (I used ABC nuts - almonds, brazils and cashews)
3 cups coconut flakes
1/2 cup linseeds
1/2 cup raw buckwheat
1/4 cup chia seeds
1/4 cup sesame seeds
1/4 cup raw cacao
1/2 cup coconut oil
1/2 cup rice malt syrup (or honey or maple syrup)
2 ts cinnamon
1/2 ts Himalayan salt

Preheat oven to 140 degrees C. Line a large baking tray with foil and set aside.

Roughly chop the nuts by hand or in a food processor. Place the nuts in a very large bowl and add all remaining ingredients. Mix until well combined.

Bake for approximately 1 hour, checking and stirring every 15 minutes, or until the granola is as dark and crunchy as you prefer. Make sure you keep a close eye on it!

Allow to cool completely before storing in an airtight container for a few weeks to a month.

Thursday, March 5, 2015

Quinoa Salad with Sausage and Roast Pumpkin

Quinoa salad with sausage and roast pumpkin © www.mywholefoodfamily.com

I have been a little slow getting on board with quinoa. Actually that's not entirely true as I used to make Noah a quinoa and strawberry porridge which he adored!

But given how nutritious it is I have made a concerted effort to buy and cook some this week and have had great results.

Firstly for dinner I made the quinoa salad pictured above and it was insanely delicious. Seriously! I could eat a big bowlful of this every day of the week. I drew my inspiration from this Quirky Cooking recipe but just used the ingredients I had.

So no recipe as such for this but here is what I used:
4 cups cooked quinoa
4 sausages, cooked and sliced
1 punnet cherry tomatoes, halved
a handful of basil from the garden
1 wedge of pumpkin, diced and roasted with a little sesame oil
a dressing made from extra virgin olive oil, lemon juice, dijon mustard, salt and pepper

I am planning on making a batch of this (or a variation depending on what we have in the fridge) most weeks to have as my weekday lunches. The possibilities are endless with different combinations of meat, veg and herbs.

With some leftover cooked quinoa I made a very simple porridge which we al had this morning for breakfast. I prepared it in the thermomix but just a pot on the stove would work just as well. To 2 cups of cooked quinoa I added enough nut milk to cover, 2 tbs rice malt syrup and 1/2 ts cinnamon and let it simmer for 5 mins or so until the milk was about half absorbed. 2 of my 3 boys had this with me for breakfast today and loved it so this is a keeper as well.

There is still a little quinoa leftover and I am planning on using it in some bliss balls (recipe to come).

Expect to see lots more quinoa here as I am now officially on the bandwagon! :)

Monday, February 23, 2015

Peanut Butter Chocolate Chip Cookie Dough Balls (SRC)


Peanut Butter Chocolate Chip Cookie Dough Balls © www.foodbabylife.com
 
It's Secret Recipe Club time! Every month SRC members are assigned a blog in secret to peruse and choose a recipe, then we all post on the same day. This month I was assigned Life on Food by Emily.

Emily is a self-proclaimed foodie who has been blogging since 2009. She and her husband Jordan are expecting their first baby next month (how exciting!) and she had the most gorgeous baby shower with a Very Hungry Caterpillar theme. My kids all love that book and we read it constantly.

I was definitely spoilt for choice when it came to picking a recipe. I wanted something sweet and easy this month and a few things caught my eye straight away. I have bookmarked the Chocolate Chunk Zucchini Bread to try when we have some spare zucchinis and I was so tempted by the Brownies with Cookie Dough Frosting (OMG) but continuing on a cookie dough theme I ended up choosing Emily's Peanut Butter Chocolate Chip Cookie Dough Balls. I made a double batch because I knew they would be good and let me tell you, I was not disappointed. These were SO good!!!

We gobbled up 3 each as soon as they were made and I stashed the rest in the freezer just to make them last longer. They have been brilliant to grab as a quick snack for the boys before or after school and kindy and I can see many, many batches of these being made in the future!

I made a few small changes to the recipe to fit in with our dietary requirements, such as using natural peanut butter, rice malt syrup and dextrose instead of regular sugar and ground almonds instead of flour. I'm thinking next time I might add some vanilla protein powder and some chia seeds to boost the protein content and make them an even more substantial snack.

Peanut Butter Chocolate Chip Cookie Dough Balls
Adapted from Life on Food

6 tbs natural peanut butter
4 tbs butter, softened
1/4 rice malt syrup or honey
2 tbs dextrose (or granulated sugar)
2 ts vanilla
1/4 ts salt
1/2 cup ground almonds
1/2 cup quick oats
6 tbs chocolate chunks

In a mixer, beat together the butter, peanut butter, rice malt syrup and dextrose until fluffy. Add the vanilla and beat again. Add in the remaining ingredients except the chocolate and mix until combined. Fold through the chocolate chunks.

Roll into balls (makes approx 16) and freeze or refrigerate until needed. Try not to eat them all at once.

Thanks for an amazing recipe Emily!

secret-recipe-club.blogspot.com


Related Posts Plugin for WordPress, Blogger...