Showing posts with label Chocolate. Show all posts

Sunday, March 24, 2013

Baked Churros with Chili Chocolate Sauce

Baked Churros with Chili Chocolate Sauce © www.foodbabylife.com

Recently we have had a few casual dinners with a group of friends and to make things interesting, we chose  a country's theme for each one and everyone brought their favourite meal to share.

Our Italian dinner was a huge hit with homemade pizzas cooked on the BBQ, a fabulous antipasto platter and a tiramisu cake made by moi.

Our most recent dinner was Mexican theme and it was amazing - chicken burritos, tacos, chili con carne, vegetarian fajitas, nachos. YUM. The only Mexican dessert I could think of was churros but our past adventures in deep frying have not turned out well. But then what should pop up in my google reader but some baked churros from the fabulous Sprinkle Bakes! That, my friends, is destiny.

Heather's recipe is really detailed and has some great tips so I won't post it again here. You will find the recipe on Sprinkle Bakes here.
 
Baked churros piped ready to bake © www.foodbabylife.com

My notes:

- for fellow Aussies 1/3 cup butter is 80 grams

- Heather said if using butter they would spread more but I found they didn't spread at all. After the first tray I realised that and placed them much closer together, meaning fewer batches were required.

- not sure if we were meant to cool the mixture before piping but I almost burnt my hands trying to pipe these all out

- I doubled the recipe as it had to feed a crowd.

- I couldn't find the exact size piping tip Heather recommended anywhere (mine was 11mm rather than 14mm) so I got about 50 little churros from the double batch!

- I baked them in the afternoon then took them cold to the party. They reheated well in an oven (not a grill) and we rolled them in cinnamon sugar after that.

- I had to almost double the initial baking time to get any colour and crispiness on them

Overall these were fantastic! They tasted amazing, just as good as fried ones though perhaps with slightly less crunch. It made for a pretty special dessert for not that much effort and everyone loved them.

Chili Chocolate Sauce

250grams dark chocolate (70% cocoa), finely chopped
250ml pure cream
1 tbs brown sugar
1 ts chili powder
1 red chili to decorate

Place the cream and the chilli powder in a medium saucepan and heat until just before boiling. Add the sugar and chopped chocolate and stir gently until the chocolate has melted and the sauce is smooth. Pour into a serving dish and sprinkle with chopped fresh chilli.

Serve warm with the churros and maybe some vanilla ice cream.


Tuesday, March 19, 2013

BWJ - Mocha Chocolate Chips

Mocha Chocolate Chips © www.foodbabylife.com
They may not be the prettiest things but they were pretty tasty!

I made just a 1/4 batch of these Mocha Chocolate Chips because I don't need 4 dozen chocolate anythings hanging around here. I also left out the apricots as that just seemed a little odd.

Most of the batch was frozen and it was great I could eat them straight from the freezer as they didn't go rock hard.

So that's about it! Probably wouldn't make them again but they did disappear pretty quickly which is always a good sign.

Our host this week is Peggy of Galettista and you will find the recipe there.


Tuesday, February 19, 2013

BWJ - Boca Negra

Boca Negra © www.foodbabylife.com

I'd never heard of a Boca Negra cake before so was curious to see how these would turn out. Well, let me just say that a Boca Negra cake is the most intensely chocolatey cake I have ever made. Ever.

We don't do bourbon in this house so I subbed in some coffee instead and also went for a lightly sweetened whipped cream to serve. OMG. So rich, soooo delicious.

I'm very glad I did just 1/4 of the recipe, using my little heart shaped springform pan which only sees the light of day for Valentine's Day.

So my 1/4 recipe used 100g dark chocolate (I used Lindt 85% cocoa), 1/3 cup sugar, 1 tbs strong coffee, 60g butter, 2 eggs and 2 ts plain flour. It baked for around 22 minutes and was just right. At room temperature it was silky and luscious, out of the fridge later it was like fudge.

The kids each had a bite and hubby and I polished off the rest. YUM.

To get the recipe and make your own Boca Negra visit out our host Cathy of A Frederick Food Garden.


Friday, December 21, 2012

Cranberry, White Chocolate & Pistachio Cookies

Cranberry White Chocolate and Pistachio Cookies © food-baby.blogspot.com All rights reserved

These cookies just shout Christmas to me! They're red, white and green and packed with Christmassy flavours. I always make cookies to give as Christmas gifts because they are so transportable and always so well received.  Every year I say I should make more cookies and fewer chocolate-y things because of the heat but it never happens!

These are the sort of cookies with so many mix-ins you wonder how they will stay together. Then you make them and they're perfect, crunchy on the outside, chewy in the middle and packed with little surprises. Oh and they make the house smell amazing :)

Cranberry, White Chocolate and Pistachio Cookies
Recipe adapted from Brown Eyed Baker

1¼ cups plain flour
½ ts baking powder
½ ts baking soda
¼ ts salt
120g butter, at room temperature
½ cup light brown sugar
½ cup white sugar
1 large egg
1 ts vanilla extract
½ cup rolled oats
½ cup roasted salted pistachios, chopped
1 cup white chocolate chips
1 cup dried cranberries

Preheat oven to 190 / 170 degrees fan-forced. Line 2 trays with baking paper and set aside.

Whisk together the flour, salt, baking powder and baking soda in a medium bowl.

Using an electric mixer beat the butter and both sugars until light and fluffy. Add the egg and vanilla and beat until well combined. Carefully mix in the dry ingredients then using a spatuala, fold through the oats, pistachios, cranberries and white chocolate.

Roll the dough into balls and place onto prepared trays, allowing room for spreading. Flatten the top of each biscuit with your fingers then bake for approx 10 minutes or until slightly golden on top. Allow to cool on the trays for 5 minutes then transfer to a wire rack to cool to room temperature. Store in an airtight container.

Makes approx 30.

Wednesday, December 19, 2012

Tim Tam Balls

Tim Tam Balls © food-baby.blogspot.com All rights reserved

It seems I have been missing out because I hadn't even heard of these little beauties until last week!

Apparently they are the most popular recipe on the Stay At Home Mum blog and I can see why. I mean everyone loves tim tams and having them in ball form makes them even more appealing. But be warned, you won't be able to stop at one!

These are just one of the tasty little homemade morsels our family and friends will be receiving this year. I will also be making my famous Rum Balls, mini Christmas Cakes and Peanut Butter squares as well as a few other things which I will post soon.

This is half the original recipe which you will find here on Stay At Home Mum.

Tim Tam Balls

1 packet of Tim Tams, any flavour
125g cream cheese (1/2 a block) at room temperature
1 cup dessicated coconut OR hundreds & thousands

Place the tim tams into the food processor and blitz until they turn into crumbs. Add the cream cheese and pulse until the mixture forms a clump around the blade. Roll teaspoonfuls of mixture into balls and then roll in the coconut or hundreds & thousands (I did 1 batch of each). Makes approx 20. Chill until ready to serve.

Tuesday, November 20, 2012

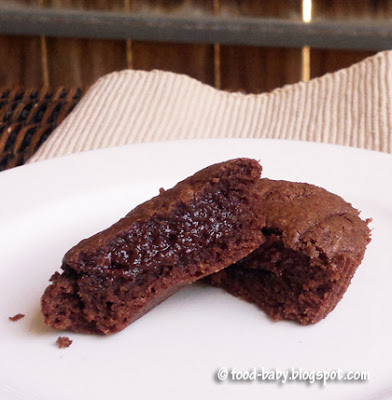
Baking with Julia - Best-Ever Brownies

Best-Ever Brownies © food-baby.blogspot.com
It's no secret I fell in love with brownies through baking with Tuesdays with Dorie. Before that I thought they were chocolatey but kind of blah. So I was really keen to see how a recipe called 'Best-Ever Brownies' would compare with what I had made previously!

Whether they were amazing or not we definitely didn't need a whole batch sitting around, especially so close to Christmas, so I made 1/4 of the recipe in a mini loaf tin. My altered recipe is below.

The taste test ...

While I wouldn't say it's the best ever, it was pretty good! I overcooked my little brownie but the very middle was perfect - fudgy and gooey and just divine with a dollop of double cream. The ends were a little drier but still in a good dense chocolate cake kind of way. My photo in no way does it justice but at 8pm under fluorescent light that's the best I'm going to get!

Best-Ever Mini Brownie

1/3 cup plain flour
pinch salt
60g unsalted butter
45g dark chocolate
1/2 cup sugar
1/2 ts vanilla extract
1 large egg   

Follow the method as per Baking with Julia p 331. Bake in a mini loaf pan at 180 degrees celsius for approx 16 minutes until firm around the edges and squoodgy in the middle. I gave mine 20 minutes and it was overdone so a few minutes less ie. 16 mins should be pretty close.

Our host this week is Monica of A Beautiful Mess so make sure you check out the original recipe!

Sunday, November 11, 2012

Christmas Baking with Lucky Nuts

Recently I received a lovely gift bag of nuts from Lucky courtesy of Product Talk by Nuffnang. Just look at that haul! As a baker it made me very, very happy especially in the lead-up to Christmas which is the time of year when I cook with nuts.

I grew up watching my mum use Lucky nuts in her Christmas baking and they are what I turn to for special occasion baking too. I didn't actually realise it but Lucky almonds are all grown in Australia and in fact Lucky is the leading cooking nut brand in Australia, so they are definitely doing something right!

In case you can't see well enough I received a bag each of blanched, slivered and flaked almonds, walnuts, pine nuts, almond and hazelnut meals and 2 new products which I was very excited about.

Firstly was a bag of Easy Chef Oven Roasted Almond Meal, which as the packet says it basically a cheesecake base in a bag. So of course I had to make a cheesecake!

Secondly was a bag of Easy Chef Almond Crumble which is a mix of almond meal, flaked and slivered almonds with oats and again as the packet says, is a crumble topping in a bag. Perfect.

The walnuts didn't make it into my baking but I enjoyed them as a tasty mid-morning snack during the week. The pine nuts are set aside for pesto and the almond meal will be used in a gluten free almond shortbread recipe I am working on for Christmas. The blanched almonds will of course be decorating the tops of my Christmas cakes which aren't ready to bake yet.

I ended up making 4 desserts, perfect for Christmas for anytime really - some moist Choc Hazelnut Cakes, a Panforte Ice Cream, Almond Cheesecake and Blueberry Crumble Pie.I'm trying to cut back on sugar so some of my recipes use Natvia.

I hope you enjoy these recipes and if you would like to try any Lucky products for yourself, the full range is available in Coles with a smaller range available in Woolies and independent grocery stores.

Almond Cheesecake


Adapted from Lucky

For the crust
125g unsalted butter, melted
250g packet Lucky Oven Roasted Almond Meal
1 tbs Natvia for Baking (or 2tbs brown sugar)

For the filling
500g cream cheese
3 eggs
3/4 cup Natvia for Baking (or 3/4 cup caster sugar)
2 ts vanilla extract
1/2 cup pure cream
1/2 cup Lucky Flaked Almonds, toasted*

Lightly grease and line the base of a 23cm springform pan.

Mix together the Lucky Oven Roasted Almond Meal with the melted butter and Natvia. Spoon into the prepared tin and press over the base and up the sides. Place in the freezer to chill for 30 minutes.

Preheat oven to 180 degrees celsius (160 degrees fan-forced).

In a food processor or electric mixer, beat together the cream cheese and Natvia until smooth. Add the eggs, vanilla and cream and beat for 3 minutes. Pour the mixture into the prepared base and bake for 35-40 minutes or until cheesecake is lightly golden and just set in the middle.

Remove and allow to cool to room temperature before chilling in the fridge for at least 2 hours. Decorate with toasted almonds. Serves 8-10.

Panforte Ice Cream

Panforte Ice Cream © food-baby.blogspot.com All rights reserved
Adapted from The Perfect Scoop by David Lebovitz, p68

1 cup full cream milk
1/3 cup Natvia for Baking (or white sugar)
1/2 ts cinnamon
1/4 ts ground cloves
1/4 ts ground nutmeg
Zest of 1 orange
2 cups pure cream
4 large egg yolks
1 x 110g pack Lucky Slivered Almonds, toasted*

Warm the milk, Natvia/sugar, spices and orange zest in a medium saucepan. Remove the pan from the heat, cover and leave to steep for 30 minutes. Add the cream and rewarm the mixture.

In another large bowl whisk the egg yolks.

Pour the warm milk/cream over the yolks, whisking constantly, then pour the mixture back into the saucepan. Cook the custard over medium heat, stirring with a heatproof spatula, until it thickens and coats the spatula. Pour the custard through the strainer into the cream. Mix thoroughly.

Place the bowl into an ice bath and stir the custard until it is cool.

Chill the mixture thoroughly in the fridge before churning in an ice cream maker according to the manufacturer's instructions. Add the toasted almonds in the last few minutes of churning.

* To toast almonds place them on a large ungreased oven tray and bake at 170 degrees celsius for 10-12 minutes, stirring several times. Leave to cool    

Makes approx 1 litre.


Moist Choc Hazelnut Cakes

Moist Choc Hazelnut Cakes © food-baby.blogspot.com All rights reserved
Adapted from Curtis Stone

90g Lucky hazelnut meal
125g dark chocolate (minimum 70% cocoa)
125g butter
pinch of salt
2 whole eggs
2 egg yolks
65g caster sugar
Plain flour for dusting (can use gluten free flour)
Butter for greasing
Raspberries for serve

Place a baking tray in the oven and preheat to 180 degrees celsius fan forced. Grease the inside of 6 metal dariole molds with butter and dust with flour. Set aside.

Melt the chocolate in a small bowl over a pan of simmering water, making sure the water does not touch the bottom of the bowl. Stir in the butter and remove from the heat.

Place the whole eggs, egg yolks and sugar in a large bowl and beat with an electric mixer for 5-7 minutes or until light, pale and foamy. Fold the melted chocolate into the eggs and then the hazelnut meal, mixing gently until well combined.

Spoon evenly into the prepared molds, place on the baking tray and bake for 8 minutes. Remove from oven and allow to rest for 1-2 minutes, before turning out onto serving plates. Dust each one with icing sugar and serve with fresh raspberries. Makes 6.


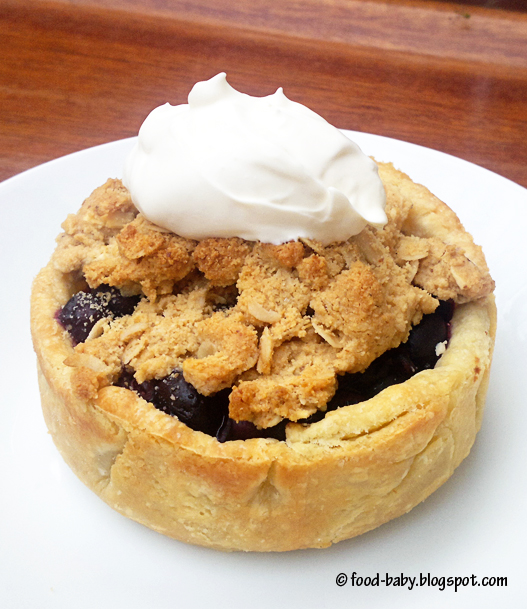
Blueberry Crumble Pie

Blueberry Crumble Pie © food-baby.blogspot.com All rights reserved
Adapted from Dorie Greenspan's Double Crusted Blueberry Pie in Baking from My Home to Yours, p361

Crust
1 1/2 cups all purpose flour
1 tbs sugar
280g salted butter, very cold and cut into tablespoon size pieces
68g coconut oil, cold
About 1/2 cup ice water

Put the flour and sugar in a food processor and pulse just to combine the ingredients. Add the butter and coconut oil and pulse only until the butter and coconut oil are cut into the flour. Gradually add the water, a few tablespoons at a time, until the dough is moist and clumpy. You want to see some pieces of butter. Check to see if the dough will stick together if pinched, and keep pulsing until it does.

Tip the dough out onto a piece of cling wrap, bring it together into a disc and refrigerate for at least 1 hour before rolling out.

Roll out the dough on a floured work surface or in between 2 pieces of baking paper. Lay the dough out into a greased 9 inch pie pan and trim the edges. Place in the fridge for 30 minutes. Preheat the oven to 180 degrees celsius. Blind bake the pastry shell for 20 minutes, then remove the lining and bake for a further 5 minutes.

Filling
1 x 500g pack frozen blueberries
2 tbs sugar
Juice and zest of 1 lemon
1 tbs cornflour mixed with 2 tbs water

Place the blueberries, sugar and lemon zest and juice in a saucepan and cook over medium heat until the blueberries have thawed. Add the cornflour and water and cook for a further few minutes until the liquid has thickened and is clear and syrupy. Remove from the heat and cool for 10 minutes.

Crumble
1 pack Lucky Almond Crumble
80g unsalted butter
2 tbs raw sugar
1/2 ts ground cinnamon

In a medium bowl mix together the Almond Crumble, sugar and cinnamon. Rub in the butter using your fingertips until well combined..

To assemble
Spoon the filling into the prepared pie shell. Sprinkle over the crumble topping evenly over the filling leaving a small gap around the edges to show the gorgeous colour of the blueberries.

Bake in a preheated 180 degree oven (160 degrees fan forced) for approx 20 minutes until the topping is golden brown and the filling is bubbling.

Remove from the oven and allow to cool for 10 minutes before serving with a big dollop of cream.

This recipe makes 1 large 9 inch pie or 4 smaller pies.

Note - this is not a sponsored post however I did receive product for consideration. For more information see Product Talk by Nuffnang.

Monday, October 15, 2012

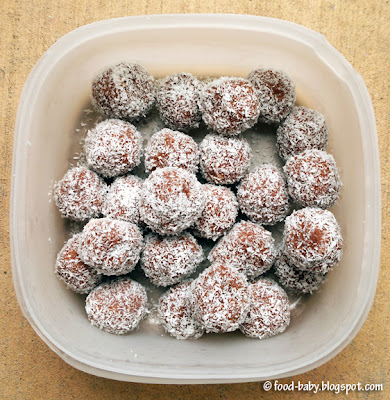
Cocoa, Cranberry and Almond Balls

Cocoa, Cranberry and Almond Balls © food-baby.blogspot.com All rights reserved
 
After completing my 3 day juice cleanse I was on the lookout for some snacks that were in line with a detox, that is, no wheat, dairy or refined sugar. What I found online was a veritable treasure trove of vegan treats. Call them truffles, bliss bombs or whatever you like, they taste amazing and are a brilliant portable snack.

This is my version simply based on what I happened to have in the pantry, but the possibilities are endless!

Cocoa, Cranberry and Almond Balls
Makes approx 20

2 cups raw almonds
1/2 cup dried cranberries
1 tbs cocoa
1 tbs rice malt syrup
1/2 cup dessicated coconut for rolling (optional)

Place the almonds in the bowl of your food processor and blitz until they form chunky crumbs. Add the cranberries, cocoa and rice malt syrup and process until you get a sticky and cohesive mix. You can made the mixture as smooth as you like but I prefer to see the ingredients in the finished product so didn't over-process them. Roll into balls, using coconut if you wish. Stored in an airtight container in the fridge they will keep for up to 2 weeks.

The taste test ...

Absolutely delicious! I'm already planning on making these, as well as a few other variations, at Christmas time. They make a great alternative to sugar and saturated fat filled chocolate truffles. Both the boys loved them too which makes for a happy mummy!

This post is linked to Veggie Mama's Meatless Mondays:

Sunday, October 7, 2012

Easy Nutella Brownie Bites

Nutella Brownie Bites © food-baby.blogspot.com All rights reserved
My husband (aka the chocolate fiend) loves nutella and will quite often be seen eating it out of the jar by the thick, fudgy spoonful. Having just bought a few jars on special I was determined to actually make something with it this time. And then I stumbled across these incredibly decadent but oh so easy brownie bites.

They were originally called 3 ingredient brownies with just nutella, flour and eggs, but I can't help tweaking so I added some salt and also vanilla extract to round out the flavour.

The verdict? 10/10. These would be up there with some of the best brownies I've made and for a lot less effort. I managed to freeze a few and after a quick zap in the microwave they were back to brownie perfection. They would be sensational smooshed up through vanilla ice cream as well. Yum!

Nutella Brownie Bites
Makes 12. Adapted from various sources including Laura's Sweet Spot

1 cup Nutella
1/2 heaped cup plain flour
2 eggs
1 ts vanilla extract
Pinch of salt

Preheat oven to 180 degrees celsius (160 degrees fan-forced). Line a muffin tray with paper liners and set aside.

In a large bowl mix together the nutella, eggs and vanilla until smooth. Sprinkle over the flour and salt and mix until just combined. Spoon evenly into the prepared tray and bake for 12 minutes.

Allow to cool to room temperature before removing from the tray and the paper cases. Just try to stop at one!
Oscar has definitely inherited his father's sweet tooth and couldn't wait for a taste.

Monday, September 3, 2012

Best Ever Brownies with Aztec "Hot" Chocolate Ice Cream

Aztec Hot Chocolate Ice Cream with Best Ever Brownies © food-baby.blogspot.com All rights reserved
It was Father's Day here in Australia yesterday, so belated good wishes for all the amazing dads out there!

We didn't really have the best weekend, with 3 out of 4 of us coming down with a bad cold and cough, and poor Charlie had conjunctivitis as well. Needless to say there were no fun father's day activities to be had, unless you count hubby and Oscar going to the library and to Coles to pick up a few essentials. Oh well, there's always next year!

In spite of feeling like crap I still cooked up a storm, doing toasted ham and cheese croissants for breakfast, this creamy prawn curry with naan for dinner and of course a yummy dessert.

You really can't go wrong with chocolate for my husband. He is the ultimate chocoholic! So what better for a decadent Father's Day dessert than these amazing fudgy brownies topped with a spicy chocolate ice cream?

I spotted this ice cream recipe in The Perfect Scoop on my first read flick through. It is a Philadelphia style (no eggs) chocolate ice cream with cinnamon, chili and brandy to give it some kick. I also added the zest of an orange to ramp up the flavour.

The taste test ...

Sensational! Incredibly smooth and luscious but with a bit of a fiery kick at the same time. Hubby said it tasted like Christmas. Adding alcohol to ice cream stops it from setting too hard and I definitely think that's what made the texture so luscious. Served on top of a fudgy chocolate brownie this was a chocoholic's dream. Success.

If there are any chocoholics in your family then you should definitely make these!

Aztec "Hot" Chocolate Ice Cream
Adapted from The Perfect Scoop by David Lebovitz p 29

560ml pure cream
50g cocoa powder
150g sugar
85g dark chocolate, chopped
310ml full cream milk
1 ts vanilla extract
Pinch of salt
1 1/4 ts cinnamon
1/2 ts hot chilli powder
Finely grated zest of 1 orange
2 tbs brandy

In a large saucepan over medium heat, whisk together the cream, sugar, orange zest and cocoa until it comes to a full rolling boil. Remove from the heat and add the chocolate, whisking until it is completely incorporated. Stir in the milk, vanilla, cinnamon, salt, chilli and brandy. Pour the mix into a blender or food processor and blitz for 30 seconds or until completely smooth.

Chill the mixture thoroughly in the fridge and then churn in your ice cream maker according to the manufacturer's instructions.

Makes approx 1 litre.


Rick Katz's Brownies for Julia

Adapted from Dorie Greenspan's Baking from My Home to Yours, p 91

1 cup plain flour
1 tsp salt
250g butter
120g dark chocolate, coarsely chopped
60g milk chocolate, coarsely chopped
1 cup brown sugar
1 cup white sugar
1/2 cup toasted walnuts, roughly chopped
1 tsp pure vanilla extract
4 large eggs

Preheat the oven to 180 degrees celsius (160 degrees fan-forced). Line the base of a 9 inch square baking pan with baking paper and place on a baking sheet.

Whisk together the flour and salt and set aside.

Place a heat proof bowl over a saucepan of gently simmering water, put the butter and chocolate in. Stir frequently until the ingredients are just melted-you don’t want them to get so hot that the butter separates. Add the brown sugar and whisk gently just to incorporate it, then remove the bowl from the pan of water. Stir in the vanilla and transfer to a large bowl.

Put the remaining cup of sugar into the bowl of a stand mixer or a medium bowl and whisk in the eggs. Switch to a rubber spatula and little by little add half of the sugar-egg mixture to the warm chocolate, stirring very gently without stopping-you don’t want the heat of the chocolate to cook the eggs.

With the whisk attachment or with a hand mixer beat the remaining sugar and eggs on medium-high for about 3 minutes, or until they double in volume. Using a spatula and a light touch, fold the whipped eggs into the chocolate, stopping just short of blending them in completely.

Sprinkle the dry ingredients and the nuts over the batter and delicately fold them in, working only until they disappear. Scrape the batter into the pan and smooth the top with the spatula.

Bake for 25-28 minutes, or until the top looks dry. Use a thin knife to check for doneness - the brownies should be only just set and quite gooey. (Mine took about 40 minutes to reach this point so just keep an eye on them and keep checking regularly).

Transfer the pan to a rack and cool to room temperature. Cut into pieces while still in the pan. Makes approx 16.

Wednesday, August 22, 2012

Chocolate and Zucchini Muffins

Wholefood Chocolate and Zucchini Muffins - free from dairy and refined sugar - from www.mywholefoodfamily.com

I don't really need much of an excuse to bake. And when recipes like this come along you don't need one! Not only will you probably have all the ingredients already, they're healthy! Well healthier anyway.

The recipe seems pretty flexible so you could use whatever type of milk or oil suits you. Some chocolate chips or grated orange zest would be lovely additions!

So how did they taste? These muffins were moist, really chocolatey and slightly fudgy tasting. There was absolutely no detectable zucchini flavour and both the boys loved them and kept asking for 'more cake please.' This is definitely a keeper!

These would be a perfect treat for the lunchbox, just not everyday because they are still pretty sweet.

Chocolate and Zucchini Muffins
Recipe slightly adapted from Vegie Smugglers

1 1/4 cups self-raising flour
3/4 cup traditional rolled oats
1/4 cup raw cacao powder
1/2 cup coconut sugar
1/2 tsp cinnamon
1 egg
3/4 cup non-dairy milk
3/4 cup coconut or macadamia oil
1 tsp vanilla essence
1 small zucchini, finely grated

Preheat the oven to 180 degrees Celsius (160 degrees fan-forced). Grease a 12 cup muffin tray or line with paper liners.

In a large bowl mix together the flour, oats, cocoa, cinnamon and sugar. In a separate bowl mix together the milk, egg, oil, vanilla and grated zucchini.

Pour the liquid ingredients into the dry ones and mix gently until well combined. Divide the mixture evenly between your muffin holes and bake for 25 minutes or so, until they spring back when touched and a skewer comes out clean. Make sure you check a few minutes earlier, mine were one at 22 minutes. Leave to cool in the tin for 5 minutes before turning out onto a wire rack.

Makes 12.

If you haven't been there before make sure you check out Vegie Smugglers for more great kid-friendly meal ideas!

Thursday, August 9, 2012

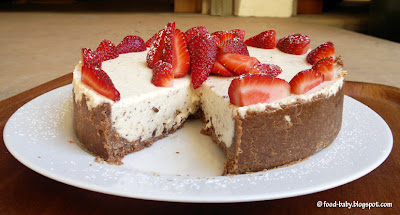
No-Bake Chocolate Chip Cheesecake

No-Bake Chocolate Chip Cheesecake © food-baby.blogspot.com All rights reserved

I've made a lot of cheesecakes over the years like these here, here and here. But I can't even remember the last time I made a no-bake one! So in honour of my dad coming to dinner I decided to make this no-bake Chocolate Chip Cheesecake.


No-Bake Chocolate Chip Cheesecake © food-baby.blogspot.com All rights reserved

The taste test ...

Wow, seriously good! The filling is smooth and light and the natural yoghurt gives it a lovely tangy creaminess. I actually chopped the chocolate rather than grated it so I had a few bigger chunks of chocolate that sank to the bottom. Not that there's anything wrong with that! Served with fresh strawberries this was the perfect make-ahead dessert and a great alternative when you don't have time for a baked cheesecake. Two thumbs up!!!

No-Bake Chocolate Chip Cheesecake
Recipe by me

250g chocolate chip biscuits
100g melted butter
250g cream cheese, at room temperature
1 x 400g tin condensed milk
300ml natural yoghurt
1 ts vanilla extract
100g dark chocolate, grated
3 ts gelatine
1/4 cup hot water

Line the base of an 8 inch springform pan with baking paper and set aside. Using a food processor, crush the biscuits into a fine crumb. Add the melted butter and blitz until well combined. Pour the crumbs into the prepare tin and smooth over the base and about halfway up the sides. Place in the fridge to set.

Sprinkle the gelatine over the hot water and set aside for a few minutes then stir to make sure it is completely disolved.

Wipe out the food processor bowl then add the cream cheese and whiz until smooth. Add the condensed milk, yoghurt and vanilla and mix well. Add the cooled gelatine mixture and whiz for 1 minute until thoroughly combined. Tip in the grated chocolate and blitz to mix through.

Pour over the prepared base then refrigerate until set, a few hours at least or overnight. Serve with sliced strawberries and a dusting of icing sugar. Serves 8-10.

Sunday, June 10, 2012

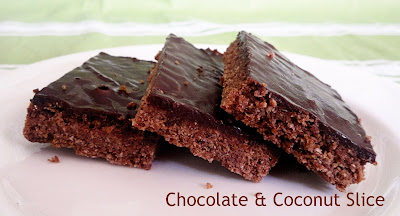
Sunday Baking - Chocolate and Coconut Slice

Chocolate and Coconut Slice © Susan Lockhart King http://food-baby.blogspot.com.au

Another childhood favourite this week! This slice brings back memories of school fairs, fancy morning teas and Grandma's house. With a crunchy chocolate base covered with smooth chocolate icing, it will disappear pretty quickly. This is such an easy and yummy treat to make. In fact, you will probably have all the ingredients in the pantry right now. So get baking!

Chocolate and Coconut Slice
Recipe slightly adapted from Taste.com.au

3 weetbix or similar
85g dessicated coconut
100g raw sugar
150g self-raising flour
150g melted butter
2 tbs cocoa
1 ts vanilla extract
1 cup icing sugar
1 tbs cocoa extra
20g soft butter
1-2 tbs hot water

Preheat the oven to 180 /160 fan-forced degrees celsius. Lightly grease a slice pan (20 x 30cm approx) and line with baking paper. 

Crush the weetbix into a large mixing bowl. Add the coconut, sugar, flour and cocoa and stir well. Pour the melted butter over the dry ingredients. Add the vanilla and mix well to combine. Tip the mixture into the pan and smooth out to make level, then press down with the back of a spoon (if you don't press it down at this stage it may be too crumbly when cooked). Bake for 15 minutes. Remove from the oven and ice while hot. 

To make the icing, sift the icing sugar and cocoa into a bowl. Add the softened butter and start to mix through. Add 1 tablespoon of hot water and stir well to combine. If it is too thick add a little extra water. Pour over the hot slice and smooth into the corners. Allow to cool completely before slicing in the pan. 

Makes 24 pieces.

Sunday, April 1, 2012

Sunday Baking - Milo Muffins

In a few years I'll be baking treats for my kids' lunchboxes, but for now I am baking for the big kid in my life aka the hubby! We are trying to cut back our spending and making sure he takes lunch with him every day is a big part of that.

We have been planning our dinners pretty carefully for a while so that there are always leftover meals for his lunch, and now I am baking every Sunday so there is something sweet to have with his coffee as well. I'm such a good wife! Ha!

I stumbled across these Milo Muffins on the Essential Kids website but they are actually from one of my favourite bloggers, Melissa at Frills in the Hills.

Milo Muffins
Recipe very slightly adapted from Essential Kids
Makes 12 small or 6 jumbo muffins

1 1/2 cups self raising flour
2/3 cup milo
1 egg
2/3 cup milk
2/3 cup brown sugar
1/2 tsp baking powder
60g butter, melted
Chocolate sprinkles to decorate

Preheat oven to 190 degrees celsius. Place all ingredients in a large bowl and mix until smooth. Pour into muffin papers until 3/4 full. Cover each with chocolate sprinkles and bake for approx 20 minutes.

Cool in tin for 5 minutes then turn out onto a wire rack to cool completely. Suitable to freeze.

I made 6 jumbo muffins which meant 1 for me and 5 for hubby's lunches. He did forget to take one one day and I got a text with sad face that morning!

Tuesday, February 21, 2012

TWD BWJ - Chocolate Truffle Tartlets


Wow, our second recipe for Baking with Julia and it couldn't be more indulgent! This week we have Chocolate Truffle Tartlets which contain chocolate in almost every form.

First, a chocolate pastry made with cocoa. Next comes a decadent truffle filling made with melted dark chocolate, eggs and sugar. Then it's finished off with a smattering of milk and white chocolate pieces. Can anyone say yum?!

Surprisingly these tartlets aren't over the top in sweetness. A big scoop of creamy vanilla icecream was perfect on top. Still wouldn't want to eat too much though.

I made a full batch of pastry but only used about 2/3 of it to make my 4 tartlets (with a half batch of filling). I rolled the remainder of the pastry out and baked some little biscuits with it. Hubby was a big fan of the tartlets and my 2 littlest taste testers couldn't get enough of the pastry!

Our hosts this week are Steph, Spike, Jaime and Jessica. Thanks for a great pick! You can find the recipe on their blogs under today's date.

Tuesday, December 13, 2011

TWD - Unbelievably Good Chocolate Blueberry Ice Cream


This week our fearless leader Laurie of Slush chose Dorie's Unbelievably Good Chocolate Blueberry Ice Cream. Now I love chocolate ice cream and blueberries but I have to admit I wasn't sure about this combination, especially when it involved mixing ice cream with jam!

As it turned out though, after forgetting to buy any blueberry jam (no really! I did forget!) I subbed in frozen blueberries and ended up with the most luscious chocolate ice cream punctuated by sharp icy berries. Delicious!

It took hubby a little while to hunt down our ice cream maker. We moved in to this house over a year ago and it never really got unpacked. This has reminded me just how good homemade ice cream can be and I foresee a whole lot more being made this summer!

You will find the recipe for this amazing ice cream on Laurie's blog under today's date.

Friday, November 25, 2011

Charlie turns 1


Hard to believe but on 8th November my baby Charlie turned 1! Which means Oscar is now 2 and a half. Which makes me ... well never mind!

Charlie has brought us so much happiness over the past 12 months. All those wonderful firsts - smiles, laughs, rolling over, sitting, standing and just in the last week, those amazing first steps. He's such a different little personality from his brother too, much more independant and a real daddy's boy.

Hubs and I are both only-children so we had no idea what to expect with 2 little ones. While we are certainly busier now and a for a while got a lot less sleep, having 2 kids is awesome. Can't wait to see what the next year brings for both my little men.


Here are a few photos of the birthday boy and his cakes (yep, cakes plural)!

A basic chocolate cake with chocolate buttercream icing and decorated with white chocolate buttons. I made this for his actual birthday.

First ever taste of cake. Yum! Just watch the sugar coma setting in ...

Finger licking good!

The kite cake from p11 of the Women's Weekly Kids' Birthday Cakes cookbook. A basic buttercake with buttercream icing tinted in red, leaf green, violet and lemon yellow. A little rough around the edges but with 2 birthday cakes a year from now on, there's plenty of chance to practice!

At his birthday party in the park.
'whaddya mean no more cake till next year?!'

Monday, November 21, 2011

I'm still here! ... and gluten free chocolate chip cookies

Wow, so it's been a whole 5 months since my last post. I have to say 2011 has completely gotten away from me and now it's nearly Christmas! After a few years of regular baking and blogging I guess I just needed a break. I know my waistline and bank account did too! But with TWD soon coming to an end it's definitely time I checked back into the bloggy world.

We've had a few health hiccups this year and a forray into food intolerances. The boys and I have all seen an allergist and had skin prick tests done. The boys were all clear (which is good and not so good since I am convinced that Oscar has a few food sensitivies that maybe will never show up on a test) and I am only allergic to dust, pollen and cats.

Regardless I am baking with a few more alternative ingredients and trying out some gluten-free and lactose-free products. I made these chocolate chip cookies a few weeks ago and they were absolutely to die for! Hubby had no idea they were gluten free until I told him and honestly they disappeared so fast I had to grab a photo of the lowly last one. Enjoy!


Gluten Free Chocolate Chip Cookies
Adapted from a recipe on Nellbe's Gluten Free Kitchen Table

115g melted butter, cooled
1 egg
1 ts vanilla extract
1 1/2 cups gluten free flour
1/2 cup brown sugar
1 cup chocolate chips

Preheat over to 180 degrees C. Line 2 baking trays with baking paper.

Whisk together melted butter with egg and vanilla extract until combined. Combine gluten free flour, sugar and choc bits in a large mixing bowl. Add butter mixture and mix well. Press mixture, 1 tbsp at a time, into balls. Place on tray and allow room for spreading. Press each cookie down slightly and cook 12-15 mins until golden. Cool on trays for 5 minutes before turning out onto a wire rack to cool completely.

These were fabulous warm out of the oven. Once cooled they settled into crispy-around-the-edges-but-still-chewy-in-the-middle deliciousness.

Next post - Charlie turns 1!

Tuesday, February 15, 2011

Tuesdays with Dorie: Chocolate Oatmeal Drops

This week Caroline and Claire of Bake With Us chose Dorie's Chocolate Oatmeal Drops. I really love this sort of cookie. There's no creaming butter, you don't have to wait for the dough to chill and you don't have to roll them out. Just melt, mix, drop, bake and eat!

I made just 1/4 of the recipe and got 10 large cookies. They disappeared in record time so I will definitely have to make another batch sometime soon. Next time I will leave a little more space between them on the tray though, these spread like crazy.

The taste test ...

I don't think I've ever really had oats in a chocolate cookie before but it was delicious. I upped the wholegrain aspect by using wholemeal flour which made me feel a bit better about scoffing down 3 of them for lunch! These were really tasty everyday cookies and I will be making them again.

Make sure you check out Bake With Us for the recipe as well as the other TWD bakers here.

Tuesday, January 25, 2011

Tuesdays with Dorie: Nutty, Chocolatey, Swirly Sour Cream Bundt Cake

This week Jennifer of Cooking for Comfort chose a recipe with possibly the longest name I've ever come across! The Nutty, Chocolatey, Swirly Sour Cream Bundt Cake. To tell the truth I was debating whether to make this or not. My thighs really don't need a chocolatey, sour cream anything at the moment. But I know N's lab mates are always up for cake so I figured I could just give it away. Unfortunately the universe/my oven didn't cooperate.

Despite the oven always cooking hotter and faster than I expect, this time... it didn't. My beautiful bundt cake with the crispy golden crust was massively underbaked. As it was cut each slice collapsed in on itself leaving a gooey, doughy centre. As you expect this made for a very sorry looking photo. See above.

But still, it was delicious! Chocolate, orange zest, cinnamon, walnuts ... it was a marriage made in heaven. It even came out the pan perfectly, something I know others were struggling with. (I used a silicone pan greased with olive oil spray in case you were wondering).

We ended up just picking at the cooked parts and throwing the rest away. Such a shame. But I'm really not sure what I could have done differently. It baked for the full 65 minutes, the top was crisp and golden, it was pulling away from the sides and a skewer came out clean. Oh well.

Thanks to Jennifer for a great pick anyway! It was really tasty and I love making bundts. Make sure you visit the other TWDers for better results and Jennifer's blog for the recipe.
Related Posts Plugin for WordPress, Blogger...