Friday, July 15, 2016

Wholefood Banana Custard Slice (Gluten and Dairy Free)


Baking desserts has always been one of my favourite things - not only because I get to eat what I make, but also because bringing out a special dessert to the table always lights people up. I love it when people love my food!

Not too many years ago I was baking regularly and going through a staggering amount of sugar. Rather than beat myself up about that I choose to see that just by making it myself I was avoiding all the artificial additives you find in processed versions of desserts.

After quitting sugar and when food intolerances became an issue for the boys and me, I was worried  I wouldn't be able to bake anymore, or at least not anything that other people would enjoy. While I've had quite a few flops I am now at a point where I can quite easily convert a recipe to be free of wheat or gluten, dairy and refined sugar without any drama.

And the results can be spectacular!

You know how you always have a soft spot for the sweets from your childhood? For me it's custard - think vanilla slice, custard tart or just plain custard with sliced bananas. So with that in mind I decided to create my own version - something that would be free of gluten, dairy and refined sugar, something that would be sweet and luscious and feel a bit special.

I had the opportunity to bake it when we had family over for morning tea during the school holidays and I had some time to play in the kitchen. I find a slice is always a crowd-pleaser and it's certainly easy to do a big tray of something and slice it up to feed everyone.


We all LOVED this slice. Perfect for morning or afternoon tea, but special enough for dessert.


Banana custard slice - gluten, dairy and refined sugar free - www.mywholefoodfamily.com

Wholefood Banana Custard Slice (Gluten and Dairy Free)

Base:

1 cup buckwheat flour
1 cup desiccated coconut
1/2 cup almond meal
2 tbs coconut sugar
150g coconut oil

Custard:

400ml coconut cream
300ml rice milk
4 egg yolks
2 tbs arrowroot flour
125g rice malt syrup
1 vanilla bean, split and scraped (save the bean for something else)
2 tbs gelatine (I use Great Lakes - the red one)

Topping:

3 bananas, thinly sliced
1/2 lemon, juiced
fresh nutmeg

Preheat the oven to 180 degrees Celsius. Grease and line a 20 x 30 cm slice tray with baking paper and set aside.

To make the base, mix all ingredients together (TMX - 6 secs / SP 4), then tip into the prepared tin and press in firmly with your hands or the back of a large spoon.

Bake for 15-20 minutes - when done it will be  evenly golden brown and still a little soft, it will firm up as it cools.

Remove from the oven and place the tin on a wire rack to cool completely.

While the base is cooking, start to prepare the custard.

If you're using the Thermomix, place all custard ingredients into the bowl and cook for 9 minutes / 90 degrees / SP 4.

No thermomix? Place the coconut cream, milk and vanilla into a medium pan over medium heat until it starts to steam. Meanwhile, use a whisk to beat together the egg yolks, arrowroot and syrup until smooth. When the milk is steaming pour it over the egg mixture and whisk together. Place a few tablespoons of the mixture into a small bowl, sprinkle over the gelatine and stir to dissolve. Pour all the custard mixture back into the pan, add the gelatine mixture and cook over low heat until it starts to thicken, stirring constantly with a large spoon or spatula. This could take 20 minutes so be patient!

Leave the custard to cool for 10 minutes before pouring over the cooked base, then place in the fridge to chill until set (at least 4-6 hours or overnight).

Just before serving, slice the bananas into thin rounds and place in a large bowl. Sprinkle over the lemon juice and toss gently to combine, making sure all the banana gets the juice. The lemon stops the banana going brown but also adds a lovely flavour.

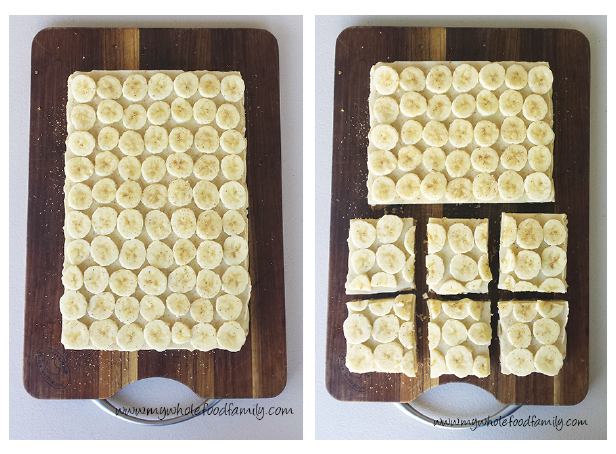
Using the baking paper on each side as a handle, carefully lift the slice out of the tin and place onto a serving board. Gently slide the paper off and discard.

Layer on the banana pieces and dust the top generously with nutmeg.

Cut into 12-16 pieces and enjoy!

What was your favourite childhood sweet treat?

Thursday, July 7, 2016

Chocolate Beetroot Cake

Wheat-free, dairy-free Chocolate Beetroot Cake - from www.mywholefoodfamily.com

We're coming to the end of 2 weeks school holidays here and while I've been baking up a storm I've taken a bit of a break from blogging. I do have a slew of awesome recipes lined up for the next few weeks though! 

Having all 3 of my boys for 2 weeks has been wonderful and they've been very willing guinea pigs for my baking experiments. Some hits, some misses ... but they've devoured the lot!

This recipe was an unexpected hit with my boys - they LOVED it! I had a couple of beetroots leftover at the end of the week and rather than make juice or a beetroot dip as I normally would I decided to make something sweet.

As you know I love boosting the nutrition of my baked goods by using spelt instead of wheat, adding nuts and seeds and of course, adding vegetables. Carrot, pumpkin, sweet potato and zucchini all work brilliantly. I wondered if the earthy flavour of the beetroot would be too much for the kids but I needn't have worried, they just saw it as a chocolate cake and each had seconds, and then thirds!

The boys had theirs with butter and then the next day I had a piece toasted and topped with my homemade roasted strawberry chia jam. SO delicious.


You can increase the chocolate flavour by replacing 1/4 cup of the white spelt flour with 1/4 cup raw cacao powder.

Wheat-free, Dairy-free Chocolate Beetroot Cake

120g coconut oil
80g dark chocolate (Green and Black's 70%)
2 beetroots, finely grated (mine was 286g peeled)
2/3 cup coconut sugar
1 cup white spelt flour
1/2 cup wholemeal spelt flour
3 ts baking powder
pinch salt
3 eggs, lightly beaten

Preheat the oven to 170 degrees Celsius.

Grease and line a loaf pan with baking paper and set aside.

In a small pan, melt the coconut oil and chocolate together over low heat, stirring until it is smooth. Remove from the heat and allow to cool for a few minutes.

Place the coconut sugar, flours, baking powder and salt in a large bowl and stir with a whisk until well mixed. 

Pour in the cooled chocolate mixture, grated beetroot and eggs, and fold together with a spatula until just combined.

Thermomix - roughly chop the beetroot then grate for 4-5 seconds / SP 6. Tip out the beetroot into a small bowl and scrape down the sides well. Add the chocolate and chop for a few seconds / SP 6-7. Add the coconut oil and melt for 3 minutes / 37 degrees / SP 3. Add the coconut sugar, flours, baking powder and salt, followed by the beetroot and eggs. Mix for 10 seconds / REV / SP 3. Scrape down the sides and repeat if needed.

Pour the mixture into the prepared pan and bake for approximately 50 minutes or until the top springs back when pressed and a skewer comes out clean.

Leave in the tin to cool for at least 15 minutes before turning out onto a wire rack.

Have you tried hiding vegetables in cakes and muffins? Do you have a favourite recipe you could share? I'm always looking for inspiration!

~ Susan

Wednesday, June 29, 2016

Dairy-free Jaffa Hot Chocolate

dairy free jaffa orange hot chocolate - from www.mywholefoodfamily.com

I don't want to start by talking about the weather but boy has it been cold! Winter has well and truly arrived here finally and we've been enjoying being all rugged up with coats and scarves and eating lots of yummy warming soups and casseroles.

We've also been having a lot of hot chocolate lately, and I've started experimenting with different combinations of milk to find just the right one. This is the best one yet!

As a kid Jaffas were my favourite chocolate and I got a bag every time we went to the movies (I'm sure I must have been delightful after all that sugar!). To me the combination of chocolate and orange is always a winner. In fact I made myself a Choc-Orange birthday cake last year, have you seen it?

This jaffa hot chocolate is rich and creamy and oh so flavourful. My boys absolutely loved it and ask for it every morning. I can see this becoming a bit of a family tradition!

Dairy-free Jaffa Hot Chocolate

3 cups rice milk
1 cup coconut cream
2 tbs raw cacao
2 tbs coconut sugar (or sweeten to taste)
3 strips of orange rind (use a peeler to peel off nice wide strips)

Place all ingredients into the thermomix and heat for 6 minutes / 60 degrees / REV / SP 2.

No thermomix? Just place all ingredients into a medium pot and stir over low-medium heat with a whisk, until the cacao and coconut sugar have dissolved and it is hot enough for you.

Serves 4

Do you have a favourite Winter drink?

Wednesday, June 22, 2016

Best Ever Dairy-free Macaroni and Cheese

best ever dairy free macaroni and cheese - from www.mywholefoodfamily.com

I gave up dairy cold-turkey in December 2013 and honestly it was really hard. Not just giving up a food I loved, but the fact that dairy hides in so many foods that you wouldn't expect!

It was the right thing to do for the sake of bub's reflex and dairy intolerance (and for my health too) but I was completely addicted to dairy and ate loads of it - milk, cheese, cream, ice cream, you name it.

At first I just completely avoided it and didn't look for alternatives but as time went on, I started really missing the creaminess that only dairy gives. I  perfected dairy-free ice cream and dairy-free lasagne a while ago, which brought macaroni and cheese to the top of the list. It's one of my husband's favourite meals and he has mentioned it often over the past few years.

After a bit of experimentation, mac and cheese is back on the table!

So while this is not exactly the same as the original it is creamy, full of flavour and has a delicious cheesiness from the nutritional yeast. It is the ultimate comfort food and the kids will never know there are hidden veggies.

We LOVE this dish and it's become a regular feature on our meal plans.

If you're dairy free give it a go and let me know what you think!

Best Ever Dairy-free Macaroni and Cheese

2 tbs extra virgin olive oil
375ml rice milk
3 tbs spelt flour
2 tbs nutritional yeast flakes
1/2 ts garlic powder
1/2 ts onion powder
1/2 ts turmeric
140 diced sweet potato
140g diced pumpkin
500g macaroni, cooked per packet instructions
Crispy bacon and fresh parsley to garnish

Put the water on to boil for the macaroni. Add the macaroni and cook as per packet instructions while the sauce is cooking.

Place the sweet potato and pumpkin into the bowl and chop for  8 secs / SP 8 or until very finely chopped.

Scrape down the sides of the bowl and add all remaining ingredients. Cook for 12 minutes / 100 degrees / SP 4.

The sauce should be smooth but if it's not, puree for 30 secs / slowly increasing from SP 3 - 9.

Drain the macaroni and return to the pot. Pour over the sauce and mix well.

Serve topped with crispy bacon and fresh parsley.

Serves 4-6

Monday, June 20, 2016

Garlic Chicken with Polenta (SRC)


Well, where has June gone?? I didn't mean for the blog to become a ghost town this month but between exams and assignments and just daily life with 3 children I've been really stretched this month!

But there is no way I would miss out on my Secret Recipe Club post! Each month members are assigned a blog in secret to peruse and choose something to share on the reveal day. This is my second month as a member of Group C and I am loving discovering all these new blogs!

This month I was assigned Where is my spoon? by Adina. Adina is Romanian but has lived in Germany for the past 10 years with her husband and 2 young children. Her recipes really reflect this European heritage and I spent many happy hours on her blog. There were literally dozens of very European recipes I would love to make - German Schnitzel, Transylvanian Yeast Cake and Linzer Torte just to name a few. But then I also loved her kid friendly recipes like homemade Chocolate Peanut Butter and the delightfully named Magical Soup for Children.

As Winter has finally arrived here I was looking for some serious comfort food and Adina's Garlic Chicken with Polenta ticks all the boxes. A simple but intensely flavourful meal, nothing fancy or complicated but so delicious that everyone is licking their fingers and asking for seconds. Adina describes it as a typical Romanian dish and something that her grandmother would have made. Perfect.

These photos really don't do it justice (it was pouring rain and very dark) but this was SO DELICIOUS! I made a few small changes to the sauce, just reducing it down a little and cooking out the garlic a little more to suit my kids' tastes.

I love simple food like this that when cooked with a little care become so much more than the sum of its parts.


Garlic Chicken with Polenta
Slightly adapted from Where is my spoon?

For the chicken:
8 chicken drumsticks
2 tbs extra virgin olive oil
2 cups chicken broth
1 ts sweet paprika
1/2 bunch flat leaf parsley, divided
4 cloves garlic, crushed
1 tbs butter
salt and pepper to taste

For the polenta:
1 litre water
1 tbs extra virgin olive oil
250g polenta
1 ts salt

Season the chicken with salt and pepper.

Heat the oil in a large, heavy based frying pan.

Fry the chicken pieces until browned on all sides.

Pour over the chicken broth, sprinkle on the paprika and half the chopped parsley.

Bring to the boil then lower the heat and simmer with the lid on but just ajar slightly to let some of the steam escape. Turn the chicken in the broth several times while cooking for about 30 minutes or until the chicken is cooked through.

(Start the polenta now).

Remove the chicken pieces to a dish and cover with foil to keep warm while you prepare the sauce.

Add the crushed garlic to the pan, increase the heat and simmer rapidly with the lid off for about 10 minutes or until it has reduced by half. Add the butter and stir to combine. Strain the sauce through a sieve into a jug, then return the sauce to the pan along with the chicken pieces.

Coat the chicken in the sauce, sprinkle over the remaining parsley and serve with polenta.

To make the polenta:

Bring the water and salt to the boil in a large heavy based pot. Once boiling add the polenta in a steady stream, along with the oil and cook over low heat, whisking often for 30-40 minutes or until cooked through.

Thank you for a wonderful month, Adina – this recipe is a keeper!

Thursday, June 9, 2016

One-bowl Banana Bread


When I first got into cooking again as an adult I was all about trying new things, sourcing new ingredients and making every meal spectacular. I now have 3 young children and while I still want delicious food, my priorities have definitely changed!

What I look for now is - how long is this going to take me to make when I have a dozen other things I need to do right now? how many ingredients do I need to search for in the supermarket when I have a fussy, whingy toddler in the trolley trying to grab everything off the shelves? will my kids actually eat this or am I wasting my time?

One-pot dinners and one-bowl bakes - those words are music to my ears!

While I have made a hundred different banana breads this one is my simplest yet. Real ingredients, nothing fancy and just one bowl. Hallelujah.

I did this in the Thermomix (which to me is the epitome of one-bowl cooking) but a large bowl, a fork and a spoon will do the job just as well.

My husband scored a 15kg box of bananas for just $7 on the weekend so we have bananas coming out our ears at the moment. Most of these have been peeled and frozen so I am down to the last couple of bunches which are getting nice and brown and spotty, perfect for banana bread.

So here you go, the simplest wholefood banana bread around. This recipe is a keeper!

One-Bowl Banana Bread

3 ripe bananas (250g peeled)
2 extra large eggs
1/3 cup oil (coconut, macadamia or olive oil)
1/3 cup sweetener (rice malt syrup, honey or maple syrup)
1/4 cup milk (rice, almond or coconut)
1 1/2 cups wholemeal spelt flour
3 ts baking powder
1 ts cinnamon
pinch salt

Preheat oven to 170 degrees Celsius / 150 degrees fan-forced. Grease a loaf pan and line with baking paper.

In a large bowl mash the bananas, then add the eggs, oil and sweetener and beat together until smooth (TMX - 10 secs / SP 6).

Add the remaining ingredients and fold together until just combined (TMX - 10 secs / SP 3 - scrape down the sides and repeat if you need to).

Pour mixture into prepared pan and bake for 40-45 minutes or until it is golden brown and the tops springs back when you press lightly.

Remove from the oven and leave in pan for 5 minutes before turning out onto a wire rack to cool completely.

Delicious still warm from the oven or cold in lunchboxes.

Have you scored any amazing fruit and veg bargains lately?

What would you do with 15kg of bananas??

~ Susan

Monday, May 30, 2016

Meal Plan Monday (30th May)


Is it cold where you are? Winter weather has well and truly arrived which means one thing around here ... comfort food! But winter warmers don't have to be heavy and loaded with carbs. Slow cooked meats, soups and hearty vegetarian dishes packed with warming spices all hit the spot perfectly.

Last fortnight was cheap for us as we used up some of our stash of freezer food. This turned out to be a good thing because we had a bit of a disaster and discovered our chest freezer in the shed had been accidentally turned off after a power surge and we lost bags full of food. So frustrating! Not to mention costly.

We're still keeping things simple this fortnight and our only meat purchases are a whole organic chicken (bought from Woolies for just $15 on special), 2kg of gravy beef and some bacon. The mince and sausages are from our freezer stock we buy in bulk every few months (luckily we hadn't gotten around to transferring all this meat to the outside freezer or we would have lost the lot).

Have you ever had a freezer disaster?

On the menu ...

Monday - Vegie-loaded Spaghetti Bolognaise with zucchini and beans

Tuesday - BLTs on homemade spelt rolls

Wednesday - Slow-cooked Beef Madras with veg

Thursday - Vegan macaroni cheese

Friday - DIY

Saturday - Pumpkin soup and hash browns

Sunday - Spelt Pizza

Monday - Lasagna (gluten and dairy free)

Tuesday - Sausage and veggie bake

Wednesday - Dhal with rice and greens

Thursday - Chicken and sweet potato bake

Friday - Brinner

Saturday - Veggie soup with foccacia

Sunday - Roast chicken with veg

What's on the menu for you this week? Do you have some favourite winter-warmers?

Thursday, May 26, 2016

Curried Tuna Mornay (and how to choose the best tuna!)

Curried tuna mornay - and how to choose the best sustainable tuna - from www.mywholefoodfamily.com

We're going retro with this one! Is there anyone who didn't eat tuna mornay sometime growing up int he seventies or eighties? It was a staple at my house but mum always made it with canned cream of celery soup in it which is not something I choose to eat these days.

(If you're interested Rachael Ray has a delicious homemade cream of celery soup recipe - it is loaded with dairy though - must experiment with a dairy free version!).

I haven't made mornay for the kids for ages so it was high time to bring it back into the rotation.

How to choose the best canned tuna


But before we get to the recipe, let's talk about tuna.

Do you have canned tuna in the pantry? And importantly, do you know how that tuna was caught?

According to Choice there are 2 things to think about when buying tuna.

1. Look for a sustainable species of tuna:


Read your labels carefully and look for skipjack tuna, which may also be called Katsuwonus pelamis. Avoid the commonly seen yellowfin tuna which is considered by Greenpeace to be 'near threatened.'

2. Look for sustainably caught tuna:


You want to look for 'pole and line caught' tuna, which should be noted prominently on the label.

Check out this Greenpeace guide to tuna brands in Australia. While I have never seen the number one pick (Fish 4 Ever), it is nice to see Safcol and Coles brand tunas rounding out the top 3. Are you surprised about which one is in last position?

So check your pantry. What brand is your tuna? Have you ever actually read the label on a can of tuna?

Oh and make sure you choose tuna in spring water, in order to avoid the vegetable oil most tuna is packed in. Because even the brands that mention olive oil on the front of the tin also contain a large proportion of vegetable oil. Yuck.

Back to the mornay and I decided to mix things up a bit and add some curry powder. This was largely to please my curry-loving husband who also happens to hate 'mushy' food (and yes he would include tuna mornay in that category).

The result? An easy and delicious dinner that (just about) everyone gobbled up in record time. Still can't convince Mr 5 to have either tuna or any sort of sauce on his pasta but ... 

My Curried Tuna Mornay

1 onion
1 clove garlic
1 carrot
2 zucchinis
100g butter or extra virgin olive oil
50g white spelt flour
350ml rice milk
1-2 ts curry powder
1/2 ts salt
425g can sustainable tuna in springwater

Place onion, garlic, carrot and zucchini in mixing bowl and chop for 4 secs / SP 6.

Scrape down the sides, add the butter and cook for 8 minutes / 100 degrees / SP 1 / measuring cup off.

Add the flour, milk, curry powder and salt and cook for 6 minutes / 100 degrees / SP 1.

Puree 20 secs / SP 8.

Add the tuna and cook for 3 minutes / 90 degrees / SP 1 / Reverse.

Mix through cooked pasta and serve.

No thermomix? Prepare your sauce in a medium saucepan. Melt the butter and sauted the grated vegetables. Once tender, sprinkle over the flour and cook until it is dry, about a minute or so. Add the remaining ingredients, except the tuna, and cook stirring continuously for a few minutes until a smooth sauce forms. Add the tuna, turn down the heat to low and let simmer for a few minutes or until everything is cooked and warmed through. Add your pasta and enjoy!

Do you have a favourite dish from your childhood?

Tuesday, May 24, 2016

Top 10 things I make from scratch (and no longer have to buy) now I have a Thermomix

Top 10 things to make from scratch with a thermomix www.mywholefoodfamily.com

So unless you've been living under a rock you will have noticed a LOT of publicity lately regarding the Thermomix and some safety issues.

Without getting into that at all (although I will state for the record I have had mine for nearly 2 years without any problems) I thought I would share my experiences with a Thermomix.

First of all there have been very few days in the past 2 years that we haven't used it. On a typical day we use it for our breakfast (either porridge or a smoothie), perhaps make a batch of dough for bread, whip up a soup, mix something up for afternoon tea and make dinner with it.

Our record was the first Christmas we had when it and made 11 different things in a day including a sponge cake, jelly, lemon curd, custard, coconut cream, mayonnaise, gravy and quinoa!

I've heard a lot of people say it and it's totally true - if you want to get away from processed food and start avoiding additives, having a Thermomix will help you make food from scratch quicker and easier.

While I have always made a lot of things from scratch, having a Thermomix has allowed me to completely stop buying a number of products that I always just took for granted as being things that 'you just buy'.

Well not any more!

Top 10 Things I Make From Scratch 

(and No Longer Have To Buy) Now I Have a Thermomix


1. Bread


This is the biggie. After years of dabbling with bread making  I have finally made the switch and 100% of our bread is homemade. Sandwich loaves, wraps, focaccia, rolls, scrolls and pizza. You name it, I make it. The Thermomix does amazing dough and it is quick and mess-free. Not only that though I feel 100% happy about the ingredients. No nasty vegetable oil or preservatives here.

2. Nut milk


We've been dealing with dairy intolerances for years now and whichever way you look at it, nut milk is expensive. There are some brands that I like but really it is so easy to make your own and for a fraction of the cost. We buy nuts (usually almonds) in bulk and make a few litres of nut milk at a time. Fresh, delicious and cheap. Gotta love that.

3. Soup


Ok so you don't need a Thermomix to make soup. I've been doing it for years without one, but I like smooth soups and it was always a bit of a palaver to tip hot soup into a blender or risk a soup-cano with a stick blender.

Previously if there were some boxes of soup on special at the supermarket I would always grab a couple to stash in the pantry for a quick lunch, but not anymore. While I always chose ones with ingredients that looked good (no numbers), it was still a really long time since those vegetable were in the ground.

Being able to chop, cook and then puree all in one and have soup ready on the table in about 20 minutes is brilliant. I make at least 1 batch a week all year round (even in summer) and love that I'm getting so many veggies into all of us. 

4. Stock


Just like with soup, it was so easy to grab a box of liquid stock to have on hand. I always made my own chicken stock with leftover chicken bones but there was never enough to have in the freezer.

The very first thing you make with your consultant when the Thermomix is delivered is a vegetable stock paste, and it has become a staple at our place. Loaded with veggies and herbs, I always have a batch on hand in the freezer. It provides not only flavour but seasoning as well, and with its salt content it never freezes hard - perfect for scooping out a spoonful to add to soups, curries and casseroles.

5. Dishwasher powder


Yep that's right, we use the thermie for more than just food! The dishwasher powder is actually a recent addition to our repertoire, but we haven't purchased dishwasher tablets for 6 months now.

At first the difficulty was locating a cheap source of citric acid (the key ingredient in lots of natural homemade cleaning products).

You may know citric acid from those little containers in the baking aisle at the supermarket? Buying it that way will send you broke in no time, as it works out at about $34/kg. With some research I found a supplier selling 10kg buckets on ebay which works out at only $7/kg. Much better!

6. Washing powder


I've been making our own washing powder for about 3 years now, using a food processor to grate up the soap. The Thermomix of course does it better and faster! I like Dr Bronners soap bars and yes, our clothes are all perfectly clean with no chemicals!

7. Mayonnaise


Back onto food, this was another big one. Even though I knew the ingredients were less than ideal and it was a pain to make, I found it really hard to give up bought mayonnaise! That is until I discovered a cooked egg mayonnaise recipe on the recipe community site. Quick, easy and no stress about raw eggs.

8. Jam


Since going sugar free (or more accurately low-no fructose) back in 2012 we very rarely have jam. Mostly I will make a sweetener free chia jam but I do batches of 'real' jam sometimes as gifts and we always keep a little for ourselves. Making your own jam lets you control the amount of sugar and the quality of the ingredients. Get a great deal on a box of organic berries? Why not make some jam or a berry sauce for pancakes. Yum!

9. Nut butter


Have you seen the price of some nut butters at the shops? Outrageous! So much cheaper and healthier to just buy some organic nuts, roast them and grind them up. Smooth or chunky? You decide!

10. Curry


We love our curry in this house! The Thermomix is brilliant for preparing curry pastes in bulk which you can store in the freezer, and for simmering a curry for dinner even on a weeknight. Healthy and delicious and, as with just about everything you make in a Thermomix, I love that you aren't tied to the stove. You can walk away and do something else while dinner is cooking, confident that it won't burn or stick to the bottom of the pan. Love, love, love!

So that's it. My top 10 things I now make from scratch in my Thermomix.

Do you make any of these from scratch? Is there something from the supermarket you just can't give up?

If you are on the fence about getting a thermal cooker (and it doesn't have to be a Thermomix, there are a number of other brands available) and have some other questions please let me know either in the comments below or shoot me off an email! mywholefoodfamilyblog {at} gmail {dot} com.

I would love to hear from you!

Monday, May 16, 2016

Chocolate Pecan Pie (SRC)

Wholefood Chocolate Pecan Pie - wheat free - no refined sugar - from www.mywholefoodfamily.com

I've been doing a lot of baking lately but it's been all muffins, bliss balls and breads. It seems like aaaages since I've made a proper dessert - something the kids get really excited over and that seems a bit special.

As this is my first month with Group C in the Secret Recipe Club (after moving across from Group D) I thought I would celebrate and choose something sweet and out of the ordinary!

This month I was assigned The Avid Appetite by Rachel who lives in Jersey City with her husband and gorgeous daughter Penelope (the cutest name ever). I loved spending time on Rachel's blog and   apart from a love of food (obviously), found we have a quite lot in common such as loving overnight oats for breakfast to being a fan of both Castle and Gretchen Ruben!

I was really spoilt for choice when it came to selecting a recipe and there were loads that I bookmarked for later. I love the sound of her Vanilla Cinnamon Quinoa for a protein-packed breakfast, I'm intrigued by the Pumpkin Butter and my boys would go crazy for these Banana Bars with Chocolate Frosting.

It was the Chocolate Pecan Pie adapted from a Paula Deen recipe that really caught my eye though (I have a bit of a soft spot for Paula Deen after reading her autobiography a few years ago).

(Does anyone else remember 'pecan pie' scene from When Harry Met Sally?)

I was prepared to make a few changes in order to fit in with our wholefoods way of eating, and just a couple of simple switches later we had the most amazing, but not too sweet, dessert!

We LOVED this. Perfectly short pastry, sweet nutty filling with little pops of dark chocolate. What's not to love?

Try as I might though I couldn't get a clean slice. I mean, is there a trick to slicing a pecan pie neatly without all the nuts smooshing out the sides? Still the taste made up for the messiness. DELICIOUS!

Wholefood Chocolate Pecan Pie - wheat free - no refined sugar - from www.mywholefoodfamily.com

Chocolate Pecan Pie
Adapted from Paula Deen via The Avid Appetite

Shortcrust Pastry (my own recipe):

300g wholemeal spelt flour
2 ts coconut sugar
160g cold butter, diced
1/3 cup cold water, approx

Place all ingredients except the water into a food processor and blitz until it forms breadcrumbs. Add the water a little at a time until the dough comes together and forms a ball. Wrap in plastic and place in the fridge to chill for 30 minutes.

Roll out the dough in between 2 sheets of baking paper, large enough to fit a 22cm tart dish. Either wrap the remainder of the dough and place in the freezer for another time or roll it flat and cut out cookies to bake at the same time as the pie. My boys love this!

Preheat the oven to 190 degrees Celsius.

Filling:

2 cups pecans
3 large eggs, beaten
3 tbs melted butter, cooled
1/2 cup rice malt syrup
1 tbs molasses
1/2 cup coconut sugar
100g dark chocolate, chopped (I used Lindt 85%)

Scatter pecans over the uncooked pastry shell.

Place the eggs, butter, syrup, sugar and chocolate into a mixing bowl and whisk together until well combined. Pour the mixture over the pecans.

Place the pie onto a baking sheet and cook for 10 minutes. Lower the temperature to 180 degrees and cook for a further 25 minutes or until set.

Remove from the oven and place on a rack to cool completely.

Thanks for a great recipe Rachel! My family loved it.

Menu Plan Monday (16th May)


This fortnight's meal plan is full of cheap eats.

We're going though our stash in the freezer, bulking out our meals with loads of veggies as well as having a few vegetarian meals, and then rounding it out with some mince and sausages.

My husband scored an amazing array of fruit and veg for next to nothing on the weekend, including a box piled high with apples, oranges and butternut pumpkin for the grand price of $1!

Real food definitely doesn't have to be expensive:)

What's on the menu ...

Monday - Roast chicken with gravy and potato, pumpkin, broccoli and corn

Tuesday - Spaghetti and meatballs with beans

Wednesday - Hamburgers with homemade buns, lettuce, tomato and beetroot

Thursday - Leftover lamb curry with rice and Asian greens

Friday - Grain free pancakes with bacon and eggs

Saturday - DIY

Sunday - Homemade pizza with spelt bases

Monday - Leftover pulled pork with coleslaw and homemade tortillas

Tuesday - Vegan macaroni and cheese

Wednesday - Sausage and veggie bake

Thursday - Leftover beef ragu with pumpkin and greens

Friday - Leftover chicken with potato salad

Saturday - Veggie soup

Sunday - OUT

What's on the menu at your place this week? Did you score any grocery bargains on the weekend?

Thursday, May 12, 2016

Peanut Butter Banana Muffins

Peanut Butter Banana Muffins - wheat free, dairy free, no refined sugar - from www.mywholefoodfamily.com

There are some flavour combinations that just work.

And peanut butter and banana is definitely one of the best!

While peanut butter gets a bad rap sometimes (and of course if you're allergic you should steer well clear), it's actually packed with protein, potassium, magnesium and good fat that will help keep you full.

My Mr 5 has lots of sensory issues to do with food but he has always loved peanut butter so it's a staple at our place. We buy tubs of freshly ground peanut butter from our local health store, that is made from 100% organic peanuts, nothing else added.

Staying away from commercial varieties which are full of added salt, sugar and vegetable oils is a good idea. Most supermarkets will have at least one brand of natural peanut butter so check the health food section and get reading those labels.

Apart from sandwiches we add peanut butter to smoothies, spread it on celery and top with sultanas to make ants on a log and serve with apple slices. And now we can add muffins to the list because these were delicious!

My boys absolutely devoured these - they couldn't get enough and ate 3 each for afternoon tea (and yes still ate dinner afterwards).

Banana Peanut Butter Muffins

1 cup wholemeal spelt flour
1 cup buckwheat flour
1 tbs baking powder
1/3 cup coconut sugar
pinch salt
2 ripe bananas
1/2 cup peanut butter
1/4 cup coconut oil
3/4 cup coconut milk
2 eggs
1 ts vanilla extract

Preheat the oven to 180 degrees Celsius / 160 degrees fan-forced. Line a 12 cup muffin tray with paper liners and set aside.

In a large bowl, whisk together the flours, baking powder, salt and sugar.

In a medium bowl, mash the bananas and peanut butter together until smooth. Add the eggs and beat until well combined. Add the oil, milk and vanilla and mix to combine.

Pour the wet ingredients into the dry ingredients and stir together with a fork until only just combined.

Spoon the mixture evenly into the prepared tin and bake for 15-20 minutes or until golden brown and the top springs back when you press lightly.

Leave in the tin for 5 minutes before turning out onto a wire rack to cool completely.

Serve with a big glass of milk and watch kids and big kids smile!

Makes 12.

Are you a peanut butter fan?

Tuesday, May 10, 2016

No Knead, Overnight Artisan Bread


I'm a huge fan of making bread these days, but it hasn't always been that way!

Not too many years ago I was terrified of using yeast. It just seemed all too hard and that there was so much that could go wrong.

My first step to making homemade bread was with a breadmaker and bread mix. All the hard work was done for us, there was no kneading, no shaping and no worrying about getting the oven temperature right. Plus I loved the convenience of being able to set it the night before and wake up to fresh bread first thing in the morning. Is there anything better than the smell of fresh bread??

We then moved on to just mixing and kneading the dough in the breadmaker but shaping and baking the dough ourselves. This meant we could make proper sandwich loaves and cob loaves rather than just the squat oblongs you can make in a breadmaker.

After lots of use our breadmaker finally gave up and died and we went back to buying supermarket and bakery bread, which was not ideal for a number of reasons - it's more expensive, it's not as fresh, and there are lots of questionable ingredients like preservatives, emulsifiers and vegetable oils to name a few.

But before we could fully commit to making all our own bread from scratch we took one important step - we cut back on the amount of bread we were eating.

Yep, that's right. 

I've dabbled with a Paleo style of eating and while going completely grain free is never going to work for my family, reducing grains (and especially wheat) can only be a positive step for our health.

I now make just 1 loaf of spelt and grain sandwich bread every week and that does sandwiches and toast for all of us for the week. I often also make one other type of bread, such as cheese and olive scrolls for lunchboxes or a focaccia to have with soup.

A few weeks ago we had friends around for breakfast and wanted to serve some fresh bread. I could have made an extra loaf the day before but it wouldn't have been as fresh, and as it was a public holiday there was no chance of nipping down to the bakery and grabbing a loaf that morning.

So I went searching and came across a basic recipe for a no knead, overnight artisan bread. This recipe seemed to pop up everywhere! With that many reviews I knew it had to be good and it was just what we were looking for.

If you're a novice bread-baker this recipe could be just the thing to help you fall in love with baking bread. Why?

1. It uses plain flour NOT baker's flour which you may not have at home
2. You don't have to knead it
3. You don't need a bread tin, just a large heavy oven safe pot with a lid

Just mix, rest and bake. Easy!

This made a fantastic loaf of bread - crackly crusty exterior with a chewy texture reminiscent of sourdough. Totally delicious and perfect for our breakfast of eggs, bacon, grilled tomatoes and homemade tomato sauce. Yum!

 
No Knead, Overnight Artisan Bread
Recipe from Don't Waste The Crumbs

3 cups plain flour
2 ts salt
1 ts instant yeast
1 1/2 cups water, at room temperature

Stir together the flour, salt and yeast in a large bowl. Pour in the water and mix well to form a rough and shaggy dough (it will not be smooth).

Cover with plastic wrap and leave on the bench for 8-18 hours, or just overnight. It will be light and bubbly.

When you are ready to bake, flour your hands and a sheet of baking paper and tip out the dough. Gently shape into a ball, without kneading, and leave on the baking paper covered with a tea towel for one hour.

When the dough has rested for 30 minutes, place a large heavy oven-safe pot (like a Dutch oven) into the oven and preheat to 230 degrees Celsius.

After the dough has rested for an hour, remove the pot from the oven and carefully place the dough inside, still on the baking paper.

Put the lid on the pot and place back into the oven to bake for 30 minutes. Remove the lid and then bake for a further 15 minutes.

Remove from the oven and place on a rack to cool completely for at least 30 minutes before slicing.

Monday, May 2, 2016

Menu Plan Monday (2nd May)


Happy May everyone! Can you believe it's May already??

This week is a special one for us with our anniversary on Wednesday. My wonderful mother-in-law is coming to look after the boys so we can go out the evening, probably for a quick dinner then a movie.

So we've factored in dinner out for us on Wednesday, then we're out for a BBQ with friends on Saturday night and then on Sunday it's Mother's Day! Should be a fun week :)

What we're eating this fortnight ...

Monday - Roast chicken with sweet potato, pumpkin and beans

Tuesday - Chickpea curry (leftover from freezer)

Wednesday - DATE NIGHT - sausages and wedges for the kids

Thursday - Curried sausages

Friday - Chicken and potato salad (chicken leftover from freezer)

Saturday - OUT

Sunday - Pulled pork with tortillas and coleslaw

Monday - Beef madras with rice and pumpkin mash

Tuesday - DF GF Lasagna (with leftover bolognaise from freezer)

Wednesday - Sweet potato and bacon risotto

Thursday - Slow cooked lamb and veg curry

Friday - DIY

Saturday - Sweet potato hash browns with poached eggs and bacon

Sunday - Leftover curried lamb wraps

What's on the menu for you this week? Leave me a comment with your dinner ideas ... I'm always looking for inspiration!

Monday, April 25, 2016

Healthier ANZAC Slice

Healthier ANZAC Slice from www.mywholefoodfamily.com

It just wouldn't be Anzac Day without Anzac Biscuits. I did a round-up of healthy Anzac biscuits on Friday and then posted on Facebook yesterday that I also made some Really Healthy Anzac Biscuits. But I couldn't just leave it at that!

We had friends around for breakfast today and I wanted to make something sweet to finish our meal. A quick search found lots of different recipes for Anzac Slice and I chose one to tweak. This is still very sweet and definitely a sometimes food but overall far healthier than the regular white flour and golden syrup varieties.

It went down a treat - this recipe is a keeper!

Healthier Anzac Slice
Adapted from Cooking in the Chaos

130g white spelt flour
90g rolled oats
65g shredded coconut
150g butter
120g rice malt syrup
40g coconut sugar
1/2 ts bicarb soda

Preheat the oven to 180 degrees Celsius / 160 degrees fan-forced.

Grease a slice pan (mine was 15 x 23 cm) and line with baking paper.

Mix together the flour, oats, coconut and coconut sugar in a large bowl.

Place the butter and syrup into a small pan and melt over medium heat. Add the bicarb and stir as it bubbles and froths. Pour into the dry ingredients and mix well.

Tip the mixture into the prepared pan and smooth the top.

Bake for approx 20 minutes or until golden brown and pulling away from the sides. Leave to cool in the pan before slicing into squares (12) or bars (16).

This is a really forgiving recipe and you can easily swap out the flour or sweeteners for whatever you happen to have.

Enjoy!

Chili with Beef, Chocolate and Pumpkin (SRC)

Slow cooked Beef Chili with Chocolate and Pumpkin from www.mywholefoodfamily.com
This month marks the last official month for Group D in the Secret Recipe Club. Group D has been my home within SRC since I started back in February 2013 so it feels a little strange to be moving on!  Next month I will be in Group C which posts on the third Monday of the month and I'm really excited to discover a whole new group of blogs and bloggers.

This month I was absolutely delighted to be assigned Lavender and Lovage by Karen, who is truly living the dream dividing her time between England and France. Karen's blog is absolutely beautiful and she has recipes for everything from simple home cooked favourites to regional specialities to fabulous breads and desserts.

I've had Karen's blog before and last time I chose to make her Saffron and Cardamom Sweet Buns which were so amazingly good my kids still talk about them! This time I wanted something seasonal and luckily Karen has some wonderful Autumn recipes to choose from.

I loved Karen's description of Autumn in Bonfire Chili with Beef, Chocolate and Pumpkin - she speaks of crisp misty mornings, crackling leaves, log fires, fireside suppers and hot chocolate. Where I live Autumn simply means that night time temperatures might finally slip into the teens but don't get too excited because it could still be 30 degrees during the day! I really do think I live on the wrong continent.

I initially planned on baking her Harvest Apple Cake which is a wonderfully simple apple sponge cake that would be equally good for afternoon tea or dessert. 

But whether it was from dreaming of being in a true northern hemisphere Autumn or just the fact the recipe sounded so intriguing, I ended up choosing to make the Bonfire Chili. I've never made a chili quite like this one with chocolate and pumpkin and when the weather actually turned cool and rainy it seemed it was meant to be.

I chose to make the chili in the slow cooker which I love doing at any time of the year but has become my default these days as it makes dinner time so much easier to have a meal sitting there ready to go. We served the chili with some plain rice but it would be equally delicious with corn chips and cheese.

It was a hearty and warming dish to have on a cool night and my Mr 7 cleaned his plate not once, not twice but three times! I've never used chocolate in a savoury recipe before although I know it's quite common in Mexico. The chocolate made the sauce much richer and more complex without being overly chocolate-y. My husband also gave it the thumbs up despite hating pumpkin with a passion and having to pick around it to get his serve.

Slow cooked Beef Chili with Chocolate and Pumpkin from www.mywholefoodfamily.com

Slow Cooked Beef Chili with Chocolate and Pumpkin
Adapted from Lavender and Lovage

1kg casserole beef, diced into large chunks
2 medium onions, sliced
4 cloves garlic, minced
500g pumpkin, diced the same size as the beef
1 small red chili, finely sliced
2 ts ground cumin
2 ts ground coriander
1 ts dried oregano
1/2 ts cinnamon
1/2 - 1 ts chili powder
500g tomato passata
1 tbs tomato paste
1 tbs coconut sugar
1 x 400g tin red kidney beans
70g dark chocolate (I used Green & Blacks 70%)
salt and pepper to taste

Place all ingredients into the slow cooker and mix well.

Cook on low for 8 hours.

Serve with rice.

Serves 6-8

Thank you Karen for a lovely recipe and a wonderful final month for Group D!

Thursday, April 21, 2016

Turning 7


I can't even believe it but my big boy turned 7 yesterday. 7! We couldn't be prouder of this kind, curious, funny boy with the infectious laugh and big heart. Love him to bits!

No birthday party this year (we've decided to alternate birthday parties for the boys and he had one last year which I talked about here), instead he took some cupcakes to share with his classmates and we had family over for birthday cake and pizza - his choice.

Being a wholefood and low sugar family birthdays always pose a dilemma for me. While we don't want to take an 'anything goes' approach, we also don't want to restrict treats when to me, having something once a year on your birthday is the very definition of a treat.

So while these recipes definitely contain more sugar than is normal for us, they are also free from artificial additives and full of less-refined ingredients such as spelt flour, raw cacao, coconut sugar and grass-fed butter. And I'm totally ok with that.

Mr 7 was very clear that he wanted mini chocolate cupcakes with chocolate icing for school, and chocolate number 7 cake with vanilla icing and sprinkles for home.


Mini Chocolate Cupcakes

125g melted butter
100g coconut sugar
2 eggs
1 ts vanilla extract
170 g white spelt flour
2 1/2 ts baking powder
40g raw cacao
2/3 cup coconut milk

Preheat oven to 150 degrees fan-forced / 170 degrees Celsius. Line 2 mini cupcake pans with 36 paper cupcake liners and set aside.

Place all ingredients into a large bowl, in the order listed, and mix with electric beaters for about 1 minute until smooth and well combined.

If you have a thermomix, place all ingredients into the mixing bowl and mix for 30 secs / SP 4, scraping down the sides as needed.

Spoon heaped teaspoons of mixture into the prepared tins, filling each just over half full.

Bake for 9-10 minutes or until the top springs back when pressed lightly. Do not overcook!

Makes 36

Chocolate Icing

90g softened butter
1/3 cup raw cacao
1 1/2 cups powdered coconut sugar (grind coconut sugar in thermomix or high powered blender until as fine as icing sugar and measure after grinding)
1 ts vanilla extract
1 tbs coconut milk

Hoppers 00s & 000s to decorate

Grind the coconut sugar first and then measure out 1 1/2 cups, reserving any extra for another time. Add the remaining ingredients and beat until smooth and fluffy.

Pour 00s & 000s into a small bowl.

Spread icing on the top of each cupcake then dip lightly into the sprinkles to decorate.

I'm told the cupcakes went down very well at school!

Next was his birthday cake for home. Now I've tried many recipes over the years and I knew that not all of them would work for a shaped cake like this one. I need something that wouldn't fall apart when it was sliced. Rather than reinvent the wheel I decided to tweak a few recipes I've made before and come up with my own.


Wholefood Chocolate Sheet Cake

400g white spelt flour
100g raw cacao powder
2 tbs baking powder
250g unsalted butter, softened
1/4 ts fine sea salt
3 eggs, lightly beaten
500g rice malt syrup
250ml water
1 ts vanilla extract

Preheat oven to 170 degrees Celsius / 150 degrees fan-forced. Grease a 23 x 33cm tin and line the base and sides with baking paper.

Place all ingredients into a large bowl and using electric beaters, beat together at low speed until combined, then on high speed for 2 minutes until smooth and glossy.

Pour the mixture into the prepared tin and bake for approx 50 minutes or until a skewer inserted into the middle comes out clean and the top springs back when lightly pressed.

Cool in the tin for 5 minutes before turning out onto a wire rack to cool completely.

Vanilla Icing

125g unsalted butter, softened
1 cup organic icing sugar*
1/2 cup powdered coconut sugar (see chocolate icing above)
1 ts vanilla extract
1-2 tbs coconut milk

Combine all ingredients in thermomix or large bowl with electric beaters and beat until smooth and pale.

*I have experimented using all coconut sugar for the icing before and while the flavour was amazing it was quite caramel in colour which was not the look I wanted here. Next year I will be pushing harder for a chocolate icing so I can use all coconut sugar and some avocado as well.

I used a template to cut out the number 7 shape and did a crumb coat and second coat of icing before decorating with Hopper's 00s and 000s which are free from artificial additives.

So that's it. Our sweet but additive free birthday cakes for our sweet Mr 7.

How do you handle birthday parties at your place? Do you have certain foods that you just won't serve or does anything go?

Monday, April 18, 2016

Menu Plan Monday (18th April)


Is is starting to get cooler where you are? The weather is definitely changing here and we are loving the cooler Autumn nights. It means that soups, casseroles and slow cooked meals are well and truly back on the menu. Yippee! My big boy turns 7 this week and he has chosen homemade pizza for his birthday dinner with birthday cake for dessert.

On the menu this week ...

Monday - Slow cooked roast chicken with cinnamon sweet potato and greens

Tuesday - Leftovers from freezer

Wednesday - Pizza and birthday cake

Thursday - Slow cooked beef madras

Friday - Grain free pancakes with bacon

Saturday - Hash browns with poached eggs and avocado

Sunday - Baked veggie spring rolls

Monday - Sausage and vege bake

Tuesday - Lemon and coconut dahl with rice

Wednesday - Spaghetti bolognaise

Thursday - Chicken and cauliflower risotto (with leftover roast chicken)

Friday - DIY

SaturdayPumpkin and apple soup with focaccia

Sunday - Nasi goreng

What's on your meal plan this week?

Wednesday, April 13, 2016

Dairy Free Chocolate Panna Cotta


Well I don't know where the last week has gone! The kids went back to school on Monday and we've been easing ourselves back into normal routine. Early starts in the morning, less time to cook, homework to do - I'm sure you all know about that!

If you've been following me on Facebook you will have seen my whoops moment today. You see there was a blackout a few nights ago and the next morning our oven wouldn't turn on. Which is a pretty much a complete disaster for someone who bakes as often as I do! Anyway after stressing for a few days about whether we could replace it now or survive without one for a while, I realised I hadn't reset the clock on the oven after the blackout and as soon as I did, voila! It worked! Whew.

Today though I'm sharing a recipe which doesn't require an oven and was so delicious my kids haven't stopped talking about it!

While panna cotta is traditionally a dairy-laden dessert, this version gives you the same ultra creamy result with coconut cream. This is essentially the richest, creamiest most luscious custard you will ever eat, with the gelatine allowing it to set enough to be turned out while still having a bit of a wobble. Just gorgeous.

Enjoy!

Dairy Free Chocolate Panna Cotta
Adapted from The Nourished Psychologist

400g coconut cream
200g non-dairy milk (rice or coconut work well)
2 eggs
20g coconut oil
1/4 cup raw cacao
1/4 cup coconut sugar
1 ts vanilla extract
pinch salt
2 ts Great Lakes gelatine

Place all ingredients into the Thermomix and cook for 7.5 minutes / 80 degrees / SP 4.

Pour mixture into 4 cups or ramekins and place in the fridge to chill for at least 4 hours or overnight.

Serve topped with berries.

No thermomix? No worries. You can make this on the stove top by following the link above to the original method (I did make a few changes to the recipe).

Makes 4

Wednesday, April 6, 2016

Dairy Free Strawberry Muffins

Dairy free Strawberry Muffins - wholefood - free from wheat and refined sugar - from www.mywholefoodfamily.com

I feel like I've lost my baking mojo a little over the past few weeks. The kids and I have all been taking turns to get sick and I just had my first exam of the year, so time and energy has been pretty low. Every weekend I've just been baking the essentials of bread, a couple of snacks for the week and prepping some dinners.

Today though I was inspired to whip up something yummy for the boys to have for afternoon tea. The sun was shining, I had nowhere to be and there was a punnet of strawberries calling my name!

We are huge fans of strawberries but it's rare that I cook with them, they just never seem to last long enough.

Did you know that strawberries are one of the highest spayed crops? So if you can't get organic berries then washing them well is essential. I tip strawberries into a bowl, cover with water and a splash of apple cider vinegar and leave them to soak for 5 minutes before rinsing. Easy. If you have an abundance of fresh strawberries you can wash them, trim the tops off and freeze to use later.

The boys loved these muffins. They are light and sweet and packed with fresh strawberry flavour. I would like to say I know they'll freeze well but there weren't any left for me to find out!

I got 8 full muffins from this recipe but you could probably stretch the mixture to 12.

My Dairy Free Strawberry Muffins

1 1/2 cups white spelt flour
1/3 cup coconut sugar
2 ts baking powder
1/4 ts salt
1 egg, at room temperature
1/2 cup non-dairy milk, at room temperature
1/2 cup coconut oil
1 ts vanilla extract
1 punnet strawberries, washed and quartered

Preheat the oven to 180 degrees Celsius / 160 degrees fan-forced. Place 8 paper liners in a muffin tray and set aside.

Place the dry ingredients in a large bowl and use a whisk to combine.

Place the wet ingredients into a jug and whisk together until smooth.

Pour the wet ingredients into the dry and mix gently until only just combined. Fold through the strawberries reserving a handful to scatter on top of the muffins.

Spoon the mixture into the prepared tray, about 2/3 full, and top with reserved strawberries.

Bake for approximately 20-25 minutes or until golden brown and the top springs back when pressed lightly.

Turn out onto a wire rack to cool.

Makes 8

Tuesday, April 5, 2016

What are whole foods and why eat them?

What are whole foods and why we should eat them from www.mywholefoodfamily.com

Not too many years ago we were a typical household, spending a fortune at the supermarket every week and coming home with piles of packets, jars and cans. The pantry never seemed big enough to hold all the packaged food and if I'm honest, I liked seeing the pantry full - it gave me a sense of security.

Fast forward to when our first child was ready to start solids and I had no idea what I should be feeding him. The advice was to start with processed rice cereal but that never sat quite right with me. Surely just plain fruit or vegetables would be better? We then discovered quite quickly that he was intolerant to wheat and dairy and did an overhaul of the ingredients we bought for him, even if not so much for ourselves.

How important is our diet to our overall health? 


It was only when we were trying for our third baby and suffered two devastating miscarriages along the way that we really began to look at what we were eating. We wanted to be as healthy as possible and it didn't take too much research to tell us that diet has a massive impact on physical and mental health.

The turning point for me was finding Sarah Wilson's I Quit Sugar and reading Sweet Poison by David Gillespie. I realised we had fallen into the trap of pseudo-healthy processed foods - high sugar, high carb, low fat filler foods with very little nutritional value. All the veggies in the world weren't going to balance that out! We had to do a major overhaul and start fresh. It was time to eat cleanly.

What is clean eating?


Clean eating is all about refreshing your eating habits and really getting back to basics. Embracing fresh, whole foods and choosing the most natural and healthy option from all the food groups. The term whole foods refers to foods that are are as close to their natural state as possible with minimal or no processing or additives. They are clean foods that retain their nutrients and nourish the body. As an example a tomato is a wholefood - tinned tomato soup is not!

As I've explained before, eating this way has been a journey of discovery for us and not something that happened overnight. We are now at the point where I make nearly everything from scratch including bread, but this has been a long time coming.

Great reasons to switch from processed foods to wholefoods


Living a long and healthy life is clearly the major reason to ditch the processed stuff but there are tons of other great reasons like:
  • boosting your nutrition which can boost your immunity and cut cravings, 
  • improving behaviour and mood by removing artificial additives like colours and preservatives
  • feeling fuller allowing you to eat less and lose weight
A wholefoods diet is not restrictive at all and in fact, no food is off limits. Want potato chips? No problem, just make them yourself with fresh potatoes and a good quality fat (these garlic fries were amazing). Want chocolate cake? Choose a recipe with spelt flour, nuts, 85% cocoa chocolate, butter, eggs and free from refined sugar (check out my Chocolate Orange Celebration Cake). It is amazing how satisfying these foods are when made from scratch with quality ingredients. And it makes it much easier to stop at just one piece!

Does it have to be organic to be healthy?


Something I get asked a lot is whether we eat organic and the answer is, no. Well not completely anyway. Budget-wise eating 100% organic is simply not possible for us.  There is no doubt that organic is better for you and if money were no object we would absolutely choose organic. However, organic is not the defining factor when it comes to whole foods. A carrot is a healthy and delicious whole food whether it is organic or not so don't let that stop you!

And speaking of fruits and vegetables, you may have heard of the Clean 15 and Dirty Dozen put out by the US Environmental Working Group. These are a great guide as to whether it is worth buying organic. Using a guide like this is a way to stretch your food budget further by only buying the organic food that is really worth it.

Free Printables


I have created a free printable of the Dirty Dozen and Clean 15 for you which are now in my resource library. Want access? Subscribe here for free instant access to all the materials in the resource library, with new content being added all the time!

Next week we'll be talking about how to set up your wholefoods kitchen including taking inventories of pantry, fridge and freezer so you're not throwing money away. If you like this post you can also sign up to get new posts delivered straight to your inbox.


Monday, April 4, 2016

Menu Plan Monday (4th April)

Menu plan Monday - wholefood meal plan on a budget - from www.mywholefoodfamily.com

Welcome to April everyone! Can you believe it? We're a month into Autumn and although the days are ever so slightly shorter and the nights a little cooler, it's still hot, hot, hot during the day.

We have one week of school holidays left and then it's back to school for the second week of this fortnight so our meal plan reflects that change. We leave at 6.45am on Wednesdays and Thursdays during term time so I like to have breakfast pre-prepared (things like overnight oats work well) and dinner either super-quick or in the slow cooker on those days. It is an absolute lifesaver and gives me the maximum amount of time to study without domestic interruptions (I feel like I should hashtag that!).

What we're eating this fortnight ...

Monday - Slow cooked chicken with potatoes and bacon

Tuesday - Lemon and coconut dahl

Wednesday - Spaghetti Bolognaise

Thursday - Veggie quiche

Friday - Brinner (brown rice pancakes and scrambled eggs)

Saturday - Homemade pizza

Sunday - Za’atar chicken with salad

Monday - Stir fry (with leftover pork from the freezer)

Tuesday - Shepherd's Pie

Wednesday - Slow cooked curried sausages

Thursday - Creamy chicken and avocado pasta (with leftover chicken)

Friday - DIY

Saturday - Burgers (with meat patties from the freezer)

Sunday - Dinner out with family

What's on the menu at your place this week?

Saturday, April 2, 2016

Hot Cross Bun and Butter Pudding

Hot cross bun and butter pudding with leftover hot cross buns - dairy free - from www.mywholefoodfamily.com

I am a huge fan of bread and butter pudding, it's the ultimate in comfort food. Making it with hot cross buns really takes it up another level though with the spice and sultanas.

In the interest of full disclosure I have to admit I actually made this batch of hot cross buns especially to make this pudding. Because there is zero chance I would ever get to make it because we never have leftover hot cross buns!

I used home made hot cross buns for this but of course any would do. Just make sure they are at least a day or so old so they soak up all the delicious custard.

And with that we say goodbye to hot cross buns for another year.

My Hot Cross Bun and Butter Pudding

6 leftover hot cross buns
1 cup coconut cream*
2 cups rice milk*
2 ts vanilla extract
1 tbs coconut sugar
3 eggs
6 ts marmalade*

Preheat the oven to 180 degrees / 160 degrees fan-forced.

In a jug beat together the coconut cream, milk, vanilla, coconut sugar and eggs until well combined.

Slice the hot cross buns through the middle and place the bottom halves in a greased deep baking dish. Spread each one with a teaspoon of marmalade.

Pour over half of the milk mixture, replace the tops of the buns and pour over the remaining mixture.

Leave to rest, covered, for at least 30 minutes to allow the buns to absorb about 1/2 the liquid.

Bake in a preheated oven for about 35 minutes or until golden brown and the custard is only just set in the middle (it should still have a wobble).

Stand for 15 minutes before serving.

Serves 6

* if not dairy free you can replace with regular cream, milk and butter for a more traditional bread and butter pudding.

Do you ever have leftover hot cross buns? Or are you more likely to have a stash of Easter eggs hidden somewhere?
Related Posts Plugin for WordPress, Blogger...